M20D-FKS ENGINE CONTROL SFI SYSTEM P017100 System Too Lean Bank 1 P017200 System Too Rich Bank 1 P117000 Fuel Performance/Port Injector P117B00 Fuel Performance/Direct Injector
DESCRIPTION
The fuel trim is related to the feedback compensation value, not to the basic injection duration. The fuel trim consists of both the short-term and long-term fuel trims.
The short-term fuel trim is fuel compensation that is used to constantly maintain the air fuel ratio at stoichiometric levels. The signal from the air fuel ratio sensor (sensor 1) indicates whether the air fuel ratio is rich or lean compared to the stoichiometric ratio. This triggers a reduction in the fuel injection volume if the air fuel ratio is rich and an increase in the fuel injection volume if lean.
Factors such as individual engine differences, wear over time and changes in operating environment cause short-term fuel trim to vary from the central value. The long-term fuel trim, which controls overall fuel compensation, compensates for long-term deviations in the fuel trim from the central value caused by the short-term fuel trim compensation.
| DTC No. | Detection Item | DTC Detection Condition | Trouble Area | MIL | Memory | Note |
|---|---|---|---|---|---|---|
| P017100 | System Too Lean Bank 1 | With a warm engine and stable air fuel ratio feedback, the fuel trim is considerably in error to the lean side (2 trip detection logic). | ·
Intake system ·
Port fuel injector assembly ·
Direct fuel injector assembly ·
Mass air flow meter sub-assembly ·
Engine coolant temperature sensor ·
Fuel pressure ·
Fuel pressure sensor (for high pressure side) ·
Gas leak from exhaust system ·
Open or short in air fuel ratio sensor (sensor 1) circuit ·
Air fuel ratio sensor (sensor 1) ·
PCV valve and hose ·
PCV hose connections ·
EGR valve assembly ·
Wire harness or connector ·
ECM |
Comes on | DTC stored | SAE: P0171 |
| P017200 | System Too Rich Bank 1 | With a warm engine and stable air fuel ratio feedback, the fuel trim is considerably in error to the rich side (2 trip detection logic). | ·
Port fuel injector assembly ·
Direct fuel injector assembly ·
Mass air flow meter sub-assembly ·
Engine coolant temperature sensor ·
Ignition system ·
Fuel pressure ·
Fuel pressure sensor (for high pressure side) ·
Gas leak from exhaust system ·
Open or short in air fuel ratio sensor (sensor 1) circuit ·
Air fuel ratio sensor (sensor 1) ·
EGR valve assembly ·
Wire harness or connector ·
ECM |
Comes on | DTC stored | SAE: P0172 |
| P117000 | Fuel Performance/Port Injector | Although a DTC is stored for a rich or lean condition, the amount of fuel trim during direct injection is normal (1 trip detection logic) | ·
Port fuel injector assembly ·
Direct fuel injector assembly ·
Fuel pressure ·
ECM |
- | DTC stored | SAE: P1170 |
| P117B00 | Fuel Performance/Direct Injector | Although a DTC is stored for a rich or lean condition, the amount of fuel trim during port injection is normal (1 trip detection logic) | ·
Port fuel injector assembly ·
Direct fuel injector assembly ·
Fuel pressure ·
ECM |
- | DTC stored | SAE: P117B |
- HINT:
- ·
When DTC P017100 is stored, the actual air fuel ratio is on the lean side. When DTC P017200 is stored, the actual air fuel ratio is on the rich side.
·If the vehicle runs out of fuel, the air fuel ratio is lean and DTC P017100 may be stored. The MIL is then illuminated.
·When DTC P117000 or P117B00 is output, it may not be possible to precisely determine whether the port injection or the direct injection is malfunctioning, depending on the conditions. In this case, perform an Active Test (Control the Injection Mode) to determine which injection system is malfunctioning.
MONITOR DESCRIPTION
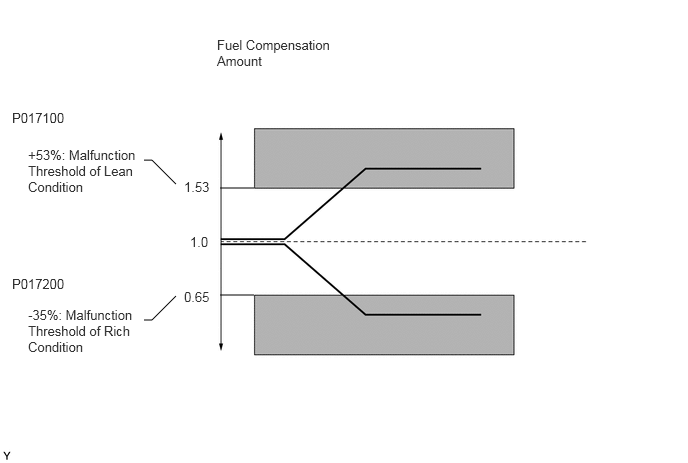
Under closed loop fuel control, fuel injection volumes that deviate from those estimated by the ECM cause changes in the long-term fuel trim compensation value. The long-term fuel trim is adjusted when there are persistent deviations in the short-term fuel trim values. Deviations from the fuel injection volumes estimated by the ECM also affect the average fuel trim learned value, which is a combination of the average short-term fuel trim (fuel feedback compensation value) and the average long-term fuel trim (learned value of the air fuel ratio). If the average fuel trim learned value exceeds the malfunction thresholds, the ECM interprets this as a malfunction of the fuel system and stores a DTC.
Example:
The average fuel trim learned value is +53% or higher, or -35% or less, the ECM interprets this as a fuel system malfunction.
MONITOR STRATEGY
| Required Sensors/Components (Main) | Fuel system |
| Required Sensors/Components (Related) | Air fuel ratio sensor (sensor 1)
Mass air flow meter sub-assembly Crankshaft position sensor |
| Frequency of Operation | Continuous |
TYPICAL ENABLING CONDITIONS
| Fuel system status | Closed loop |
| Battery voltage | 11 V or higher |
| Either of the following conditions is met | 1 or 2 |
| 1. Engine speed | Less than 800 rpm |
| 2. Engine load | 12% or higher |
| Catalyst monitor | Not executed |
TYPICAL MALFUNCTION THRESHOLDS
| EVAP purge-cut | Executing |
| Either of the following conditions is met | 1 or 2 |
| 1. Average between short-term fuel trim and long-term fuel trim | 53% or higher (varies with engine coolant temperature) |
| 2. Average between short-term fuel trim and long-term fuel trim | -35% or less (varies with engine coolant temperature) |
| DTCs of fuel system have already been set | - |
| EVAP purge-cut | Executing |
| Direct injection | 100% |
| Both of the following conditions are met | 1 and 2 |
| 1. Average between short-term fuel trim and long-term fuel trim | Less than 53% (varies with engine coolant temperature) |
| 2. Average between short-term fuel trim and long-term fuel trim | Higher than -35% (varies with engine coolant temperature) |
| DTCs of fuel system have already been set | - |
| EVAP purge-cut | Executing |
| Port injection | 100% |
| Both of the following conditions are met | 1 and 2 |
| 1. Average between short-term fuel trim and long-term fuel trim | Less than 53% (varies with engine coolant temperature) |
| 2. Average between short-term fuel trim and long-term fuel trim | Higher than -35% (varies with engine coolant temperature) |
CONFIRMATION DRIVING PATTERN
- HINT:
- ·
When clearing the permanent DTCs, refer to the "CLEAR PERMANENT DTC" procedure.
·Permanent misfire and fuel system DTCs can only be cleared when performing the universal trip driving pattern when no malfunction is detected.
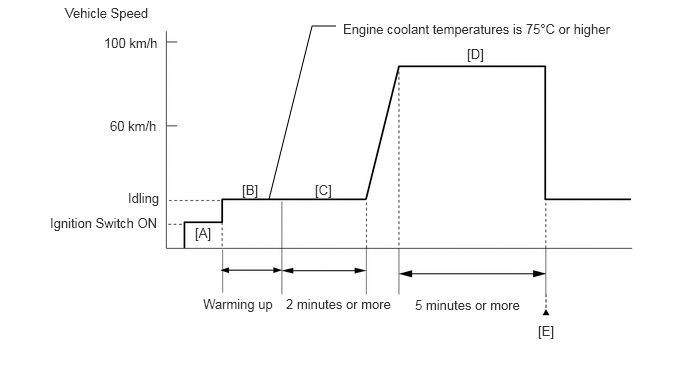
Connect the GTS to the DLC3.
Turn the ignition switch to ON.
Turn the GTS on.
Clear the DTCs (even if no DTCs are stored, perform the clear DTC procedure).
Turn the ignition switch off and wait for at least 30 seconds.
Turn the ignition switch to ON [A].
Turn the GTS on.
Start the engine and warm it up until the engine coolant temperature 75°C (167°F) or higher with all the accessories switched off [B].
With the engine warmed up, idle the engine for 2 minutes or more [C].
Drive the vehicle at a speed between 60 and 100 km/h (37 and 62 mph) for 5 minutes or more [D].
- CAUTION:
-
When performing the confirmation driving pattern, obey all speed limits and traffic laws.
Enter the following menus: Powertrain / Engine / Trouble Codes [E].
Read the pending DTCs.
- HINT:
- ·
If a pending DTC is output, the system is malfunctioning.
·If no pending DTC is output, the system is normal.
WIRING DIAGRAM
Refer to DTC P010012 for the mass air flow meter sub-assembly circuit.
Refer to DTC P003012 for the air fuel ratio sensor (sensor 1) circuit.
CAUTION / NOTICE / HINT
- NOTICE:
-
Inspect the fuses for circuits related to this system before performing the following procedure.
- HINT:
- ·
Sensor 1 refers to the sensor closest to the engine assembly.
·Sensor 2 refers to the sensor farthest away from the engine assembly.
·A low air fuel ratio sensor (sensor 1) voltage could be caused by a rich air fuel mixture. Check for conditions that would cause the engine to run rich.
·A high air fuel ratio sensor (sensor 1) voltage could be caused by a lean air fuel mixture. Check for conditions that would cause the engine to run lean.
·Read Freeze Frame Data using the GTS. The ECM records vehicle and driving condition information as Freeze Frame Data the moment a DTC is stored. When troubleshooting, Freeze Frame Data can help determine if the vehicle was moving or stationary, if the engine was warmed up or not, if the air fuel ratio was lean or rich, and other data from the time the malfunction occurred.
PROCEDURE
Connect the GTS to the DLC3.
Turn the ignition switch to ON.
Turn the GTS on.
Enter the following menus: Powertrain / Engine / Trouble Codes.
Read the DTCs.
- Powertrain > Engine > Trouble Codes
- 50001 372
- Result:
Result Proceed to DTC P017100, P017200, P117000 and/or P117B00 is output A DTC P017100, P017200, P117000 and/or P117B00 and other DTCs are output B
- HINT:
-
If any DTCs other than P017100, P017200, P117000 and/or P117B00 are output, troubleshoot those DTCs first.
A
B
Connect the GTS to the DLC3.
Start the engine and warm it up until the engine coolant temperature is 75°C (167°F) or higher with all the accessories switched off.
Turn the GTS on.
Enter the following menus: Powertrain / Engine / Active Test / Control the Injection Mode / Data List / Coolant Temperature, Injection Mode, Short FT B1S1 and Long FT B1S1.
- Powertrain > Engine > Active Test
-
Active Test Display Control the Injection Mode -
Data List Display Coolant Temperature Injection Mode Short FT B1S1 Long FT B1S1 - 50004 372 42004 205,294,207,209
According to the display on the GTS, read the Data List with the Active Test "Control the Injection Mode" set to Port.
- OK:
GTS Display Specified Condition Total of Short FT B1S1 and Long FT B1S1 Between -20 and 20%
According to the display on the GTS, read the Data List with the Active Test "Control the Injection Mode" set to Direct.
- OK:
GTS Display Specified Condition Total of Short FT B1S1 and Long FT B1S1 Between -20 and 20%
- Result:
Item Proceed to Port Direct OK OK A OK NG B NG OK C NG NG D
A
B
C
D
Has the vehicle run out of fuel in the past?
- Result:
Proceed to YES NO
YES
NO
Connect the GTS to the DLC3.
Turn the ignition switch to ON.
Turn the GTS on.
Enter the following menus: Powertrain / Engine / Data List / Engine Speed, Coolant Temperature, Fuel Pressure (High) and Injection Mode.
- Powertrain > Engine > Data List
-
Tester Display Engine Speed Coolant Temperature Fuel Pressure (High) Injection Mode - 50003 372 211,205,265,294
Start the engine and warm it up until the engine coolant temperature is 75°C (167°F) or higher with all the accessories switched off.
According to the display on the GTS, read the Data List.
- Standard:
GTS Display Condition Specified Condition Fuel Pressure (High) ·Shift position: P
·A/C: Off
·Engine warmed up
·Engine Speed: 3000 rpm
·Injection Mode: Direct
2400 to 20000 kPag
- Result:
Proceed to OK NG
OK
NG
Connect the GTS to the DLC3.
Turn the ignition switch to ON.
Turn the GTS on.
Start the engine and warm it up until the engine coolant temperature is 75°C (167°F) or higher with all the accessories switched off.
Enter the following menus: Powertrain / Engine / Active Test / Control the Injection Mode / Data List / Coolant Temperature, High Pressure Fuel Pump Duty Ratio (D4), Injection Mode, Short FT B1S1 and Long FT B1S1.
- Powertrain > Engine > Active Test
-
Active Test Display Control the Injection Mode -
Data List Display Coolant Temperature High Pressure Fuel Pump Duty Ratio (D4) Injection Mode Short FT B1S1 Long FT B1S1 - 50004 372 42004 205,46,294,207,209
According to the display on the GTS, read the Data List with the Active Test "Control the Injection Mode" set to Direct.
- HINT:
-
The A/C switch and all accessory switches should be off, and the shift lever should be in P, and the engine should be fully warmed up.
- Result:
Item Proceed to Injection Mode High Pressure Fuel Pump Duty Ratio (D4) Total of Short FT B1S1 and Long FT B1S1 Direct 10% to 50% - A 50% or higher -20% or less B 10% or less +20% or higher 50% or higher +20% or higher C 10% or less -20% or less D
- HINT:
-
Perform "Inspection After Repair" after replacing the fuel pressure sensor (for high pressure side).
A
B
C
D
Connect the GTS to the DLC3.
Turn the ignition switch to ON.
Turn the GTS on.
Start the engine and warm it up until the engine coolant temperature is 75°C (167°F) or higher with all the accessories switched off.
Enter the following menus: Powertrain / Engine / Active Test / Control the Injection Mode / Data List / Coolant Temperature, High Pressure Fuel Pump Duty Ratio (D4), Injection Mode, Short FT B1S1 and Long FT B1S1.
- Powertrain > Engine > Active Test
-
Active Test Display Control the Injection Mode -
Data List Display Coolant Temperature High Pressure Fuel Pump Duty Ratio (D4) Injection Mode Short FT B1S1 Long FT B1S1 - 50004 372 42004 205,46,294,207,209
According to the display on the GTS, read the Data List with the Active Test "Control the Injection Mode" set to Direct.
- HINT:
-
The A/C switch and all accessory switches should be off, and the shift lever should be in P, and the engine should be fully warmed up.
- Result:
Item Proceed to Injection Mode High Pressure Fuel Pump Duty Ratio (D4) Total of Short FT B1S1 and Long FT B1S1 Direct 10 to 50% -25% or less A 10 to 50% +25% or higher 10 to 50% -25 to +25% B
- HINT:
-
Perform "Inspection After Repair" after replacing the direct fuel injector assembly.
A
B
Connect the GTS to the DLC3.
Turn the ignition switch to ON.
Turn the GTS on.
Start the engine and warm it up until the engine coolant temperature is 75°C (167°F) or higher with all the accessories switched off.
Enter the following menus: Powertrain / Engine / Active Test / Control the Injection Mode / Data List / Coolant Temperature, Injection Mode and Misfire Count Cylinder #1 to Misfire Count Cylinder #4.
- Powertrain > Engine > Active Test
-
Active Test Display Control the Injection Mode -
Data List Display Coolant Temperature Injection Mode Misfire Count Cylinder #1 Misfire Count Cylinder #2 Misfire Count Cylinder #3 Misfire Count Cylinder #4 - 50004 372 42004 205,294,148,149,150,151
According to the display on the GTS, read the Data List with the Active Test "Control the Injection Mode" set to Direct.
- HINT:
-
The A/C switch and all accessory switches should be off, and the shift lever should be in P, and the engine should be fully warmed up.
- Result:
Injection Mode Misfire Count Proceed to Direct No misfire counts, or misfire counts occur randomly in all cylinders A Misfire counts occur in particular cylinder B
- HINT:
-
Perform "Inspection After Repair" after replacing the direct fuel injector assembly.
A
B
Replace the fuel pump assembly (for high pressure side).
- HINT:
-
Perform "Inspection After Repair" after replacing the fuel pump assembly (for high pressure side).
- Result:
Proceed to NEXT
NEXT
Connect the GTS to the DLC3.
Turn the ignition switch to ON.
Turn the GTS on.
Clear the DTCs.
- Powertrain > Engine > Clear DTCs
- 50002 372
Turn the ignition switch off and wait for at least 30 seconds.
- Result:
Proceed to NEXT
NEXT
Drive the vehicle in accordance with the driving pattern described in Confirmation Driving Pattern.
Enter the following menus: Powertrain / Engine / Trouble Codes.
Read the DTCs.
- Powertrain > Engine > Trouble Codes
- 50001 372
- Result:
Result Proceed to DTCs are not output A DTC P017100, P017200, P117000 and/or P117B00 are output B
A
B
Check the injection volume (whether fuel volume is high or low, and whether injection pattern is poor).
- HINT:
-
Perform "Inspection After Repair" after replacing the port fuel injector assembly.
- Result:
Proceed to OK NG
OK
NG
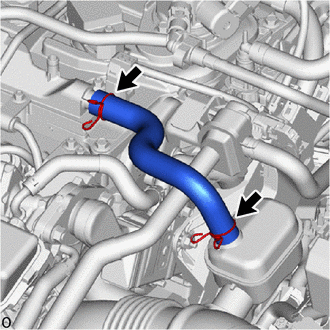
Check the PCV hose connections.
Check the PCV valve.
- OK:
PCV hose and PCV valve are connected correctly and are not damaged.
- Result:
Proceed to OK NG
OK
NG
Check the intake system for vacuum leaks.
- OK:
No leaks in intake system.
- HINT:
-
Perform "Inspection After Repair" after repairing or replacing the intake system.
- Result:
Proceed to OK NG
OK
NG
Connect the GTS to the DLC3.
Turn the ignition switch to ON.
Turn the GTS on.
Start the engine and warm it up until the engine coolant temperature reaches 75°C (167°F) or higher.
Warm up the air fuel ratio sensors at an engine speed of 2500 rpm for 90 seconds.
Enter the following menus: Powertrain / Engine / Active Test / Control the Injection Volume for A/F Sensor / Data List / Coolant Temperature, A/F (O2) Sensor Current B1S1 and A/F (O2) Sensor Current B1S2.
- Powertrain > Engine > Active Test
-
Active Test Display Control the Injection Volume for A/F Sensor -
Data List Display Coolant Temperature A/F (O2) Sensor Current B1S1 A/F (O2) Sensor Current B1S2 - 50004 372 8 205,230,564
Perform the Control the Injection Volume for A/F Sensor operation with the engine idling.
Monitor the output values of the air fuel ratio sensor (sensor 1) and air fuel ratio sensor (sensor 2) (A/F (O2) Sensor Current B1S1 and A/F (O2) Sensor Current B1S2) displayed on the GTS.
- HINT:
- ·
The Control the Injection Volume for A/F Sensor operation lowers the fuel injection volume by 12.5% or increases the injection volume by 12.5%.
·The air fuel ratio sensor (sensor 1) has an output delay of a few seconds and the air fuel ratio sensor (sensor 2) has a maximum output delay of approximately 20 seconds.
·If the sensor output value does not change (almost no reaction) while performing the Active Test, the sensor may be malfunctioning.
- Standard:
GTS Display (Sensor) Injection Volume Status Voltage A/F (O2) Sensor Current B1S1
(Air fuel ratio [sensor 1])12.5% Rich Below -0.075 mA -12.5% Lean More than 0.037 mA A/F (O2) Sensor Current B1S2
(Air fuel ratio [sensor 2])12.5% Rich Below -0.86 mA -12.5% Lean More than 0.33 mA
- Result:
Status A/F (O2) Sensor Current B1S1 Status A/F (O2) Sensor Current B1S2 Air Fuel Ratio Condition and Air Fuel Ratio Sensor Condition Suspected Trouble Area Proceed to Lean/Rich Lean/Rich Normal - A Lean Lean Actual air fuel ratio lean ·PCV valve and hose
·PCV hose connections
·Gas leak from exhaust system
·Intake system
·Fuel pressure
·Mass air flow meter sub-assembly
·Engine coolant temperature sensor
·EGR valve assembly
Rich Rich Actual air fuel ratio rich ·Gas leak from exhaust system
·Ignition system
·Fuel pressure
·Mass air flow meter sub-assembly
·Engine coolant temperature sensor
·EGR valve assembly
Lean Lean/Rich Air fuel ratio sensor (sensor 1) malfunction ·Air fuel ratio sensor (sensor 1)
B Rich Lean/Rich Air fuel ratio sensor (sensor 1) malfunction ·Air fuel ratio sensor (sensor 1)
Lean: During the Control the Injection Volume for A/F Sensor Active Test, the air fuel ratio sensor (sensor 1) output current (A/F (O2) Sensor Current B1S1) is consistently more than 0.037 mA, and the air fuel ratio sensor (sensor 2) output current (A/F (O2) Sensor Current B1S2) is consistently more than 0.33 mA.
Rich: During the Control the Injection Volume for A/F Sensor Active Test, the air fuel ratio sensor (sensor 1) output current (A/F (O2) Sensor Current B1S1) is consistently below -0.075 mA, and the air fuel ratio sensor (sensor 2) output current (A/F (O2) Sensor Current B1S2) is consistently below -0.86 mA.
Lean/Rich: During the Control the Injection Volume for A/F Sensor Active Test, the output current of the air fuel ratio sensor (sensor 1) or air fuel ratio sensor (sensor 2) alternate correctly.
- HINT:
-
Refer to "Data List / Active Test" [A/F (O2) Sensor Current B1S1 and A/F (O2) Sensor Current B1S2].
A
B
Connect the GTS to the DLC3.
Turn the ignition switch to ON.
Turn the GTS on.
Enter the following menus: Powertrain / Engine / Data List / Coolant Temperature.
- Powertrain > Engine > Data List
-
Tester Display Coolant Temperature - 50003 372 205
Read the Data List twice, when the engine is both cold and warmed up.
- Standard:
GTS Display Condition Specified Condition Coolant Temperature Cold engine Same as ambient air temperature Warm engine Between 75 and 100°C (167 and 212°F)
- HINT:
-
Perform "Inspection After Repair" after replacing the engine coolant temperature sensor.
- Result:
Proceed to OK NG
OK
NG
Connect the GTS to the DLC3.
Turn the ignition switch to ON.
Turn the GTS on.
Start the engine and warm it up until the engine coolant temperature reaches 75°C (167°F) or higher.
- HINT:
-
The A/C switch and all accessory switches should be off.
Enter the following menus: Powertrain / Engine / Active Test / Control the EGR Step Position / Data List / Engine Speed, Intake Manifold Absolute Pressure and Coolant Temperature.
- Powertrain > Engine > Active Test
-
Active Test Display Control the EGR Step Position -
Data List Display Engine Speed Intake Manifold Absolute Pressure Coolant Temperature - 50004 372 25 211,385,205
Check the engine idling condition and Intake Manifold Absolute Pressure values in the Data List while performing the Active Test.
- NOTICE:
- ·
Do not leave the EGR valve open for 10 seconds or more during the Active Test.
·Be sure to return the EGR valve to step 0 when the Active Test is completed.
·Do not open the EGR valve 30 steps or more during the Active Test.
- OK:
The value of Intake Manifold Absolute Pressure and Engine Speed change in response to EGR step position.
- Standard:
- EGR Step Position (Active Test) 0 Steps 0 to 30 Steps Idling condition Steady idling Idling changes from steady to rough idling or engine stalls Intake Manifold Absolute Pressure
(Data List)Intake Manifold Absolute Pressure value is 18 to 38 kPa(abs) (2.6 to 5.5 psi(abs))
(EGR valve is fully closed)Intake Manifold Absolute Pressure value is at least +10 kPa (1.45 psi) higher than when EGR valve is fully closed
- HINT:
-
During Active Test, if the idling condition does not change in response to EGR step position, then there is probably a malfunction in the EGR valve.
- Result:
Proceed to OK NG
OK
NG
Remove the EGR valve assembly.
Check if the EGR valve is stuck open.
- OK:
EGR valve is tightly closed.
- HINT:
-
Perform "Inspection After Repair" after replacing the EGR valve assembly.
- Result:
Proceed to OK NG
OK
NG
Connect the GTS to the DLC3.
Start the engine.
Turn the GTS on.
Enter the following menus: Powertrain / Engine / Data List / Engine Speed, Mass Air Flow Sensor and Coolant Temperature.
- Powertrain > Engine > Data List
-
Tester Display Engine Speed Mass Air Flow Sensor Coolant Temperature - 50003 372 211,215,205
Allow the engine to idle until Coolant Temperature reaches 75°C (167°F) or higher.
Read Mass Air Flow Sensor while maintaining an engine speed of 3000 rpm.
- Standard:
GTS Display Condition Specified Condition Mass Air Flow Sensor Engine warmed up
Shift position: P
A/C: Off
Engine Speed: 3000 rpmBetween 8 and 13 gm/sec
- Result:
Proceed to OK NG
OK
NG
Check the fuel pressure (for low pressure side).
- Result:
Proceed to OK NG
OK
NG
Check for exhaust gas leaks.
- OK:
No gas leaks.
- HINT:
-
Perform "Inspection After Repair" after repairing or replacing the exhaust system.
- Result:
Proceed to OK NG
OK
NG
Inspect the spark plug.
- HINT:
-
Perform "Inspection After Repair" after replacing the spark plug.
- Result:
Proceed to OK NG
OK
NG
Perform a spark test.
- HINT:
- ·
If the result of the spark test is normal, proceed to the next step.
·Perform "Inspection After Repair" after replacing the spark plug or ignition coil assembly.
- Result:
Proceed to NEXT
NEXT
Check the fuel lines for leaks or blockage.
- Result:
Proceed to OK NG
OK
NG
Inspect the air fuel ratio sensor (sensor 1).
- HINT:
-
Perform "Inspection After Repair" after replacing the air fuel ratio sensor (sensor 1).
- Result:
Proceed to OK NG
OK
NG
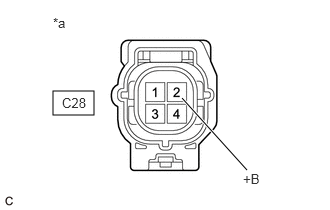
| *a | Front view of wire harness connector
(to Air Fuel Ratio Sensor (Sensor 1)) |
Disconnect the air fuel ratio sensor (sensor 1) connector.
Turn the ignition switch to ON.
Measure the voltage according to the value(s) in the table below.
- Standard Voltage:
Tester Connection Switch Condition Specified Condition C28-2 (+B) - Body ground Ignition switch ON 11 to 14 V
- Result:
Proceed to OK NG
OK
NG
Disconnect the air fuel ratio sensor (sensor 1) connector.
Disconnect the ECM connector.
Measure the resistance according to the value(s) in the table below.
- Standard Resistance:
Tester Connection Condition Specified Condition C28-1 (HA1A) - C71-10 (HA1A) Always Below 1 Ω C28-3 (A1A+) - C71-169 (A1A+) Always Below 1 Ω C28-4 (A1A-) - C71-168 (A1A-) Always Below 1 Ω C28-1 (HA1A) or C71-10 (HA1A) - Body ground and other terminals Always 10 kΩ or higher C28-3 (A1A+) or C71-169 (A1A+) - Body ground and other terminals Always 10 kΩ or higher C28-4 (A1A-) or C71-168 (A1A-) - Body ground and other terminals Always 10 kΩ or higher
- Result:
Proceed to OK NG
OK
NG
Replace the air fuel ratio sensor (sensor 1).
- HINT:
-
Perform "Inspection After Repair" after replacing the air fuel ratio sensor (sensor 1).
- Result:
Proceed to NEXT
NEXT
Connect the GTS to the DLC3.
Turn the ignition switch to ON.
Turn the GTS on.
Clear the DTCs.
- Powertrain > Engine > Clear DTCs
- 50002 372
Turn the ignition switch off and wait for at least 30 seconds.
- Result:
Proceed to NEXT
NEXT
Drive the vehicle in accordance with the driving pattern described in Confirmation Driving Pattern.
Enter the following menus: Powertrain / Engine / Trouble Codes.
Read the DTCs.
- Powertrain > Engine > Trouble Codes
- 50001 372
- Result:
Result Proceed to DTCs are not output A DTC P017100, P017200, P117000 and/or P117B00 is output B
A
B
Connect the GTS to the DLC3.
Start the engine.
Turn the GTS on.
Enter the following menus: Powertrain / Engine / Data List / Engine Speed, Mass Air Flow Sensor and Coolant Temperature.
- Powertrain > Engine > Data List
-
Tester Display Engine Speed Mass Air Flow Sensor Coolant Temperature - 50003 372 211,215,205
Allow the engine to idle until Coolant Temperature reaches 75°C (167°F) or higher.
Read Mass Air Flow Sensor while maintaining an engine speed of 3000 rpm.
- Standard:
GTS Display Condition Specified Condition Mass Air Flow Sensor Engine warmed up
Shift position: P
A/C: Off
Engine Speed: 3000 rpmBetween 8 and 13 gm/sec
- Result:
Proceed to NEXT
NEXT
Check the connection and terminal contact pressure of connectors and wire harnesses between the mass air flow meter sub-assembly and ECM.
- HINT:
-
Repair any problems.
- Result:
Proceed to NEXT
NEXT
Connect the GTS to the DLC3.
Turn the ignition switch to ON.
Turn the GTS on.
Clear the DTCs.
- Powertrain > Engine > Clear DTCs
- 50002 372
Turn the ignition switch off and wait for at least 30 seconds.
- Result:
Proceed to NEXT
NEXT
Drive the vehicle in accordance with the driving pattern described in Confirmation Driving Pattern.
Enter the following menus: Powertrain / Engine / Trouble Codes.
Read the DTCs.
- Powertrain > Engine > Trouble Codes
- 50001 372
- Result:
Result Proceed to DTCs are not output A DTC P017100, P017200, P117000 or P117B00 is output B
A
B
Disconnect the mass air flow meter sub-assembly connector.
Disconnect the ECM connector.
Measure the resistance according to the value(s) in the table below.
- Standard Resistance:
Tester Connection Condition Specified Condition C17-3 (VCC) - C71-137 (VCVG) Always Below 1 Ω C17-1 (FG) - C71-135 (VG) Always Below 1 Ω C17-2 (E2G) - C71-136 (E2G) Always Below 1 Ω C17-3 (VCC) or C71-137 (VCVG) - Body ground and other terminals Always 10 kΩ or higher C17-1 (FG) or C71-135 (VG) - Body ground and other terminals Always 10 kΩ or higher C17-2 (E2G) or C71-136 (E2G) - Body ground and other terminals Always 10 kΩ or higher
- Result:
Proceed to OK NG
OK
NG
Inspect the mass air flow meter sub-assembly.
- Result:
Proceed to NEXT
NEXT
Connect the GTS to the DLC3.
Turn the ignition switch to ON.
Turn the GTS on.
Clear the DTCs.
- Powertrain > Engine > Clear DTCs
- 50002 372
Turn the ignition switch off and wait for at least 30 seconds.
- Result:
Proceed to NEXT
NEXT
Drive the vehicle in accordance with the driving pattern described in Confirmation Driving Pattern.
Enter the following menus: Powertrain / Engine / Trouble Codes.
Read the DTCs.
- Powertrain > Engine > Trouble Codes
- 50001 372
- Result:
Result Proceed to DTCs are not output A DTC P017100, P017200, P117000 and/or P117B00 are output B
A
B