M20D-FKS ENGINE CONTROL IGNITION SYSTEM ON-VEHICLE INSPECTION
CAUTION / NOTICE / HINT
- CAUTION:
-
-
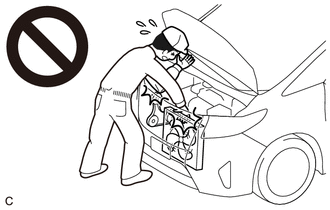
To prevent injury due to contact with an operating V-ribbed belt or cooling fan, keep your hands and clothing away from the V-ribbed belt and cooling fan when working in the engine compartment with the engine running or the ignition switch on.
PROCEDURE

 1.PERFORM SPARK TEST
Connect the GTS to the DLC3.
Turn the ignition switch to ON.
Turn the GTS on.
Enter the following menus: Powertrain / Engine / Trouble Codes.
Check for DTCs.
- Powertrain > Engine > Trouble Codes
- 50001 372
- NOTICE:
-
If any DTCs are output, perform troubleshooting in accordance with the procedure for each DTC.
Turn the ignition switch off.
Remove the 4 ignition coil assemblies and 4 spark plugs.
Click hereGeneral>MAINTENANCE>M20D-FKS SPARK PLUG>REMOVAL201910,999999,_V1,_083136,_0402978,RM100000001JMBG,
Remove the front fender front splash shield RH.
Remove the front fender front splash shield LH.
Remove the No. 1 engine under cover.
Remove the No. 2 engine under cover assembly.
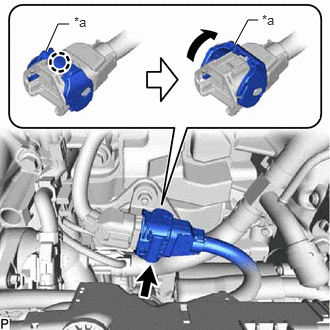
| *a | Lock Lever |
Detach the claw and raise the lock lever to disconnect the No. 6 engine wire connector as shown in the illustration.
- NOTICE:
-
Perform this step in order to stop fuel injection and prevent damage to the catalyst due to unburned fuel.
Remove the fuel delivery guard.
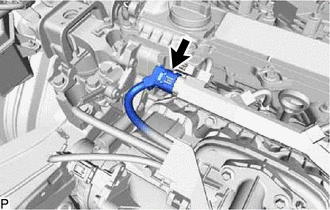
Disconnect the No. 5 engine wire connector.
- NOTICE:
-
Perform this step in order to stop fuel injection and prevent damage to the catalyst due to unburned fuel.
Install the spark plug to the ignition coil assembly, and then connect the ignition coil assembly connector.
Ground the spark plug.
Check that spark occurs at each spark plug while the engine is being cranked.
- NOTICE:
- ·
Be sure to ground the spark plugs when checking them.
·Do not crank the engine for more than 2 seconds.
·If an ignition coil assembly or spark plug has been struck or dropped, replace it.
- HINT:
- ·
If spark does not occur, perform the following procedure.
·If spark does not occur for any cylinder, inspect the ignition circuit.
Connect the No. 5 engine wire connector.
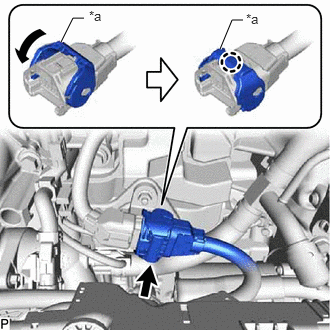
| *a | Lock Lever |
Connect the No. 6 engine wire connector and push down the lock lever to attach the claw as shown in the illustration.
Install the No. 2 engine under cover assembly.
Install the front fender front splash shield LH.
Install the front fender front splash shield RH.
Install the 4 ignition coil assemblies and 4 spark plugs.
Turn the ignition switch to ON.
Turn the GTS on.
Enter the following menus: Powertrain / Engine / Trouble Codes.
Check for DTCs.
- Powertrain > Engine > Trouble Codes
- 50001 372
Clear the DTCs.
- Powertrain > Engine > Clear DTCs
- 50002 372
2.INSPECT IGNITION COIL ASSEMBLY AND SPARK TEST
- HINT:
-
Perform "Inspection After Repair" after replacing an ignition coil assembly or spark plug.
Check that the ignition coil assembly connector is securely connected.
- Result:
Result Action NG Connect securely OK Go to next step
Perform a spark test on each ignition coil assembly.
Replace the ignition coil assembly with a known good one.
Perform the spark test again.
- Result:
Result Action NG Go to next step OK Replace ignition coil assembly
Perform a spark test on each spark plug.
Replace the spark plug with a known good one.
Perform the spark test again.
- Result:
Result Action NG Inspect ignition system
( 201910,202304,_51,_083058,_0401834,RM100000001JE03,202304,202409,_51,_083058,_0401834,RM1000000029CAP,202409,999999,_51,_083058,_0401834,RM100000002NA5L,)
OK Replace spark plug
- NOTICE:
-
If an ignition coil assembly or spark plug has been struck or dropped, replace it.
Connect the No. 5 engine wire connector.
| *a | Lock Lever |
Connect the No. 6 engine wire connector and push down the lock lever to attach the claw as shown in the illustration.
Install the No. 2 engine under cover assembly.
Install the front fender front splash shield LH.
Install the front fender front splash shield RH.
Install the 4 ignition coil assemblies and 4 spark plugs.
Turn the ignition switch to ON.
Turn the GTS on.
Enter the following menus: Powertrain / Engine / Trouble Codes.
Check for DTCs.
- Powertrain > Engine > Trouble Codes
- 50001 372
Clear the DTCs.
- Powertrain > Engine > Clear DTCs
- 50002 372
19100P
3.CHECK SPARK PLUG
- NOTICE:
- ·
Do not damage the iridium tip and platinum tip.
·Check the iridium tip visually since the iridium tip may be damaged.
·Never attempt to adjust the electrode gap of a used spark plug.
·Replace with new spark plugs if extremely dirty due to sludge, etc.
·Replace with new spark plugs if damaged at all.
·Replace with a new spark plug if it has been struck or dropped.
·When replacing with a new spark plug, do not remove the cap for protecting the spark plug tip until it is installed to the engine.
- HINT:
-
Perform "Inspection After Repair" after replacing a spark plug.
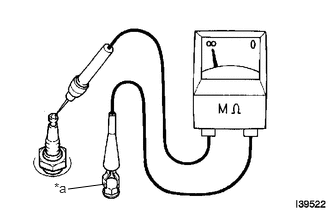
| *a | Body Ground |
Check the electrode.
Using a megohmmeter, measure the insulation resistance.
- Standard Insulation Resistance:
Tester Connection Condition Specified Condition Spark plug (terminal part) - Body ground Always 10 MΩ or higher
- HINT:
- ·
If the result is not as specified, clean the spark plug with a spark plug cleaner and measure the resistance again.
·If a megohmmeter is not available, perform the following simple inspection instead.
Alternative inspection method.
Start the engine.
- NOTICE:
-
Do not perform this step when any of the following DTCs are output: P030000, P030027, P030085, P030100, P030200, P030300, P030400 (Cylinder Misfire Detected).
Quickly accelerate the engine to 4000 rpm 5 times.
- NOTICE:
-
Do not perform this step when any of the following DTCs are output: P030000, P030027, P030085, P030100, P030200, P030300, P030400 (Cylinder Misfire Detected).
Remove the spark plug.
Click hereGeneral>MAINTENANCE>M20D-FKS SPARK PLUG>REMOVAL201910,999999,_V1,_083136,_0402978,RM100000001JMBG,
Visually check the spark plug.
- HINT:
-
If the electrode is dry, the spark plug is functioning properly. If the electrode is damp, proceed to the next step.
Check the spark plug for any damage to its threads and insulator.
If there is any damage, replace the spark plug.
- Recommended Spark Plug:
Manufacturer Spark Plug Type NGK DILKAR7S8
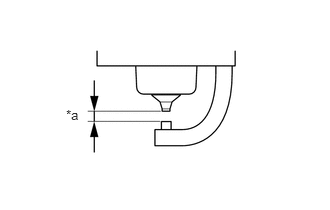
| *a | Spark Plug Electrode Gap |
Check the spark plug electrode gap.
- Maximum Electrode Gap for Used Spark Plug:
1.2 mm (0.0472 in.)
- NOTICE:
-
Never attempt to adjust the electrode gap of a used spark plug.
If the spark plug electrode gap is more than the maximum, replace the spark plug.
- Standard Electrode Gap for New Spark Plug:
0.7 to 0.8 mm (0.0276 to 0.0315 in.)
Install the spark plug.
Click here