NR Series ENGINE CONTROL SFI SYSTEM P04419C Evaporative Emission System Incorrect Purge Flow Low/Insufficient Flow
DTC SUMMARY
| DTC No. | Detection Item | DTC Detection Condition | Trouble Area | MIL | Memory | Note |
|---|---|---|---|---|---|---|
| P04419C | Evaporative Emission System Incorrect Purge Flow Low/Insufficient Flow | While engine running, following conditions successively met:
·
Negative pressure not created in EVAP system when purge VSV turned on (open) ·
EVAP system pressure change less than 0.15 kPa (0.022 psi) when vent valve turned on (closed) ·
Atmospheric pressure change before and after purge flow monitor less than 0.1 kPa (0.015 psi) |
·
Open or short in purge VSV circuit ·
Purge VSV ·
No. 1 check valve ·
No. 2 charcoal canister sub-assembly ·
Purge line ·
Canister (filter inside canister clogged) ·
ECM |
Comes on | DTC stored | SAE Code: P0441 |
| DTC No. | Monitoring Item | Detection Timing | Detection Logic | SAE |
|---|---|---|---|---|
| P04419C | ·
Purge VSV stuck closed ·
No. 1 check valve stuck closed ·
Purge flow |
While engine running | 2 trip | P0441 |
DESCRIPTION
The description can be found in EVAP (Evaporative Emission) System.
Purge flow monitor
The purge flow monitor consists of the 2 monitors. The 1st monitor is conducted every time and the 2nd monitor is activated if necessary.
The 1st monitor
While the engine is running and the purge VSV (Vacuum Switching Valve) is on (open), the ECM monitors the purge flow by measuring the EVAP pressure change. If negative pressure is not created, the ECM begins the 2nd monitor.
The 2nd monitor
The vent valve is turned on (closed) and the EVAP pressure is then measured. If the variation in the pressure is less than 0.15 kPa (0.022 psi), the ECM interprets this as the purge VSV or No. 1 check valve being stuck closed, illuminates the MIL and stores DTC P04419C (2 trip detection logic).
Atmospheric pressure check:
In order to ensure reliable malfunction detection, the variation between the atmospheric pressures, before and after of the purge flow monitor, is measured by the ECM.
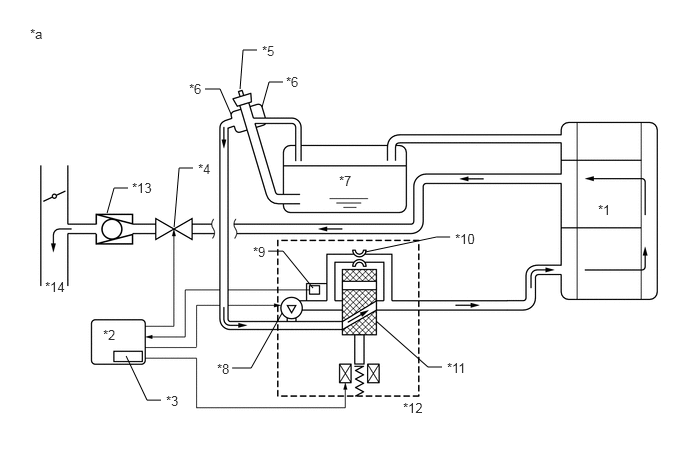
| *1 | Canister | *2 | ECM |
| *3 | Soak Timer | *4 | Purge VSV (On) |
| *5 | Fuel Cap | *6 | Canister Filter |
| *7 | Fuel Tank | *8 | Leak Detection Pump (Off) |
| *9 | Canister Pressure Sensor | *10 | Reference Orifice (0.02 inches) |
| *11 | Vent Valve (Off) | *12 | Canister Pump Module |
| *13 | No. 1 Check Valve | *14 | to Intake Manifold |
| *a | EVAP Purge Flow | - | - |
MONITOR DESCRIPTION
PURGE FLOW MONITOR
The purge flow monitor consists of 2 monitors. The 1st monitor is conducted every time and the 2nd monitor is activated if necessary.
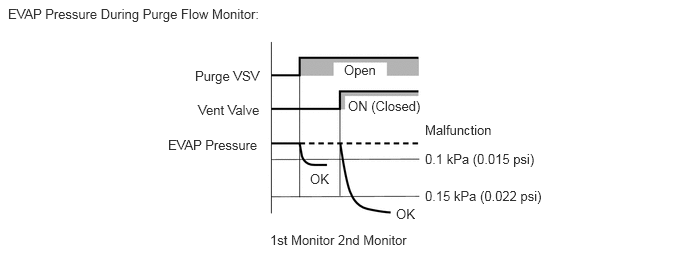
The 1st monitor
While the engine is running and the purge VSV is on (open), the ECM monitors the purge flow by measuring the EVAP pressure change. If negative pressure is not created, the ECM begins the 2nd monitor.
The 2nd monitor
The vent valve is turned on (closed) and the EVAP pressure is then measured. If the variation in the pressure is less than 0.150 kPa (0.022 psi), the ECM interprets this as the purge VSV or No. 1 check valve being stuck closed, illuminates the MIL and stores DTC P04419C (2 trip detection logic).
Atmospheric pressure check:
In order to ensure reliable malfunction detection, the variation between the atmospheric pressures, before and after conduction of the purge flow monitor, is measured by the ECM.
MONITOR STRATEGY
| Required Sensors/Components | No. 1 check valve
Purge VSV Canister pump module |
| Frequency of Operation | Once per driving cycle |
CONFIRMATION DRIVING PATTERN
- HINT:
- ·
After repair has been completed, clear the DTC and then check that the vehicle has returned to normal by performing the following All Readiness check procedure.
·When clearing the permanent DTCs, refer to the "CLEAR PERMANENT DTC" procedure.
- 1.
Connect the GTS to the DLC3.
2.Turn the ignition switch to ON.
3.Turn the GTS on.
4.Clear the DTCs (even if no DTCs are stored, perform the clear DTC procedure).
5.Turn the ignition switch off and wait for at least 30 seconds.
6.Start the engine and wait 15 minutes or more [A].
7.Turn the GTS on.
8.Enter the following menus: Powertrain / Engine / Trouble Codes [B].
9.Read the pending DTCs.
- HINT:
- ·
If a pending DTC is output, the system is malfunctioning.
·If a pending DTC is not output, perform the following procedure.
10.Enter the following menus: Powertrain / Engine / Utility / All Readiness.
11.Input the DTC: P04419C.
12.Check the DTC judgment result.
GTS Display Description NORMAL ·DTC judgment completed
·System normal
ABNORMAL ·DTC judgment completed
·System abnormal
INCOMPLETE ·DTC judgment not completed
·You should perform driving pattern after confirming DTC enabling conditions
- HINT:
- ·
If the judgment result shows NORMAL, the system is normal.
·If the judgment result shows ABNORMAL, the system has a malfunction.
·[A] to [B]: Normal judgment procedure.
The normal judgment procedure is used to complete DTC judgment and also used when clearing permanent DTCs.
·When clearing the permanent DTCs, do not disconnect the cable from the battery terminal or attempt to clear the DTCs during this procedure, as doing so will clear the universal trip and normal judgment histories.
WIRING DIAGRAM
CAUTION / NOTICE / HINT
- NOTICE:
-
Inspect the fuses for circuits related to this system before performing the following procedure.
- HINT:
-
Read Freeze Frame Data using the GTS. The ECM records vehicle and driving condition information as Freeze Frame Data the moment a DTC is stored. When troubleshooting, Freeze Frame Data can help determine if the vehicle was moving or stationary, if the engine was warmed up or not, if the air fuel ratio was lean or rich, and other data from the time the malfunction occurred.
PROCEDURE
Connect the GTS to the DLC3.
Turn the ignition switch to ON.
Turn the GTS on.
Enter the following menus: Powertrain / Engine / Active Test / Activate the EVAP Purge VSV.
- Powertrain > Engine > Active Test
-
Tester Display Activate the EVAP Purge VSV - 50004 372 1
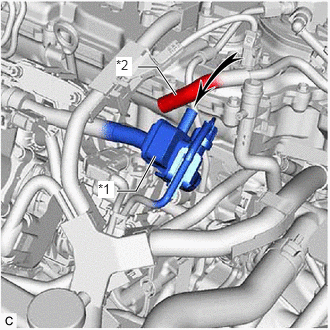
| *1 | Purge VSV |
| *2 | No. 1 Fuel Vapor Feed Hose
(to Canister) |
Disconnect the No. 1 fuel vapor feed hose (connected to the canister) from the purge VSV.
Start the engine.
Using the GTS, turn on the purge VSV (Activate the EVAP Purge VSV: ON).
Use your finger to confirm that the purge VSV has suction.
- Result:
Test Result Suspected Trouble Area Proceed to Suction applied ·Problems with EVAP hose between canister and purge VSV
·Canister (charcoal filter inside canister) clogged
A No suction ·Purge VSV stuck closed
·No. 1 check valve stuck closed
·Problems with EVAP hose between purge VSV and intake manifold
·ECM
B
A
B
Check for blockages in the EVAP purge line between the purge VSV and canister.
- OK:
No blockages in the EVAP purge line between the purge VSV and canister.
- Result:
Proceed to OK NG
OK
NG
Check for filter blockage in the canister.
- OK:
No blockages in the canister.
- Result:
Proceed to OK NG
OK
NG
Replace the canister pump module (No. 2 charcoal canister sub-assembly).
- NOTICE:
- ·
When replacing the canister pump module, check the canister pump module interior, canister interior and related pipes for water, fuel and other liquids. If liquids are present, check for disconnections and/or cracks in the following: 1) the hose between the canister and the canister pump module; 2) the pipe between the air inlet port and the canister pump module; 3) the canister filter; and 4) the fuel tank vent hose. If liquids are present in the canister interior, replace the canister and canister pump module together.
·Check for filter blockage in the canister. If the charcoal filter inside the canister is clogged, replace the canister and canister pump module together.
·Check for filter blockage in the canister filter. If the canister filter has blockages, replace the canister filter.
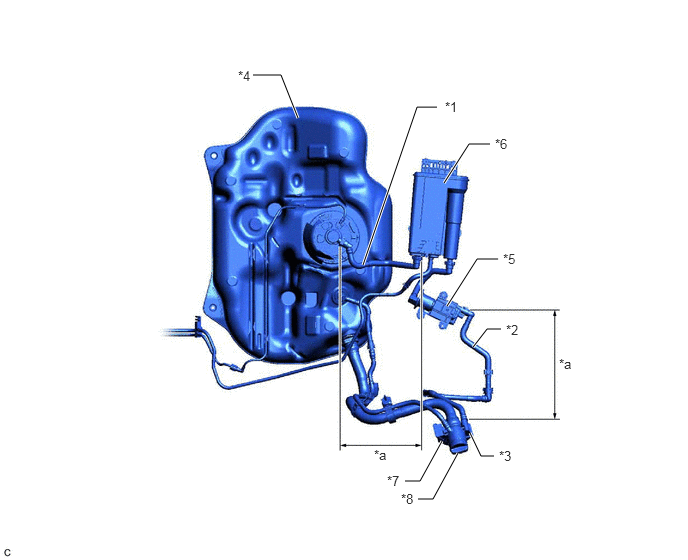
| *1 | Fuel Tank Vent Hose | *2 | Vent Hose |
| *3 | Air Inlet Port | *4 | Fuel Tank |
| *5 | No. 2 Charcoal Canister Sub-assembly
·
Canister Pump Module |
*6 | Canister |
| *7 | Canister Filter | *8 | Fuel Cap |
| *a | Inspection Area
(check for disconnection and/or cracks) |
- | - |
- Result:
Proceed to NEXT
NEXT
Replace the canister.
- NOTICE:
- ·
When replacing the canister, check the canister pump module interior and related pipes for water, fuel and other liquids. If liquids are present, check for disconnections and/or cracks in the following: 1) the hose between the canister and the canister pump module; 2) the pipe between the air inlet port and the canister pump module; 3) the canister filter; and 4) the fuel tank vent hose.
·Check for filter blockage in the canister filter. if the canister filter has blockages, replace the canister filter.
| *1 | Fuel Tank Vent Hose | *2 | Vent Hose |
| *3 | Air Inlet Port | *4 | Fuel Tank |
| *5 | No. 2 Charcoal Canister Sub-assembly
·
Canister Pump Module |
*6 | Canister |
| *7 | Canister Filter | *8 | Fuel Cap |
| *a | Inspection Area
(check for disconnection and/or cracks) |
- | - |
- Result:
Proceed to NEXT
NEXT
- Result:
Proceed to NEXT
NEXT
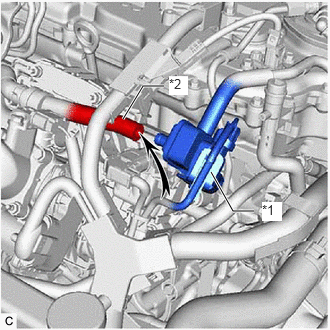
| *1 | Purge VSV |
| *2 | No. 2 Fuel Vapor Feed Hose
(to Intake Manifold) |
Disconnect the No. 2 fuel vapor feed hose (connected to the intake manifold) from the purge VSV.
Start the engine.
Use your finger to confirm that the No. 2 fuel vapor feed hose has suction.
- Result:
Test Result Suspected Trouble Area Proceed to Suction applied EVAP hose between purge VSV and intake manifold normal
·Purge VSV
·Purge VSV power source
·Wire harness or connector between purge VSV and ECM
·ECM
A No suction ·No. 1 check valve
·Intake manifold port
·EVAP hose between purge VSV and intake manifold
B
A
B
Remove the purge VSV.
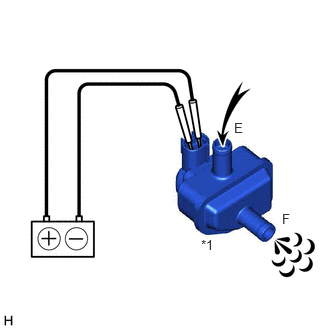
| *1 | Purge VSV |
Apply battery voltage to the terminals of the purge VSV.
Confirm that air flows from port E to port F.
- Result:
Test Result Condition Suspected Trouble Area Proceed to Air flows Battery voltage is applied to purge VSV terminals Purge VSV normal
·Purge VSV power source
·Wire harness or connector between purge VSV and ECM
·ECM
A No air flow Battery voltage is applied to purge VSV terminals Purge VSV B
A
B
Disconnect the purge VSV connector.
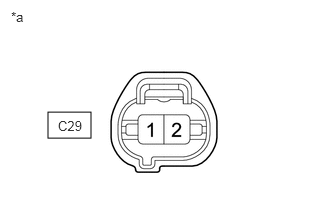
| *a | Front view of wire harness connector
(to Purge VSV) |
Turn the ignition switch to ON.
Measure the voltage according to the value(s) in the table below.
- Result:
Tester Connection Condition Specified Condition Suspected Trouble Area Proceed to C29-1 - Body ground Ignition switch ON 11 to 14 V Purge VSV power source normal
·Wire harness or connector between purge VSV and ECM
A Other than result above Wire harness or connectors between purge VSV and battery B
A
B
Disconnect the ECM connector.
Disconnect the purge VSV connector.
Measure the resistance according to the value(s) in the table below.
- Standard Resistance:
Tester Connection Condition Specified Condition C29-2 - C78-70 (PRG) Always Below 1 Ω C29-2 or C78-70 (PRG) - Body ground and other terminals Always 10 kΩ or higher
- Result:
Proceed to OK NG
OK
NG
- Result:
Proceed to NEXT
NEXT
- Result:
Proceed to NEXT
NEXT
- Result:
Proceed to NEXT
NEXT
Replace the purge VSV.
- Result:
Proceed to NEXT
NEXT
Check the No. 1 check valve.
- Result:
Proceed to OK NG
OK
NG
Stop the engine.
Disconnect the EVAP hose from the intake manifold.
Start the engine.
Use your finger to confirm that the port of the intake manifold has suction.
- Result:
Tester Connection Suspected Trouble Area Proceed to Suction applied EVAP hose between intake manifold and purge VSV A No suction Intake manifold (upper intake manifold) B
A
B
- Result:
Proceed to NEXT
NEXT
Check that the EVAP purge port of the intake manifold is not clogged. If necessary, replace the intake manifold.
- Result:
Proceed to NEXT
NEXT
Replace the No. 1 check valve.
- Result:
Proceed to NEXT
NEXT
Connect the GTS to the DLC3.
Turn the ignition switch to ON.
Turn the GTS on.
Clear the DTC after recording the Freeze Frame Data and DTC.
- Powertrain > Engine > Clear DTCs
- 50002 372
Turn the ignition switch off and wait for at least 30 seconds.
- Result:
Proceed to NEXT
NEXT
Drive the vehicle in accordance with the driving pattern described in Confirmation Driving Pattern.
Enter the following menus: Powertrain / Engine / Utility / All Readiness.
- Powertrain > Engine > Utility
-
Tester Display All Readiness - 50005 372 20
Input the DTC: P04419C.
Check the DTC judgment result.
| GTS Display | Description |
|---|---|
| NORMAL | ·
DTC judgment completed ·
System normal |
| ABNORMAL | ·
DTC judgment completed ·
System abnormal |
| INCOMPLETE | ·
DTC judgment not completed ·
Perform driving pattern after confirming DTC enabling conditions |
- Result:
Proceed to NEXT
NEXT