WINDOW / GLASS FRONT SIDE WINDOW GLASS REMOVAL
CAUTION / NOTICE / HINT
- NOTICE:
-
Make sure to use Toyota Genuine Windshield Glass Adhesive (High Modulus Type) or equivalent.
- HINT:
- ·
Use the same procedure for RHD and LHD vehicles.
·The procedure listed below is for LHD vehicles.
·Use the same procedure for the RH and LH sides.
·The procedure listed below is for the LH side.
·The No. 2 emergency hammer caution label (Type B) is only on the RH side.
PROCEDURE

 1.REMOVE REAR SEAT ASSEMBLY
for Commuter, 3-Passenger Seat with 2-Point Type Seat Belt and Headrest:
for Commuter, 3-Passenger Seat with 2-Point Type Seat Belt without Headrest:
for Commuter, 3-Passenger Seat with 3-Point Type Seat Belt:
for Commuter, 4-Passenger Seat:
for Commuter, Single-Passenger Seat with 2-Point Type Seat Belt:
for Commuter, Single-Passenger Seat with 3-Point Type Seat Belt:
for Commuter, 2-Passenger Seat with 3-Point Type Seat Belt:
for Commuter, 2-Passenger Seat with 2-Point Type Seat Belt and Headrest:
for Commuter, 2-Passenger Seat with 2-Point Type Seat Belt without Headrest:
67912A
2.REMOVE FRONT DOOR OUTSIDE SCUFF PLATE LH (for Full-trim)
67914B
3.REMOVE FRONT DOOR SCUFF PLATE LH (for Full-trim)
73178C
4.REMOVE SEAT BELT ANCHOR COVER CAP (for Full-trim)
73233
5.REMOVE OUTER LAP BELT ANCHOR COVER (for Full-trim)
73220
6.REMOVE FRONT SEAT OUTER BELT ASSEMBLY LH (for Full-trim)
73370E
7.REMOVE REAR SEAT OUTER BELT ASSEMBLY LH (for Full-trim, w/ Seat Belt)
58777A
8.REMOVE TOOL BAG HOLDER (for Full-trim)
67935
9.REMOVE BACK DOOR SCUFF PLATE (for Full-trim)
62640M
10.REMOVE REAR QUARTER TRIM BOARD ASSEMBLY LH (for Full-trim, for High Roof)
62620K
11.REMOVE SIDE TRIM BOARD ASSEMBLY LH (for Full-trim, for High Roof)
62520B
12.REMOVE QUARTER TRIM PANEL ASSEMBLY LH (for Full-trim)
62472D
13.REMOVE REAR UPPER PILLAR GARNISH LH (for Full-trim)
62639A
14.REMOVE QUARTER PILLAR GARNISH LH (for Full-trim)
62639A
15.REMOVE QUARTER PILLAR GARNISH LH (for Full-trim, for High Roof)
- HINT:
-
Use the same procedure for the quarter pillar garnish RH.
62412
16.REMOVE CENTER PILLAR GARNISH ASSEMBLY LH (for Full-trim)
62460A
17.REMOVE REAR ROOF SIDE RAIL GARNISH ASSEMBLY LH (for Full-trim)
62440D
18.REMOVE FRONT ROOF SIDE RAIL GARNISH ASSEMBLY LH (for Full-trim)
19.REMOVE ROOF HEADLINING ASSEMBLY (for Semi-trim, for High Roof, w/ Rear Air Duct)
62720C
20.REMOVE FRONT SIDE WINDOW GLASS SUB-ASSEMBLY LH

|
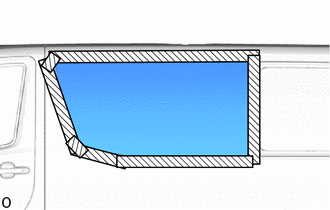
Protective Tape |
Apply protective tape to the outer surface of the vehicle body to prevent scratches.
- NOTICE:
-
When separating the front side window glass sub-assembly LH from the vehicle, be careful not to damage the vehicle paint or interior/exterior ornaments.
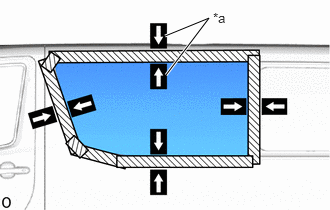
| *a | Matchmark |
When reusing the front side window glass sub-assembly LH:
Place matchmarks over the glass and vehicle body at the locations indicated in the illustration.
Install the suction cups to the front side window glass sub-assembly LH.
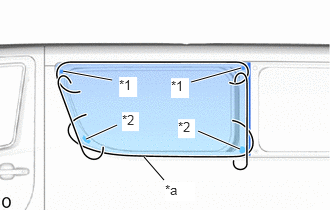
| *1 | Quarter Window Glass Spacer |
| *2 | Front Side Window Clip LH |
| *a | Piano Wire |
From the interior, insert a piano wire between the vehicle body and glass as shown in the illustration.
Tie objects that can serve as handles (for example, wooden blocks) to both wire ends.
- NOTICE:
-
When separating the glass from the vehicle, be careful not to damage the vehicle paint or interior/exterior ornaments.
Cut through the adhesive by pulling the piano wire around the front side window glass sub-assembly LH.
Using suction cups, disconnect the quarter window glass spacer and front side window clip LH and remove the front side window glass sub-assembly LH.
- NOTICE:
-
Do not drop the front side window glass sub-assembly LH.
21.REMOVE NO. 1 QUARTER PANEL SPACER
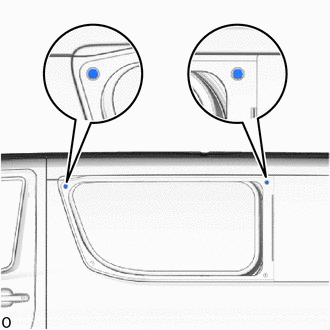
Using a clip remover, remove the 2 No. 1 quarter panel spacers from the body.