DOOR / HATCH SLIDE DOOR RAIL(for Wagon) INSTALLATION
CAUTION / NOTICE / HINT
- HINT:
- ·
Use the same procedure for RHD and LHD vehicles.
·The procedure below is for LHD vehicles.
·Use the same procedure for the RH and LH sides.
·The procedure below is for the LH side.
PROCEDURE

 67858J
1.INSTALL SLIDE DOOR RAIL PROTECTOR LH
67858J
1.INSTALL SLIDE DOOR RAIL PROTECTOR LH
- HINT:
-
When installing the slide door rail protector LH, heat the center slide door rail sub-assembly LH and slide door rail protector LH using a heat light.
Item Temperature Center Slide Door Rail Sub-assembly 40 to 60°C (104 to 140°F) Slide Door Rail Protector LH 20 to 30°C (68 to 86°F)
- CAUTION:
-
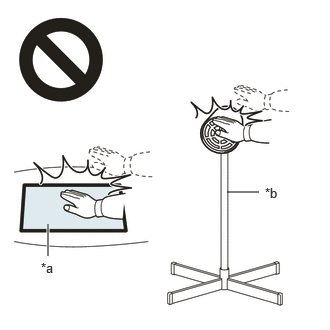 2.365,2 2.698,2 false 0.5,2.333 0.5,2.667 true 0.427,2.708 0.74,2.865 0.313,0.156 10 false *a 2.76,1.927 3.073,2.083 0.313,0.156 10 false *b
*a Heated Part *b Heat Light
- ·
Do not touch the heat light and heated parts.
·Touching the heat light may result in burns.
·Touching heated parts for a long time may result in burns.
- NOTICE:
-
Do not heat the center slide door rail sub-assembly LH and slide door rail protector LH excessively.
Clean the center slide door rail sub-assembly LH surface.
Using a heat light, heat the center slide door rail sub-assembly LH surface.
Remove any remaining double-sided tape from the slide door rail protector LH.
Wipe off any tape adhesive residue with cleaner.
Install a new slide door rail protector LH.
Using a heat light, heat the center slide door rail sub-assembly LH and slide door rail protector LH.
Remove the release paper from the slide door rail protector LH.
- HINT:
-
After removing the release paper, keep the exposed adhesive free from foreign matter.
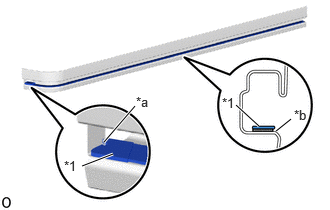
| *1 | Slide door rail protector LH |
| *a | Cutout |
| *b | R End |

|
Double-sided Tape |
Align the cutout of the front end of the slide door rail protector LH with the center slide door rail sub-assembly LH, align the end of the curve, set the slide door rail protector LH into place and install the slide door rail protector LH as shown in the illustration.
- NOTICE:
-
Firmly press the slide door rail protector LH to attach it.
68304B
2.INSTALL CENTER SLIDE DOOR RAIL SUB-ASSEMBLY LH
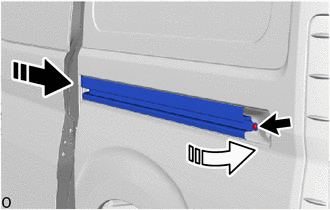

|
Install in this Direction (1) |

|
Install in this Direction (2) |
Insert the stud bolt at the front end of the center slide door rail LH in the direction (1) indicated by the arrow shown in the illustration.
Insert the stud bolt at the rear end of the center slide door rail LH in the direction (2) indicated by the arrow shown in the illustration and install the center slide door rail LH.
- NOTICE:
-
Do not damage the vehicle body with the slide door rail.
Using a T40 "TORX" socket wrench, install the "TORX" screw.
- Torque:
- 19 N*m (194 kgf*cm, 14 ft.*lbf)
Install the 5 nuts.
- Torque:
- 19 N*m (194 kgf*cm, 14 ft.*lbf)
68390A
3.INSTALL CENTER SLIDE DOOR HINGE ASSEMBLY LH
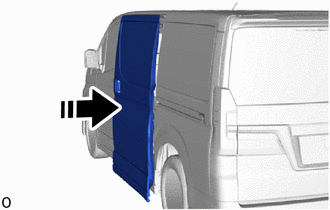
|
|
Install in this Direction |
Move the slide door to a position where the center slide door hinge assembly LH can be installed.
- NOTICE:
-
Make sure not to contact the vehicle body with the slide door.
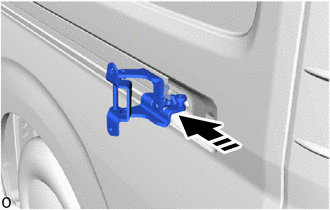
|
|
Install in this Direction |
Insert the slide door hinge into the slide door rail.
- NOTICE:
- ·
Make sure not to contact the vehicle body with the slide door.
·Do not damage the vehicle body with the center slide door hinge assembly LH.
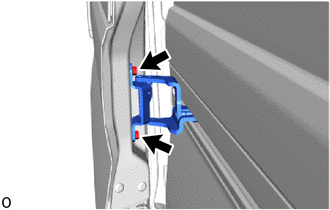
Install the center slide door hinge assembly LH with the 2 bolts.
- Torque:
- 19.5 N*m (199 kgf*cm, 14 ft.*lbf)
68074
4.INSTALL SLIDE RAIL END MOULDING SUB-ASSEMBLY LH
- HINT:
-
Use the same procedure described for the LH side.
62520B
5.INSTALL QUARTER TRIM PANEL ASSEMBLY LH
62510M
6.INSTALL QUARTER TRIM PANEL ASSEMBLY RH (w/ Rear Air Conditioning System)
67872A
7.INSTALL NO. 1 SLIDE DOOR WEATHERSTRIP LH
- HINT:
-
Use the same procedure described for the RH side.
67918D
8.INSTALL REAR DOOR SCUFF PLATE LH
73370E
9.INSTALL REAR SEAT OUTER BELT ASSEMBLY LH (w/ Seat Belt)
73178C
10.INSTALL SEAT BELT ANCHOR COVER CAP (w/ Seat Belt)
67935
11.INSTALL BACK DOOR SCUFF PLATE
12.INSTALL REAR SEAT ASSEMBLY LH
for Manual Captain Seat:
for Power Captain Seat:
for 60/40 Split Seat Type 40 Side:
for 60/40 Split Seat Type 60 Side:
13.CONNECT CABLE TO NEGATIVE BATTERY TERMINAL (w/ Rear Curtain Shield Airbag)
14. INITIALIZATION AFTER RECONNECTING BATTERY TERMINAL (w/ Rear Curtain Shield Airbag)
- HINT:
-
When disconnecting and reconnecting the battery, there is an automatic learning function that completes learning when the respective system is used.
15. CHECK SRS WARNING LIGHT (w/ Rear Curtain Shield Airbag)
16. PERFORM DIAGNOSTIC SYSTEM CHECK (w/ Rear Curtain Shield Airbag)