THEFT DETERRENT / KEYLESS ENTRY SMART ENTRY AND START SYSTEM(for Entry Function, HEV Model) All Door Entry Lock/Unlock Functions and Wireless Functions do not Operate
DESCRIPTION
If the entry lock and wireless door lock operations cannot be performed, the door control receiver assembly may be malfunctioning, or there may be wave interference or problems in the communication which is used for the entry and wireless function between the door control receiver assembly and certification ECU (smart key ECU assembly).
WIRING DIAGRAM
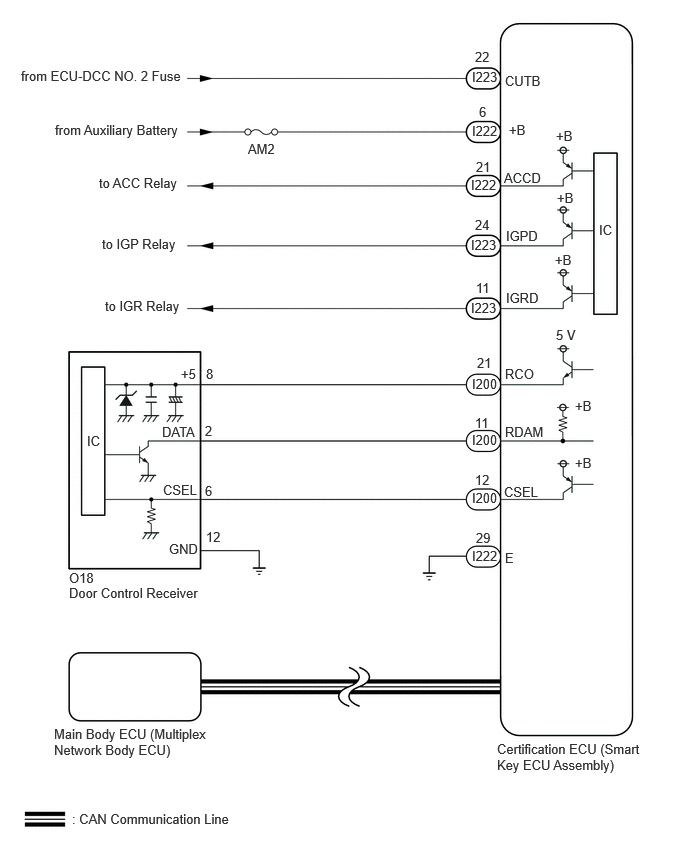
CAUTION / NOTICE / HINT
- NOTICE:
- ·
When using the GTS with the ignition switch off, connect the GTS to the DLC3 and turn a courtesy light switch on and off at intervals of 1.5 seconds or less until communication between the GTS and the vehicle begins. Then select Model Code "KEY REGIST" under manual mode and enter the following menus: Body Electrical / Entry&Start(CAN). While using the GTS, periodically turn a courtesy light switch on and off at intervals of 1.5 seconds or less to maintain communication between the GTS and the vehicle.
·The smart entry and start system (for Entry Function) uses the CAN communication system. Inspect the communication function by following How to Proceed with Troubleshooting. Troubleshoot the smart entry and start system (for Entry Function) after confirming that the communication systems are functioning properly.
·Before replacing the certification ECU (smart key ECU assembly) or main body ECU (multiplex network body ECU), refer to Service Bulletin.
·Check that there are no electrical key transmitter sub-assemblies in the vehicle.
·Before performing the inspection, check that DTC B124296 (wireless door lock control) is not output.
·After repair, confirm that no DTCs are output.
·Inspect the fuses for circuits related to this system before performing the following procedure.
PROCEDURE
Measure the auxiliary battery voltage with the ignition switch off.
- Standard Voltage:
11 to 14 V
- HINT:
-
It may be possible to tell whether the auxiliary battery is discharged by operating the horn.
-
If the voltage is below 11 V, recharge or replace the auxiliary battery before proceeding to the next step.
- Result:
Proceed to NEXT
NEXT
Check the operation of the entry lock and unlock functions, and wireless door lock function.
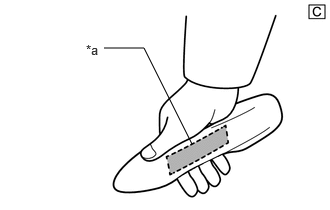
| *a | Unlock Sensor (Backside) |
Check that the entry unlock function.
Turn the ignition switch off.
Open and close the driver door.
With the electrical key transmitter sub-assembly outside of the vehicle, press the lock switch of the electrical key transmitter sub-assembly to lock all of the doors.
Hold the electrical key transmitter sub-assembly at the same height as the door outside handle assembly LH and approximately 0.3 m (0.984 ft.) from the driver door.
Check that the LED of the electrical key transmitter sub-assembly blinks.
Touch the unlock sensor on the backside of the front door outside handle assembly LH for 2 seconds or more.*
*: Perform this step 3 seconds or more after performing step (3).
- HINT:
- ·
When checking the operation of the unlock sensor again, make sure to perform the procedure from step (1).
·Perform the same inspection for the front passenger door.
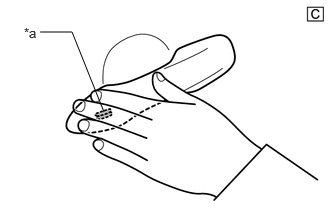
| *a | Lock Sensor |
Check that the entry lock function.
Turn the ignition switch off.
Open and close the driver door.
Hold the electrical key transmitter sub-assembly at the same height as the door outside handle assembly LH and approximately 0.3 m (0.984 ft.) from the driver door.
Touch the lock sensor of the front door outside handle assembly LH (groove on the front door outside handle) with 2 or more fingers for 2 seconds or more.
- HINT:
- ·
If the door does not lock even when touching the lock sensor for 2 seconds or more, touch it with your palm.
·When checking the operation of the lock sensor again, make sure to perform the procedure from step (1).
·When checking the operation of the entry lock function several times, it can be operated up to 2 times consecutively. To operate the function 3 times or more consecutively, the doors need to be unlocked once. However, this is only for the entry lock function, other door lock operations, such as a wireless door lock operation can be performed consecutively.
·Perform the same inspection for the front passenger door.
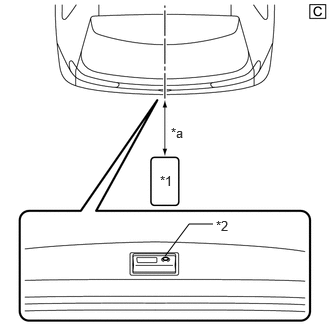
| *1 | Electrical Key Transmitter Sub-assembly |
| *2 | Back Door Opener Switch Assembly (Open Switch) |
| *a | 0.7 to 1 m (2.30 to 3.28 ft.) |
Check the entry back door open function.
With the back door closed and locked, press the lock switch of the back door opener switch sub-assembly while carrying the electrical key transmitter assembly and check that the back door opens.
| *1 | Electrical Key Transmitter Sub-assembly |
| *2 | Back Door Opener Switch Assembly (Lock Switch) |
| *a | 0.3 m (0.984 ft.) |
Check the entry back door lock function.
With the back door closed and unlocked, press the lock switch of the back door opener switch assembly while carrying the electrical key transmitter sub-assembly outside of the vehicle and check that the back door locks.
Check that the wireless door lock function.
- Result:
Result Proceed to All door entry lock/unlock functions and wireless functions do not operate A All door entry lock/unlock functions do not operate, but wireless functions operate B Entry lock/unlock functions do not operate for one or more doors, but wireless functions operate Entry lock function does not operate for one or more doors, but entry unlock and wireless functions operate Entry unlock function does not operate for one or more doors, but entry lock and wireless functions operate All entry and wireless functions operate C
A
B
C
Check that the door open/close-linked function operates normally.
- Result:
Result Proceed to Door open/close-linked function operates normally A Door open/close-linked function does not operate normally B
A
B
When the door control switch on the multiplex network master switch assembly is operated, check that the doors unlock and lock according to the switch operation.
- Result:
Result Proceed to Power door lock function operates normally A Power door lock function does not operate normally B
A
B
Check the following antennas in key diagnostic mode.
- Body Electrical > Entry&Start > Utility
-
Tester Display Communication Check(Key Diag Mode) - 50005 440 2541
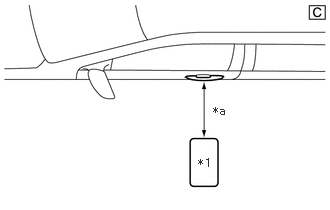
| *1 | Electrical Key Transmitter Sub-assembly |
| *a | 0.7 to 1 m (2.30 to 3.28 ft.) |
Check the electrical key antenna (for driver door):
When the electrical key transmitter sub-assembly is brought within 0.7 to 1 m (2.30 to 3.28 ft.) of the front door outside handle assembly LH, check that the buzzer sounds.
- HINT:
- ·
Select either channel 1 or channel 2 and perform the key diagnostic mode inspection for each channel.
·If the buzzer sounds with [CH1] displayed but not with [CH2], the electrical key transmitter sub-assembly cannot be detected by channel 2 due to a malfunction, such as wave interference.
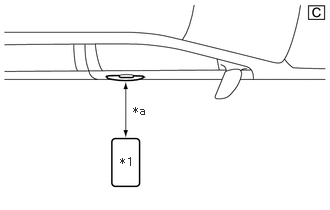
| *1 | Electrical Key Transmitter Sub-assembly |
| *a | 0.7 to 1 m (2.30 to 3.28 ft.) |
Check the electrical key antenna (for front passenger door):
When the electrical key transmitter sub-assembly is brought within 0.7 to 1 m (2.30 to 3.28 ft.) of the front door outside handle assembly RH, check that the buzzer sounds.
- HINT:
- ·
Select either channel 1 or channel 2 and perform the key diagnostic mode inspection for each channel.
·If the buzzer sounds with [CH1] displayed but not with [CH2], the electrical key transmitter sub-assembly cannot be detected by channel 2 due to a malfunction, such as wave interference.
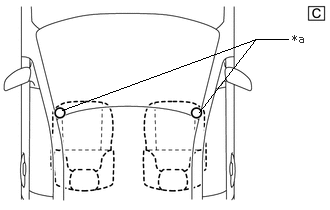
| *a | Inspection Point |
Check the No. 1 indoor electrical key antenna assembly (front floor):
When the electrical key transmitter sub-assembly is at either inspection point, check that the buzzer sounds.
- HINT:
- ·
Select either channel 1 or channel 2 and perform the key diagnostic mode inspection for each channel.
·If the buzzer sounds with [CH1] displayed but not with [CH2], the electrical key transmitter sub-assembly cannot be detected by channel 2 due to a malfunction, such as wave interference.
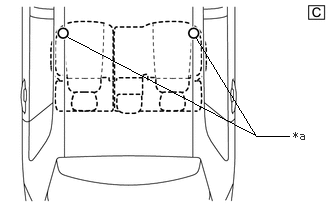
| *a | Inspection Point |
Check the No. 3 indoor electrical key antenna assembly (inside luggage compartment):
When the electrical key transmitter sub-assembly is at either inspection point, check that the buzzer sounds.
- HINT:
- ·
Select either channel 1 or channel 2 and perform the key diagnostic mode inspection for each channel.
·If the buzzer sounds with [CH1] displayed but not with [CH2], the electrical key transmitter sub-assembly cannot be detected by channel 2 due to a malfunction, such as wave interference.
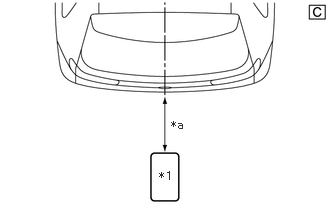
| *1 | Electrical Key Transmitter Sub-assembly |
| *a | 0.7 to 1 m (2.30 to 3.28 ft.) |
Check the electrical key antenna (outside luggage compartment):
When the electrical key transmitter sub-assembly is brought within 0.7 to 1 m (2.30 to 3.28 ft.) of the electrical key antenna (outside luggage compartment), check that the buzzer sounds.
- HINT:
- ·
Select either channel 1 or channel 2 and perform the key diagnostic mode inspection for each channel.
·If the buzzer sounds with [CH1] displayed but not with [CH2], the electrical key transmitter sub-assembly cannot be detected by channel 2 due to a malfunction, such as wave interference.
- OK:
Buzzer sounds.
- Result:
Result Proceed to Key diagnostic mode inspections fail for both channels A Key diagnostic mode inspections succeed for both channels B Key diagnostic mode inspection succeeds for only one of the channels C
A
B
C
Bring the electrical key transmitter sub-assembly near the door control receiver and perform a wireless operation 2 or more times*.
*: When the wireless function is operated, channel 1 and 2 are used alternately. If the first wireless operation is performed successfully and the second wireless operation fails, wave interference may be occurring for either channel.
- HINT:
- ·
When the electrical key transmitter sub-assembly is brought near the door control receiver, the possibility of wave interference decreases, and it can be determined if wave interference is causing the problem symptom.
·If the inspection result is that the problem only occurs in certain locations or at certain times of day, the possibility of wave interference is high. Also, added vehicle components may cause wave interference. If installed, remove them and perform the operation check.
·There may be wave interference if the vehicle is near broadcasting antennas, large video displays, wireless garage door opener systems, wireless security cameras, home security systems, etc. In this case, move the vehicle to a different location and check if there is any improvement.
·If a tool for checking radio waves, such as a signal strength meter, is available, move around the area while observing both the LF band (used by the vehicle antenna to form the detection area) and RF band (used by the electrical key transmitter sub-assembly for transmission) to check for locations where there is wave interference.
- Result:
Result Proceed to Wireless function does not operate normally A Wireless function operates normally B
A
B
Check the transmitter battery level of the electrical key transmitter sub-assembly that was checked first.
Press and hold the lock switch of the electrical key transmitter sub-assembly for 5 seconds and check the number of times that the LED illuminates.
- HINT:
- ·
The electrical key transmitter sub-assembly sends voltage information to the certification ECU (smart key ECU assembly) when it is being used. "Yes" is displayed for the Data List item "Key Low Battery" when this voltage information indicates 2.2 V or less.
·Even if the transmitter battery is depleted, it is still possible to start the hybrid control system by holding the electrical key transmitter sub-assembly near the power switch, depressing the brake pedal and pressing the power switch.
- Result:
Result Proceed to LED illuminates 3 times or more when switch is pressed and held A LED does not illuminate when switch is pressed and held B LED illuminates once or twice but not a third time C
A
B
C
Check if there is another electrical key transmitter sub-assembly available that is already registered to the vehicle.
- Result:
Result Proceed to Another registered electrical key transmitter sub-assembly is not available A Another registered electrical key transmitter sub-assembly is available B
A
B
Register a new electrical key transmitter sub-assembly.
- HINT:
-
Refer to Service Bulletin.
- Result:
Proceed to NEXT
NEXT
Using another registered electrical key transmitter sub-assembly, check that the function operates normally.
- Result:
Result Proceed to Entry function does not operate normally A Entry function operates normally B
A
B
Disconnect the O200 certification ECU (smart key ECU assembly) connector.
Disconnect the O18 door control receiver connector.
Measure the resistance according to the value(s) in the table below.
- Standard Resistance:
Tester Connection Condition Specified Condition O200-21 (RCO) - O18-8 (+5) Always Below 1 Ω O200-11 (RDAM) - O18-2 (DATA) Always Below 1 Ω O200-12 (CSEL) - O18-6 (CSEL) Always Below 1 Ω O18-12 (GND) - Body ground Always Below 1 Ω O200-21 (RCO) or O18-8 (+5) - Other terminals and body ground Always 10 kΩ or higher O200-11 (RDAM) or O18-2 (DATA) - Other terminals and body ground Always 10 kΩ or higher O200-12 (CSEL) or O18-6 (CSEL) - Other terminals and body ground Always 10 kΩ or higher
- Result:
Proceed to OK NG
OK
NG
Connect all connectors and check that the function operates normally.
- Result:
Result Proceed to Entry function does not operate normally A Entry function operates normally B
A
B
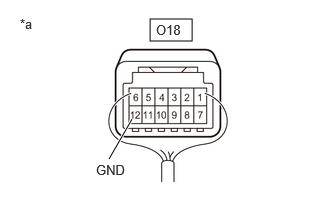
| *a | Component with harness connected
(Door Control Receiver) |
Measure the resistance according to the value(s) in the table below.
- Standard Resistance:
Tester Connection Condition Specified Condition O18-12 (GND) - Body ground Always Below 1 Ω
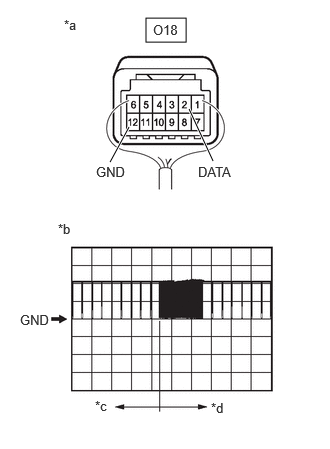
| *a | Component with harness connected
(Door Control Receiver) |
| *b | Waveform 1 |
| *c | Before lock or unlock switch of electrical key transmitter sub-assembly pressed |
| *d | After lock or unlock switch of electrical key transmitter sub-assembly pressed |
Using an oscilloscope, check the waveform.
- OK:
Tester Connection Condition Tool Setting Specified Condition O18-2 (DATA) - O18-12 (GND) Procedure:
1.Ignition switch off
2.All doors locked
3.Electrical key transmitter sub-assembly not inside vehicle
4.Electrical key transmitter sub-assembly brought outside detection area but kept inside wireless function operational area
5.Lock or unlock switch of electrical key transmitter sub-assembly not pressed → pressed
5 V/DIV., 500 ms./DIV. Pulse generation
(See waveform 1)
- Result:
Proceed to OK NG
OK
NG
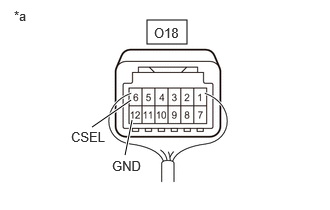
| *a | Component with harness connected
(Door Control Receiver) |
Measure the voltage according to the value(s) in the table below.
- Standard Voltage:
Tester Connection Condition Specified Condition O18-6 (CSEL) - O18-12 (GND) Procedure:
1.Ignition switch off
2.All doors closed
Below 1 V → Pulse generation
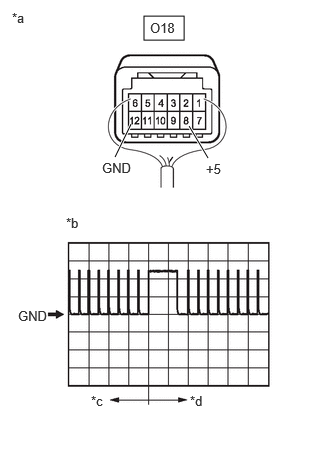
| *a | Component with harness connected
(Door Control Receiver) |
| *b | Waveform 1 |
| *c | Before lock or unlock switch of electrical key transmitter sub-assembly pressed |
| *d | After lock or unlock switch of electrical key transmitter sub-assembly pressed |
Using an oscilloscope, check the waveform.
- OK:
Tester Connection Condition Tool Setting Specified Condition O18-8 (+5) - O18-12 (GND) Procedure:
1.Ignition switch off
2.Electrical key transmitter sub-assembly brought outside detection area but kept inside wireless function operational area
3.Lock or unlock switch of electrical key transmitter sub-assembly not pressed → pressed
2 V/DIV., 500 ms./DIV. Pulse generation
(See waveform 1)
- Result:
Proceed to OK NG
OK
NG
Replace the certification ECU (smart key ECU assembly) and perform registration again.
- HINT:
-
Refer to Service Bulletin.
- Result:
Proceed to NEXT
NEXT
Check that the wireless function operates normally.
- Result:
Result Proceed to Wireless door lock function operates normally A Wireless door lock function does not operate normally B
A
B
Inspect the transmitter battery.
- NOTICE:
-
Do not wrap the lead wire around a terminal, wedge it between terminals, or solder it. The terminal may be deformed or damaged, and the transmitter battery will not be able to be installed correctly.
- Result:
Proceed to OK NG
OK
NG
Perform registration of the B code.
- HINT:
-
Refer to Service Bulletin (ECU CODE REGISTRATION).
- Result:
Proceed to NEXT
NEXT
After completing B code registration, check that the entry lock and unlock functions can be operated 2 times consecutively.
- Result:
Result Proceed to Entry function does not operate normally A Entry function operates normally B
A
B
Connect the GTS to the DLC3.
Read the Data List according to the display on the GTS.
- Body Electrical > Entry&Start > Data List
-
Tester Display Measurement Item Range Normal Condition Diagnostic Note B Code Registered B code registration status No or Yes No: B code is not registered properly
Yes: B code is registered properly-
- Body Electrical > Entry&Start > Data List
-
Tester Display B Code Registered - 50003 440 23
- Result:
Result Proceed to "No" is displayed on the GTS A "Yes" is displayed on the GTS B
A
B
Measure the voltage while checking the Data List on the GTS.
Read the Data List according to the display on the GTS.
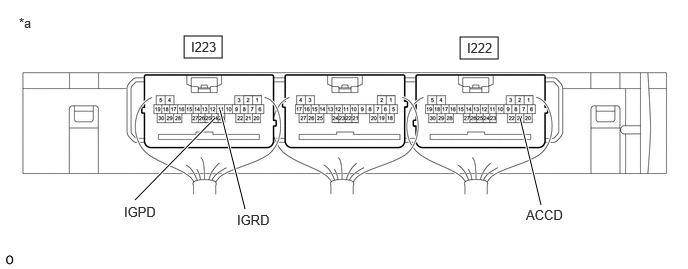
| *a | Component with harness connected
(Certification ECU (Smart Key ECU Assembly)) |
- | - |
- Body Electrical > Power Source Control > Data List
-
Tester Display Measurement Item Range Normal Condition Diagnostic Note Power Supply Condition Power supply state OFF, ACC ON, IGR ON, IGP ON or Starter ON OFF: Ignition switch off
ACC ON: Ignition switch ACC
IGR ON: Ignition switch ON
IGP ON: Ignition switch ON
Starter ON: Sending hybrid control system start request signal-
- Body Electrical > Power Source Control > Data List
-
Tester Display Power Supply Condition - 50003 454 405
- Standard Voltage:
Tester Connection Switch Condition Specified Condition I223-11 (IGRD) - Body ground Ignition switch off Below 1 V Ignition switch ACC Below 1 V Ignition switch ON 9 V or higher I223-24 (IGPD) - Body ground Ignition switch off Below 1 V Ignition switch ACC Below 1 V Ignition switch ON 9 V or higher I222-21 (ACCD) - Body ground Ignition switch off Below 1 V Ignition switch ACC 8.5 V or higher Ignition switch ON 8.5 V or higher
- Result:
Proceed to OK NG
OK
NG
Read the Data List according to the display on the GTS.
- Body Electrical > Main Body > Data List
-
Tester Display Measurement Item Range Normal Condition Diagnostic Note IGR Power Ignition switch status OFF or ON OFF: Ignition switch off
ON: Ignition switch ON-
- Body Electrical > Main Body > Data List
-
Tester Display IGR Power - 50003 449 122
- HINT:
-
If the certification ECU (smart key ECU assembly) misjudges for any reason that the ignition switch is on (IG) even though the ignition switch is off, the entry lock and unlock functions will be disabled.
- Result:
Result Proceed to The main body ECU (multiplex network body ECU) judges properly that the power source is off when the ignition switch is off A The main body ECU (multiplex network body ECU) does not judge properly that the power source is off when the ignition switch is off B
A
B
Disconnect and reconnect the certification ECU (smart key ECU assembly) connectors.
Check that the function operates normally.
- Result:
Result Proceed to Entry function does not operate normally A Entry function operates normally B
A
B
Replace the certification ECU (smart key ECU assembly) with a new one and perform registration again.
- HINT:
-
Refer to Service Bulletin.
- Result:
Proceed to NEXT
NEXT
Check that the function operates normally.
- Result:
Result Proceed to Wireless door lock function operates normally A Wireless door lock function does not operate normally B
A
B
Bring the electrical key transmitter sub-assembly near the door control receiver and perform a wireless operation 2 or more times*.
*: When the wireless function is operated, channel 1 and 2 are used alternately. If the first wireless operation is performed successfully and the second wireless operation fails, wave interference may be occurring for either channel.
- HINT:
- ·
When the electrical key transmitter sub-assembly is brought near the door control receiver, the possibility of wave interference decreases, and it can be determined if wave interference is causing the problem symptom.
·If the inspection result is that the problem only occurs in certain locations or at certain times of day, the possibility of wave interference is high. Also, added vehicle components may cause wave interference. If installed, remove them and perform the operation check.
·There may be wave interference if the vehicle is near broadcasting antennas, large video displays, wireless garage door opener systems, wireless security cameras, home security systems, etc. In this case, move the vehicle to a different location and check if there is any improvement.
·If a tool for checking radio waves, such as a signal strength meter, is available, move around the area while observing both the LF band (used by the vehicle antenna to form the detection area) and RF band (used by the electrical key transmitter sub-assembly for transmission) to check for locations where there is wave interference.
- Result:
Result Proceed to Wireless function does not operate normally A Wireless function operates normally 1 or more times. B
A
B
Check if there is another electrical key transmitter sub-assembly available that is already registered to the vehicle.
- Result:
Result Proceed to Another registered electrical key transmitter sub-assembly is not available A Another registered electrical key transmitter sub-assembly is available B
A
B
Register a new electrical key transmitter sub-assembly.
- HINT:
-
Refer to Service Bulletin.
- Result:
Proceed to NEXT
NEXT
Enter key diagnostic mode and select the channel for which the combination meter assembly buzzer did not sound and perform the inspection again using a different electrical key transmitter sub-assembly than was used in the initial inspection.
- Body Electrical > Entry&Start > Utility
-
Tester Display Communication Check(Key Diag Mode) - 50005 440 2541
- Result:
Result Proceed to Buzzer does not sound A Buzzer sounds B
A
B
Disconnect the O18 door control receiver connector.
Disconnect the O200 certification ECU (smart key ECU assembly) connector.
Measure the resistance according to the value(s) in the table below.
- Standard Resistance:
Tester Connection Condition Specified Condition O18-6 (CSEL) - O200-12 (CSEL) Always Below 1 Ω O18-6 (CSEL) or O200-12 (CSEL) - Other terminals and body ground Always 10 kΩ or higher
- Result:
Proceed to OK NG
OK
NG
Connect all connectors and check that the function operates normally.
- Result:
Result Proceed to Entry function does not operate normally A Entry function operates normally B
A
B
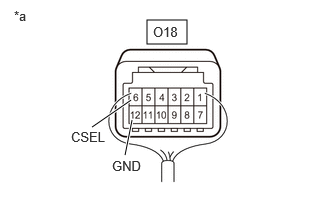
| *a | Component with harness connected
(Door Control Receiver) |
Measure the voltage according to the value(s) in the table below.
- Standard Voltage:
Tester Connection Condition Specified Condition O18-6 (CSEL) - O18-12 (GND) Procedure:
1.Ignition switch off
2.All doors closed
Below 1 V → Pulse generation
- Result:
Proceed to OK NG
OK
NG
Enter key diagnostic mode and select the channel for which the buzzer did not sound.
- Body Electrical > Entry&Start > Utility
-
Tester Display Communication Check(Key Diag Mode) - 50005 440 2541
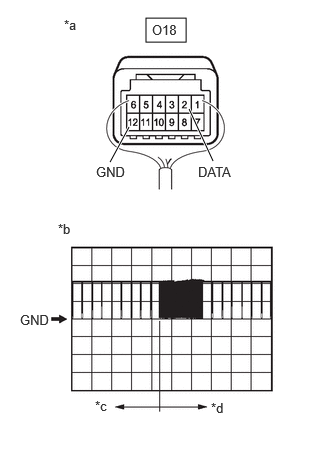
| *a | Component with harness connected
(Door Control Receiver) |
| *b | Waveform 1 |
| *c | Before lock or unlock switch of electrical key transmitter sub-assembly pressed |
| *d | After lock or unlock switch of electrical key transmitter sub-assembly pressed |
Using an oscilloscope, check the waveform.
- OK:
Tester Connection Condition Tool Setting Specified Condition O18-2 (DATA) - O18-12 (GND) Procedure:
1.Ignition switch off
2.All doors locked
3.Electrical key transmitter sub-assembly not inside vehicle
4.Electrical key transmitter sub-assembly brought outside detection area but kept inside wireless function operational area
5.Lock or unlock switch of electrical key transmitter sub-assembly not pressed → pressed
5 V/DIV., 500 ms./DIV. Pulse generation
(See waveform 1)
- HINT:
-
Inspection should be performed while the electrical key antenna check in key diagnostic mode is being performed on the failed channel (the channel in which the buzzer did not sound).
- Result:
Proceed to OK NG
OK
NG
Replace the certification ECU (smart key ECU assembly) and perform registration again.
- HINT:
-
Refer to Service Bulletin.
- Result:
Proceed to NEXT
NEXT
Check that the function operates normally.
- Result:
Result Proceed to Wireless door lock function operates normally A Wireless door lock function does not operate normally B
A
B