7GR-FKS ENGINE CONTROL SFI SYSTEM Starter Signal Circuit
DESCRIPTION
While the engine is being cranked, current flows from terminal ST2 of the ignition switch assembly*1 or terminal STAR of the certification ECU (smart key ECU assembly)*2 to the park/neutral position switch assembly*3 or clutch start switch assembly*4 and to terminal STA of the ECM (STA signal).
*1: w/o Entry and Start System
*2: w/ Entry and Start System
*3: for Automatic Transmission Models
*4: for Manual Transmission Models
WIRING DIAGRAM
Refer to DTC P061512.
CAUTION / NOTICE / HINT
- NOTICE:
- ·
Inspect the fuses for circuits related to this system before performing the following procedure.
·After the ignition switch is turned off, there may be a waiting time before disconnecting the negative (-) battery terminal.
·When disconnecting and reconnecting the battery.
- HINT:
-
When disconnecting and reconnecting the battery, there is an automatic learning function that completes learning when the respective system is used.
PROCEDURE
Check if the engine can be cranked.
- Result:
Result Proceed to Engine cannot be cranked A Engine can be cranked B
A
B
Connect the GTS to the DLC3.
Turn the ignition switch to ON.
Turn the GTS on.
Enter the following menus: Powertrain / Engine / Data List / Starter SW.
- Powertrain > Engine > Data List
-
Tester Display Starter SW - 50003 372 11
Fully depress the clutch pedal (for Manual Transmission Models with Clutch Start System).
Check the value displayed on the GTS when the ignition switch is turned to the ON and START positions.
- OK:
Condition GTS Display (Starter SW) Ignition switch ON OFF Engine started ON
- Result:
Result Proceed to NG (for Automatic Transmission Models) A NG (for Manual Transmission Models) B OK C
A
B
C
Inspect the park/neutral position switch.
- Result:
Result Proceed to OK (w/ Entry and Start System) A OK (w/o Entry and Start System) B NG C
A
B
C
Disconnect the park/neutral position switch assembly connector.
Remove the STARTER relay from No. 1 engine room relay block and junction block assembly.
Disconnect the ECM connector.
Disconnect the certification ECU (smart key ECU assembly) connector.
Measure the resistance according to the value(s) in the table below.
- Standard Resistance:
Tester Connection Condition Specified Condition E92-5 (L) - 2 (STARTER relay) Always Below 1 Ω N1-12 (STA) - 2 (STARTER relay) Always Below 1 Ω E92-5 (L), 2 (STARTER relay), N1-12 (STA) or N154-20 (STA) - Body ground and other terminals Always 10 kΩ or higher
- Result:
Proceed to OK NG
OK
NG
Disconnect the certification ECU (smart key ECU assembly) connector.
Disconnect the park/neutral position switch assembly connector.
Disconnect the ECM connector.
Measure the resistance according to the value(s) in the table below.
- Standard Resistance:
Tester Connection Condition Specified Condition N154-9 (STAR) - E92-4 (B) Always Below 1 Ω N154-9 (STAR) - N1-13 (NSW) Always Below 1 Ω N154-9 (STAR), E92-4 (B) or N1-13 (NSW) - Body ground and other terminals Always 10 kΩ or higher
- Result:
Proceed to OK NG
OK
NG
Disconnect the park/neutral position switch assembly connector.
Remove the STARTER relay from No. 1 engine room relay block and junction block assembly.
Disconnect the ECM connector.
Measure the resistance according to the value(s) in the table below.
- Standard Resistance:
Tester Connection Condition Specified Condition E92-5 (L) - 2 (STARTER relay) Always Below 1 Ω N1-12 (STA) - 2 (STARTER relay) Always Below 1 Ω E92-5 (L), 2 (STARTER relay) or N1-12 (STA) - Body ground and other terminals Always 10 kΩ or higher
- Result:
Proceed to OK NG
OK
NG
Disconnect the ignition switch assembly connector.
Disconnect the park/neutral position switch assembly connector.
Disconnect the ECM connector.
Measure the resistance according to the value(s) in the table below.
- Standard Resistance:
Tester Connection Condition Specified Condition N28-4 (ST2) - E92-4 (B) Always Below 1 Ω N28-4 (ST2) - N1-13 (NSW) Always Below 1 Ω N28-4 (ST2), E92-4 (B) or N1-13 (NSW) - Body ground and other terminals Always 10 kΩ or higher
- Result:
Proceed to OK NG
OK
NG
Inspect the ignition switch assembly.
- Result:
Proceed to OK NG
OK
NG
Inspect the clutch start switch assembly.
- Result:
Proceed to OK NG
OK
NG
Disconnect the clutch start switch assembly connector.
Remove the STARTER relay from No. 1 engine room relay block and junction block assembly.
Disconnect the ECM connector.
Disconnect the certification ECU (smart key ECU assembly) connector.
Measure the resistance according to the value(s) in the table below.
- Standard Resistance:
Tester Connection Condition Specified Condition M7-2 (L) - 2 (STARTER relay) Always Below 1 Ω N1-12 (STA) - 2 (STARTER relay) Always Below 1 Ω A15-20 (STA), 2 (STARTER relay), M7-2 (L) or N1-12 (STA) - Body ground and other terminals Always 10 kΩ or higher
- Result:
Proceed to OK NG
OK
NG
Disconnect the ignition switch assembly connector.
Disconnect the clutch start switch assembly connector.
Disconnect the ECM connector.
Measure the resistance according to the value(s) in the table below.
- Standard Resistance:
Tester Connection Condition Specified Condition N28-4 (ST2) - M7-1 (B) Always Below 1 Ω N28-4 (ST2) - N1-13 (NSW) Always Below 1 Ω N28-4 (ST2), M7-1 (B) or N1-13 (NSW) - Body ground and other terminals Always 10 kΩ or higher
- Result:
Proceed to OK NG
OK
NG
Inspect the STARTER relay.
- Result:
Proceed to OK NG
OK
NG
Inspect the starter assembly.
- Result:
Proceed to OK NG
OK
NG
Remove the STARTER relay from No. 1 engine room relay block and junction block assembly.
Disconnect the starter assembly connector.
Measure the resistance according to the value(s) in the table below.
- Standard Resistance:
Tester Connection Condition Specified Condition 3 (STARTER relay) - F5-1 (ST) Always Below 1 Ω 3 (STARTER relay) or F5-1 (ST) - Body ground and other terminals Always 10 kΩ or higher
- Result:
Proceed to OK NG
OK
NG
Disconnect the cable from the negative (-) battery terminal.
Disconnect the cable from the positive (+) battery terminal.
Disconnect the starter assembly connector.
Measure the resistance according to the value(s) in the table below.
- Standard Resistance:
Tester Connection Condition Specified Condition Positive (+) battery terminal - F2-1 (B) Always Below 1 Ω
- Result:
Proceed to OK NG
OK
NG
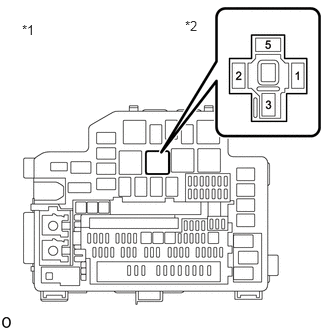
| *1 | No. 1 Engine Room Relay Block and Junction Block Assembly |
| *2 | STARTER Relay |
Remove the STARTER relay from No. 1 engine room relay block and junction block assembly
Measure the voltage according to the value(s) in the table below.
- Standard Voltage:
Tester Connection Condition Specified Condition 5 (STARTER relay) - Body ground Always 11 to 14 V
- Result:
Proceed to OK NG
OK
NG
Remove the STARTER relay from No. 1 engine room relay block and junction block assembly.
Measure the resistance according to the value(s) in the table below.
- Standard Resistance:
Tester Connection Condition Specified Condition 1 (STARTER relay) - Body ground Always Below 1 Ω
- Result:
Result Proceed to OK (for Automatic Transmission Models) A OK (for Manual Transmission Models) B NG C
A
B
C
Remove the STARTER relay from the No. 1 engine room relay block and junction block assembly.
Disconnect the park/neutral position switch assembly connector.
Measure the resistance according to the value(s) in the table below.
- Standard Resistance:
Tester Connection Condition Specified Condition 2 (STARTER relay) - E92-5 (L) Always Below 1 Ω
- Result:
Proceed to OK NG
OK
NG
Remove the STARTER relay from the No. 1 engine room relay block and junction block assembly.
Disconnect the clutch start switch assembly connector.
Measure the resistance according to the value(s) in the table below.
- Standard Resistance:
Tester Connection Condition Specified Condition 2 (STARTER relay) - M7-2 (L) Always Below 1 Ω
- Result:
Proceed to OK NG
OK
NG
Connect the GTS to the DLC3.
Turn the ignition switch to ON.
Turn the GTS on.
Enter the following menus: Powertrain / Engine / Data List / Starter SW.
- Powertrain > Engine > Data List
-
Tester Display Starter SW - 50003 372 11
Fully depress the clutch pedal (for Manual Transmission Models with Clutch Start System).
Check the value displayed on the GTS when the ignition switch is turned to the ON and START positions.
- OK:
Condition GTS Display (Starter SW) Ignition switch ON OFF Engine started ON
- Result:
Proceed to OK NG
OK
NG