RM35X0E _56 Audio / Visual / Telematics _078379 NAVIGATION / MULTI INFO DISPLAY _0380999 NAVIGATION SYSTEM J

NAVIGATION / MULTI INFO DISPLAY  NAVIGATION SYSTEM  Radio Broadcast cannot be Received or Poor Reception  


WIRING DIAGRAM
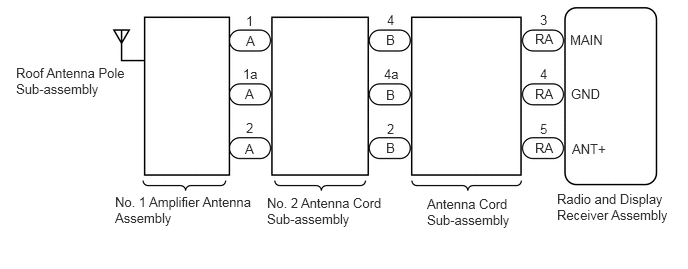
E408585E01
0.167,0.677 1.344,1.073 1.177,0.396 10 false Roof Antenna Pole Sub-assembly 1.198,2.021 2.656,2.438 1.458,0.417 10 false No. 1 Amplifier Antenna Assembly 2.781,2.031 4.031,2.469 1.25,0.438 10 false No. 2 Antenna Cord Sub-assembly 4.448,2.042 5.344,2.49 0.896,0.448 10 false Antenna Cord Sub-assembly 5.802,1.99 7,2.438 1.198,0.448 10 false Radio and Display Receiver Assembly 5.573,0.323 5.885,0.521 0.313,0.198 10 false RA 5.573,0.896 5.885,1.094 0.313,0.198 10 false RA 5.573,1.458 5.885,1.656 0.313,0.198 10 false RA 4.021,0.333 4.333,0.531 0.313,0.198 10 false B 4.021,0.906 4.333,1.104 0.313,0.198 10 false B 4.021,1.458 4.333,1.656 0.313,0.198 10 false B 2.552,1.469 2.865,1.667 0.313,0.198 10 false A 2.552,0.896 2.865,1.094 0.313,0.198 10 false A 2.563,0.344 2.875,0.542 0.313,0.198 10 false A 2.563,0.135 2.875,0.333 0.313,0.198 10 false 1 2.563,1.25 2.875,1.448 0.313,0.198 10 false 2 4.031,0.125 4.344,0.323 0.313,0.198 10 false 4 5.625,0.125 5.938,0.323 0.313,0.198 10 false 3 4.031,1.26 4.344,1.458 0.313,0.198 10 false 2 5.625,1.26 5.938,1.458 0.313,0.198 10 false 5 2.531,0.688 2.844,0.885 0.313,0.198 10 false 1a 4,0.688 4.313,0.885 0.313,0.198 10 false 4a 5.625,0.688 5.938,0.885 0.313,0.198 10 false 4 5.938,0.333 6.49,0.563 0.552,0.229 10 false MAIN 5.958,1.469 6.51,1.698 0.552,0.229 10 false ANT+ 5.948,0.896 6.5,1.125 0.552,0.229 10 false GND

CAUTION / NOTICE / HINT

NOTICE:

When replacing the radio and display receiver assembly, always replace it with a new one. If a radio and display receiver assembly which was installed to another vehicle is used, the following may occur:

·

A communication malfunction DTC may be stored.

·

The radio and display receiver assembly may not operate normally.


HINT:

Depending on the parts that are replaced during vehicle inspection or maintenance, performing initialization, registration or calibration may be needed. Refer to Precaution for Navigation System.

Click hereAudio / Visual / Telematics>NAVIGATION / MULTI INFO DISPLAY>NAVIGATION SYSTEM>PRECAUTION


PROCEDURE

1.CHECK RADIO AND DISPLAY RECEIVER ASSEMBLY
a.

Check the radio automatic station search function.

i.

Check the radio automatic station search function by activating it.

Result:
Result Proceed to
Automatic station search function does not stop. A
Automatic station search function stops on a station. B


A

2.CHECK OPTIONAL COMPONENTS

B

2.CHECK OPTIONAL COMPONENTS
a.

Check if any optional components that may decrease reception capacity, such as a sunshade film or telephone antenna, are installed.

Result:
Result Proceed to
Optional components are not installed. A
Optional components are installed. B


NOTICE:

Do not remove optional components without the permission of the customer.


A

3.CHECK RADIO AND DISPLAY RECEIVER ASSEMBLY

B

REMOVE OPTIONAL COMPONENTS AND CHECK AGAIN (SEE NOTICE ABOVE)

3.CHECK RADIO AND DISPLAY RECEIVER ASSEMBLY
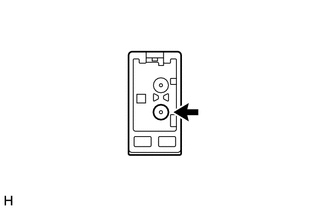
a.
E245523

Preparation for check

i.

Disconnect the antenna connector from the radio and display receiver assembly.


b.

Check for noise

i.

Turn the ignition switch to ACC with the radio and display receiver assembly connector connected.


ii.

Turn the radio on and tune into AM mode.


iii.

Place a screwdriver, thin wire or other metal object on the radio and display receiver assembly antenna jack and check that noise can be heard from the speakers.

OK:

Noise can be heard from the speakers.


Result:
Proceed to
OK
NG


OK

4.INSPECT RADIO AND DISPLAY RECEIVER ASSEMBLY

NG

4.INSPECT RADIO AND DISPLAY RECEIVER ASSEMBLY
a.

Disconnect the RA radio and display receiver assembly connector.
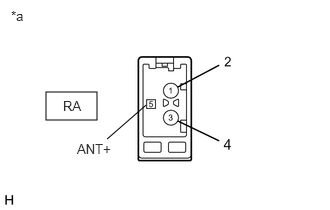

b.
E188455C09
0.479,0.958 1.01,1.25 0.531,0.292 1.521,1.094 1.115,1.448 false 0.115,0.083 0.292,0.25 0.177,0.167 10 *a 0.656,1.021 0.948,1.188 0.292,0.167 10 RA 0.802,1.469 1.198,1.635 0.396,0.167 10 ANT+
*a Component without harness connected
(Radio and Display Receiver Assembly)


Measure the voltage according to the value(s) in the table below.

Standard Voltage:
Tester Connection Condition Specified Condition
RA-5 (ANT+) - Body ground Ignition switch ACC
Radio switch on and FM or AM selected
11 to 14 V


Result:
Proceed to
OK
NG


OK

5.CHECK NO. 2 ANTENNA CORD SUB-ASSEMBLY

NG

5.CHECK NO. 2 ANTENNA CORD SUB-ASSEMBLY
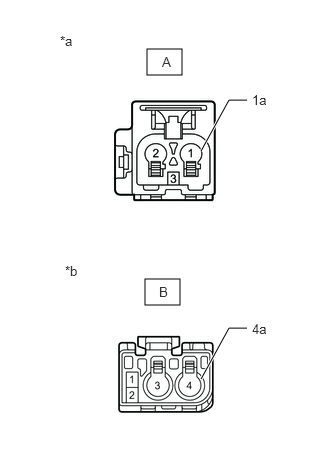
a.
E408538C01
1.531,0.51 1.896,0.781 0.365,0.271 1.51,2.906 1.875,3.177 0.365,0.271 2.094,1.573 2.385,1.042 2.385,1.042 2.573,1.042 true 2.094,3.948 2.385,3.417 2.385,3.417 2.573,3.417 true 1.688,0.563 1.844,0.76 0.156,0.198 10 false A 1.656,2.958 1.813,3.156 0.156,0.198 10 false B 0.625,0.344 0.875,0.677 0.25,0.333 10 false *a 0.677,2.74 0.927,3.073 0.25,0.333 10 false *b 2.625,3.344 2.938,3.542 0.313,0.198 10 false 4a 2.625,0.958 2.938,1.156 0.313,0.198 10 false 1a
*a Front view of wire harness connector
(to No. 1 Amplifier Antenna Assembly)
*b Front view of wire harness connector
(to Antenna Cord Sub-assembly)


Disconnect the antenna connector from the No. 1 amplifier antenna assembly.


b.

Disconnect the antenna connector from the antenna cord sub-assembly.


c.

Measure the resistance according to the value(s) in the table below.

Standard Resistance:
Tester Connection Condition Specified Condition
A-1 - B-4 Always Below 1 Ω
A-1a - B-4a Always Below 1 Ω
A-2 - B-2 Always Below 1 Ω
A-1 or B-4 - Body ground Always 10 kΩ or higher
A-2 or B-2 - Body ground Always 10 kΩ or higher


Result:
Proceed to
OK
NG


OK

6.CHECK ANTENNA CORD SUB-ASSEMBLY

NG

6.CHECK ANTENNA CORD SUB-ASSEMBLY
a.
E402573C04
1.49,0.396 1.948,0.719 0.458,0.323 1.479,2.302 1.938,2.625 0.458,0.323 1.083,4.396 1.281,4.396 1.281,4.396 1.573,3.927 true 1.083,3.604 1.281,3.604 1.281,3.604 1.5,3.844 true 2,3.656 2.302,3.281 2.302,3.281 2.49,3.281 true 0.688,1.177 0.885,1.177 0.885,1.177 1.344,1.583 true 0.229,0.188 0.542,0.385 0.313,0.198 10 false *a 0.313,2.531 0.625,2.729 0.313,0.198 10 false *b 1.677,0.469 1.99,0.667 0.313,0.198 10 false B 1.615,2.385 1.927,2.583 0.313,0.198 10 false RA 0.698,4.302 1.313,4.5 0.615,0.198 10 false MAIN 2.552,3.198 3.167,3.396 0.615,0.198 10 false ANT+ 0.563,3.521 1.177,3.719 0.615,0.198 10 false 4 0.49,1.083 1.104,1.281 0.615,0.198 10 false 4a 0.667,3.521 1.281,3.719 0.615,0.198 10 false (GND)
*a Front view of wire harness connector
(to No. 2 Antenna Cord Sub-assembly)
*b Front view of wire harness connector
(to Radio and Display Receiver Assembly)


Disconnect the antenna connector from the No. 2 antenna cord sub-assembly.


b.

Disconnect the antenna connector from the radio and display receiver assembly.


c.

Measure the resistance according to the value(s) in the table below.

Standard Resistance:
Tester Connection Condition Specified Condition
B-4 - RA-3 (MAIN) Always Below 1 Ω
B-4a - RA-4 (GND) Always Below 1 Ω
B-2 - RA-5 (ANT+) Always Below 1 Ω
B-4 or RA-3 (MAIN) - Body ground Always 10 kΩ or higher
B-2 or RA-5 (ANT+) - Body ground Always 10 kΩ or higher


Result:
Proceed to
OK
NG


OK

7.CHECK ROOF ANTENNA POLE SUB-ASSEMBLY

NG

7.CHECK ROOF ANTENNA POLE SUB-ASSEMBLY
a.

Check that the roof antenna pole sub-assembly is securely installed.

Click hereAudio / Visual / Telematics>AUDIO / VIDEO>RADIO ANTENNA POLE>INSTALLATION

OK:

The roof antenna pole sub-assembly is installed properly.


Result:
Proceed to
OK
NG


OK

8.CHECK NO. 1 AMPLIFIER ANTENNA ASSEMBLY

NG

8.CHECK NO. 1 AMPLIFIER ANTENNA ASSEMBLY
a.

Replace the No. 1 amplifier antenna assembly with a new or known good one and check if radio broadcasts can be received normally.

Click hereAudio / Visual / Telematics>AUDIO / VIDEO>AMPLIFIER ANTENNA>REMOVAL

OK:

Radio broadcasts can be received normally.


Result:
Proceed to
OK
NG


OK

END (NO. 1 AMPLIFIER ANTENNA ASSEMBLY IS DEFECTIVE)

NG