WINDOW / GLASS ROOF WINDOW FIX GLASS REMOVAL
CAUTION / NOTICE / HINT
The necessary procedures (adjustment, calibration, initialization or registration) that must be performed after parts are removed and installed, or replaced during No. 1 roof window glass sub-assembly removal/installation are shown below.
| Replaced Part or Performed Procedure | Necessary Procedure | Effect/Inoperative Function when Necessary Procedure not Performed | Link |
|---|---|---|---|
|
*: Even when not replacing the part, it is necessary to perform the specified necessary procedures after installation. |
|||
| Auxiliary battery terminal is disconnected/reconnected | Reset back door close position | Power Back Door System | ( 202111,999999,_59,_111831,_0505274,RM100000001ZMEG,) 202111,999999,_59,_111831,_0505274,RM100000001ZMEG,)
|
·
Roof sunshade ECU (Sliding roof drive gear assembly)* ·
Roof sunshade housing assembly* |
Initialize panoramic fixed moonroof with one-touch frosted glass control system | ·
Roof sunshade linked function ·
Electric roof sunshade jam protection function ·
Single touch auto function |
(202111,999999,_59,_111845,_0505691,RM100000001ZOB5,)
|
- CAUTION:
-
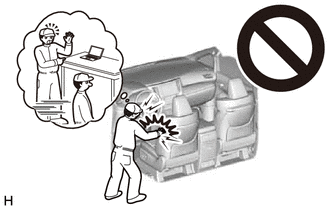
-
Be sure to read Precaution thoroughly before servicing.
- NOTICE:
- ·
After the ignition switch is turned off, there may be a waiting time before disconnecting the negative (-) auxiliary battery terminal.
·Make sure to use Toyota Genuine Windshield Glass Adhesive (No High Modulus Type) or an equivalent no high modulus adhesive to install the roof window glass.
·Make sure to use Toyota Genuine Windshield Glass Adhesive (High Modulus Type) or an equivalent high modulus adhesive to retouch it.
- HINT:
-
When the cable is disconnected / reconnected to the auxiliary battery terminal, systems temporarily stop operating. However, each system has a function that completes learning the first time the system is used.
Learning completes when vehicle is driven Effect/Inoperative Function When Necessary Procedures are not Performed Necessary Procedures Link Lane Tracing Assist System Drive the vehicle straight ahead at 35 km/h (22 mph) or more for 5 second or more. ( 202111,999999,_95,_111850,_0502173,RM100000001Z92I,)
Pre-collision System
Learning completes when vehicle is operated normally Effect/Inoperative Function When Necessary Procedures are not Performed Necessary Procedures Link Power Door Lock Control System
·Back door opener
Perform door unlock operation with door control switch or electrical key transmitter sub-assembly switch. ( 202111,999999,_58,_111830,_0505351,RM100000001ZMT3,)
Air Conditioning System After the ignition switch is turned to ON, the servo motor standard position is recognized. -
| Replaced Part or Performed Procedure | Necessary Procedure | Effect/Inoperative Function when Necessary Procedure not Performed | Link |
|---|---|---|---|
|
*: Even when not replacing the part, it is necessary to perform the specified necessary procedures after installation. |
|||
| Auxiliary battery terminal is disconnected/reconnected | Reset back door close position | Power Back Door System | (202111,999999,_59,_111831,_0505274,RM100000001ZMEG,)
|
·
Roof sunshade ECU (Sliding roof drive gear assembly)* ·
Roof sunshade housing assembly* |
Initialize panoramic fixed moonroof with one-touch frosted glass control system | ·
Roof sunshade linked function ·
Electric roof sunshade jam protection function ·
Single touch auto function |
(202111,999999,_59,_111845,_0505691,RM100000001ZOB5,)
|
- CAUTION:
-
-
Be sure to read Precaution thoroughly before servicing.
- NOTICE:
- ·
After the ignition switch is turned off, there may be a waiting time before disconnecting the negative (-) auxiliary battery terminal.
·Make sure to use Toyota Genuine Windshield Glass Adhesive (No High Modulus Type) or an equivalent no high modulus adhesive to install the roof window glass.
·Make sure to use Toyota Genuine Windshield Glass Adhesive (High Modulus Type) or an equivalent high modulus adhesive to retouch it.
- HINT:
- ·
When the cable is disconnected / reconnected to the auxiliary battery terminal, systems temporarily stop operating. However, each system has a function that completes learning the first time the system is used.
Learning completes when vehicle is driven Effect/Inoperative Function When Necessary Procedures are not Performed Necessary Procedures Link Lane Tracing Assist System Drive the vehicle straight ahead at 35 km/h (22 mph) or more for 5 second or more. ( 202111,999999,_95,_111850,_0502173,RM100000001Z92I,)
Pre-collision System Stop and Start System Idle the engine for approximately 5 to 60 minutes or drive the vehicle until stop and start control is permitted ( 202406,999999,_51,_111803,_0509671,RM100000002KOGF,)
Learning completes when vehicle is operated normally Effect/Inoperative Function When Necessary Procedures are not Performed Necessary Procedures Link Power Door Lock Control System
·Back door opener
Perform door unlock operation with door control switch or electrical key transmitter sub-assembly switch. ( 202111,999999,_58,_111830,_0505351,RM100000001ZMT3,)
Air Conditioning System After the ignition switch is turned to ON, the servo motor standard position is recognized. -
·Use the same procedure for the RH side and LH side.
·The following procedure is for the LH side.
PROCEDURE

 1.REMOVE SLIDING ROOF HOUSING ASSEMBLY (for Long Type Panoramic Fixed Moon Roof)
2.REMOVE SLIDING ROOF HOUSING ASSEMBLY (for Short Type Panoramic Fixed Moon Roof)
75554A
3.REMOVE REAR ROOF DRIP SIDE FINISH MOULDING LH (for Long Type Panoramic Fixed Moon Roof)
75553A
4.REMOVE REAR ROOF DRIP SIDE FINISH MOULDING RH (for Long Type Panoramic Fixed Moon Roof)
- HINT:
-
Use the same procedure as for the LH side.
75554A
5.REMOVE REAR ROOF DRIP SIDE FINISH MOULDING LH (for Short Type Panoramic Fixed Moon Roof)
75553A
6.REMOVE REAR ROOF DRIP SIDE FINISH MOULDING RH (for Short Type Panoramic Fixed Moon Roof)
- HINT:
-
Use the same procedure as for the LH side.
63215G
7.REMOVE FRONT MOON ROOF MOULDING
- NOTICE:
- w/ One-touch Frosted Glass Control System:
-
As the wire harness (flat wire harness) for the No. 1 roof window glass sub-assembly passes through the glass, urethane and body at the rear left of the vehicle, be careful not to damage the wire harness when reusing the No. 1 roof window glass sub-assembly.
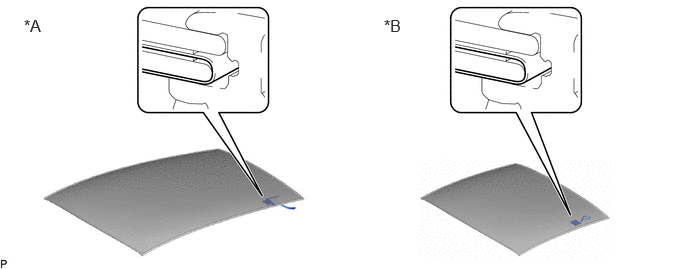 0.25,0.167 0.75,0.5 0.5,0.333 12 false *A 4,0.167 4.417,0.5 0.417,0.333 12 false *B
*A for Long Type Panoramic Fixed Moon Roof *B for Short Type Panoramic Fixed Moon Roof
Apply protective tape to the area around the installation position of the No. 1 roof window glass sub-assembly on the vehicle body to prevent it from being scratched.
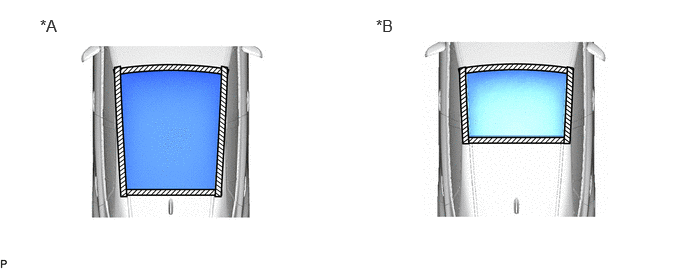
| *A | for Long Type Panoramic Fixed Moon Roof | *B | for Short Type Panoramic Fixed Moon Roof |

|
Protective Tape | - | - |
w/ One-touch Frosted Glass Control System:
Disconnect the connector.
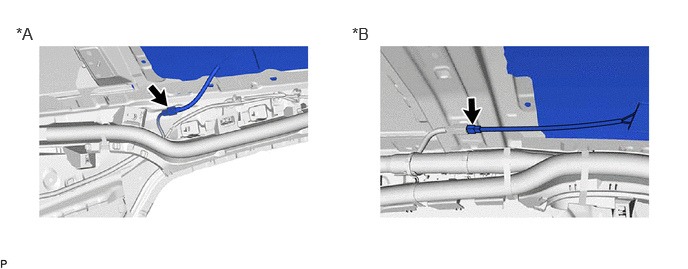
| *A | for Long Type Panoramic Fixed Moon Roof | *B | for Short Type Panoramic Fixed Moon Roof |
for Long Type Panoramic Fixed Moon Roof:
Using a knife, cut off the front moon roof moulding as shown in the illustration.
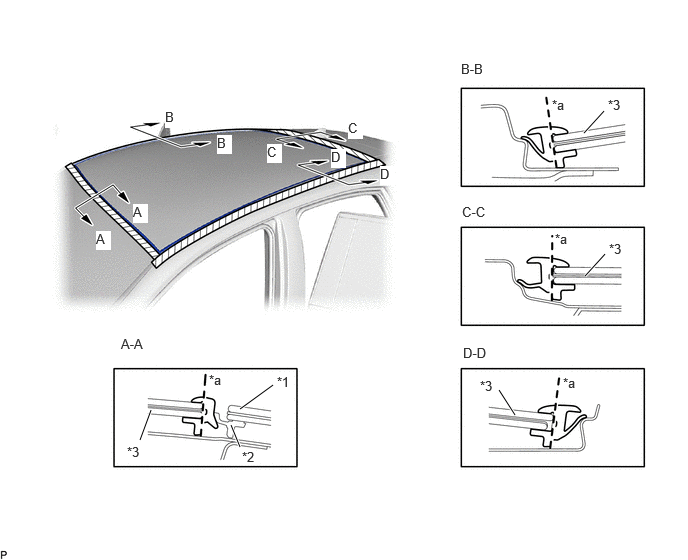
| *1 | Windshield Glass | *2 | Windshield Outside Moulding |
| *3 | No. 1 Roof Window Glass Sub-assembly | - | - |
| *a | Cut | - | - |
- NOTICE:
-
Be careful not to damage the No. 1 roof window glass sub-assembly, windshield outside moulding and vehicle body.
for Short Type Panoramic Fixed Moon Roof:
Using a knife, cut off the front moon roof moulding as shown in the illustration.
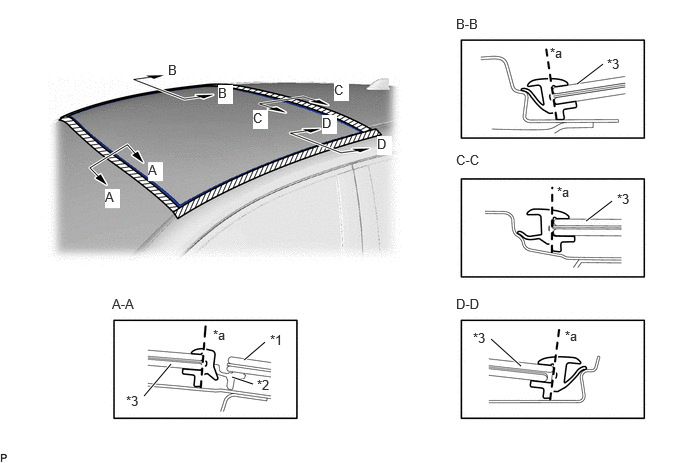
| *1 | Windshield Glass | *2 | Windshield Outside Moulding |
| *3 | No. 1 Roof Window Glass Sub-assembly | - | - |
| *a | Cut | - | - |
- NOTICE:
-
Be careful not to damage the No. 1 roof window glass sub-assembly, windshield outside moulding and vehicle body.
63201G
8.REMOVE NO. 1 ROOF WINDOW GLASS SUB-ASSEMBLY
- NOTICE:
- w/ One-touch Frosted Glass Control System:
- ·
As the wire harness (flat wire harness) for the No. 1 roof window glass sub-assembly passes through the glass, urethane and body at the rear left of the vehicle, be careful not to damage the wire harness when reusing the No. 1 roof window glass sub-assembly.
0.25,0.167 0.75,0.5 0.5,0.333 12 false *A 4,0.167 4.417,0.5 0.417,0.333 12 false *B*A for Long Type Panoramic Fixed Moon Roof *B for Short Type Panoramic Fixed Moon Roof
·To prevent water ingress or a malfunction, do not touch or damage the seal material application surface around the wire harness (flat wire harness).
- NOTICE:
- ·
To prevent the No. 1 roof window glass sub-assembly from falling when performing this operation, be sure to hold the windshield glass using suction cups from outside of the vehicle.
·Depending on the condition or location to be cut, use a windshield knife or piano wire.
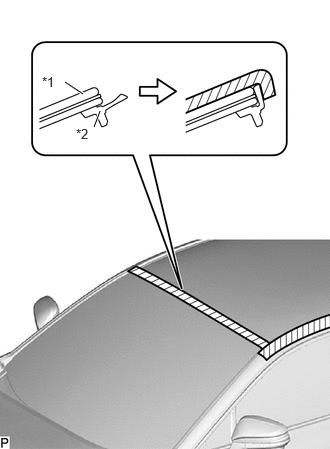
| *1 | Windshield Glass |
| *2 | Windshield Outside Moulding |
|
|
Protective Tape |
Pull back the windshield outside moulding and secure it with tape as shown in the illustration.
- NOTICE:
-
Be careful not to damage the windshield outside moulding.
- HINT:
- ·
Use wide tape to ensure strong enough adhesion.
·Use non-residue tape.
·If necessary, clean the windshield outside moulding before securing it with tape.
Apply soapy water to the area around the adhesive.
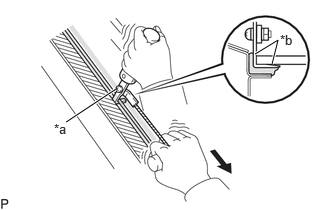
| *a | Windshield Knife |
| *b | Aligned with No. 1 Roof Window Glass Sub-assembly |

|
Pull |
Using a windshield knife, insert a windshield knife into the adhesive between the No. 1 roof window glass sub-assembly and vehicle body.
- HINT:
-
Insert the windshield knife in an area where the gap between No. 1 roof window glass sub-assembly and vehicle body is large.
While keeping the windshield knife perpendicular to the outer surface of the No. 1 roof window glass sub-assembly, cut the adhesive by pulling the windshield knife around the No. 1 roof window glass sub-assembly.
- NOTICE:
- ·
When separating the No. 1 roof window glass sub-assembly, take care not to damage the paint or interior and exterior ornaments.
·When cutting the adhesive, take care not to damage the harness on the No. 1 roof window glass sub-assembly.
·Do not pry the No. 1 roof window glass sub-assembly with the windshield knife.
Using piano wire, pass a piano wire between the vehicle body and No. 1 roof window glass sub-assembly from the interior.
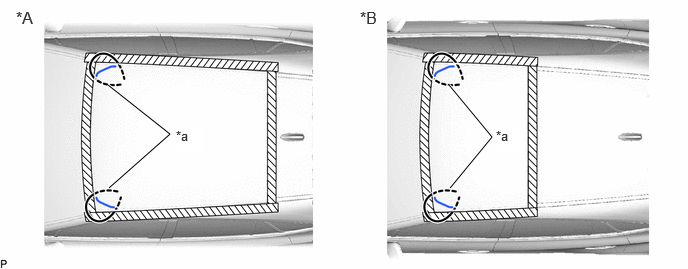
| *A | for Long Type Panoramic Fixed Moon Roof | *B | for Short Type Panoramic Fixed Moon Roof |
| *a | Piano Wire | - | - |
Tie both wire ends to wooden blocks or similar objects that can serve as handles.
Cut off the adhesive by pulling the piano wire as shown in the illustration.
- NOTICE:
- ·
When separating the No. 1 roof window glass sub-assembly, be careful not to damage the paint or interior and exterior ornaments.
·When cutting the adhesive, take care not to damage the harness on the No. 1 roof window glass sub-assembly.
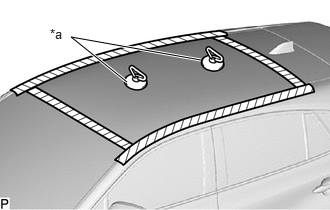
| *a | Suction Cup |
Using suction cups, remove the No. 1 roof window glass sub-assembly.
- NOTICE:
- ·
Be careful not to drop the No. 1 roof window glass sub-assembly.
·Leave as much adhesive on the vehicle body as possible when removing the No. 1 roof window glass sub-assembly.
63227L
9.REMOVE ROOF WINDOW LOWER CLIP
When reusing the No. 1 roof window glass sub-assembly:
Apply adhesive tape to the area around the installation position of the roof window lower clip on the No. 1 roof window glass sub-assembly.
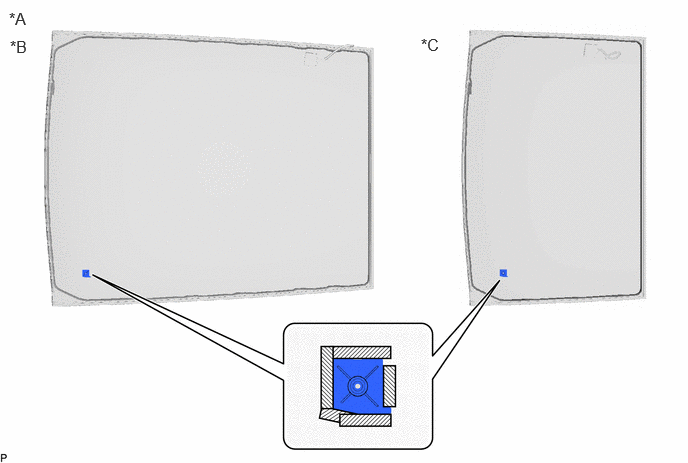
| *A | Back Side | *B | for Long Type Panoramic Fixed Moon Roof |
| *C | for Short Type Panoramic Fixed Moon Roof | - | - |
|
|
Adhesive Tape | - | - |
Using a scraper, remove the roof window lower clip.
- NOTICE:
- ·
Be careful not to damage the No. 1 roof window glass sub-assembly.
·Be sure to replace the roof window lower clip.
63228N
10.REMOVE ROOF WINDOW SIDE CLIP
- HINT:
-
Use the same procedure as for the roof window lower clip.