BRAKE CONTROL / DYNAMIC CONTROL SYSTEMS ELECTRONICALLY CONTROLLED BRAKE SYSTEM(for Gasoline Model) Brake Warning Light Remains ON
DESCRIPTION
This procedure is for troubleshooting when the brake system warning light (red indicator) remains on but no DTCs are output.
The skid control ECU (brake actuator assembly) controls the brake system warning light (red indicator) in the combination meter assembly via CAN communication.
WIRING DIAGRAM
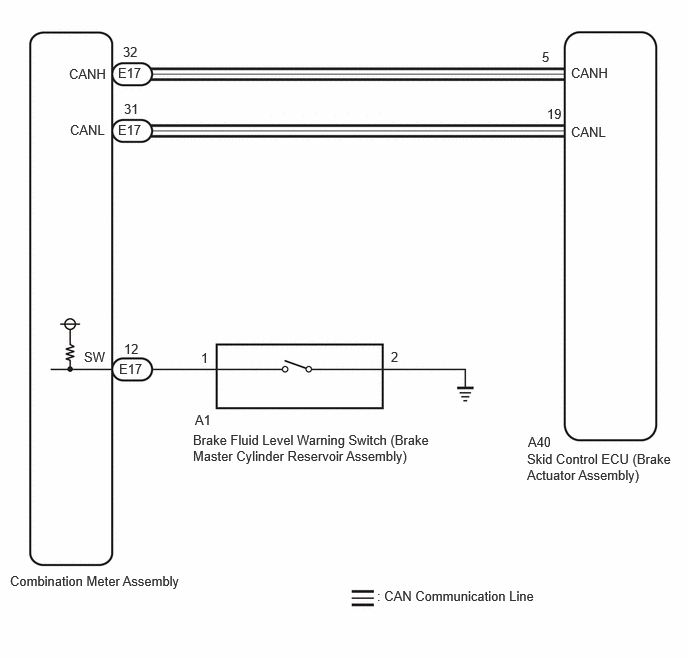
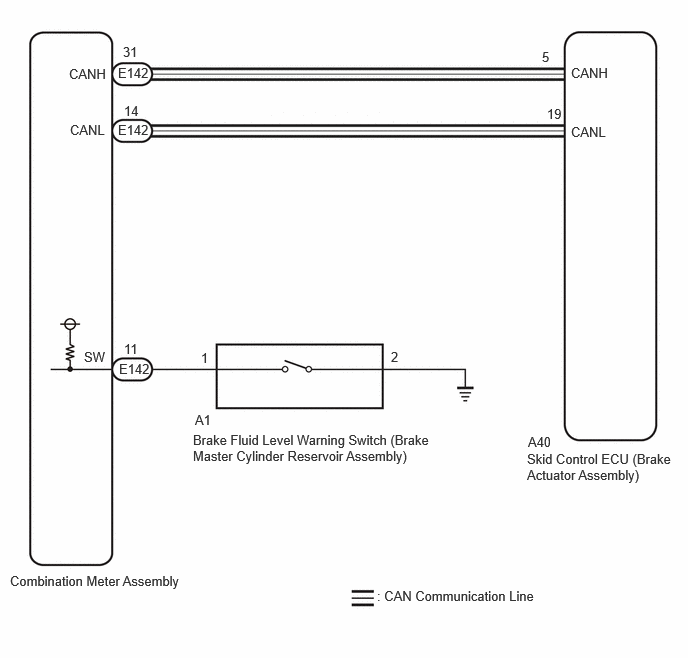
CAUTION / NOTICE / HINT
- NOTICE:
-
Before performing this procedure, depress the brake pedal and confirm that the stop lights illuminate.
PROCEDURE
Check that all of the following conditions required for the brake system warning light (red indicator) to turn off are met:
The ABS warning light are not illuminated.
- HINT:
-
If the ABS warning light remains illuminated, make sure that the conditions required for the ABS warning light to turn off are met.
The brake fluid level in the brake master cylinder reservoir assembly is not low.
Ensure that the brake booster has sufficient vacuum.
- HINT:
-
When the vacuum inside the brake booster decreases, the brake system warning light (red indicator) comes on.
- Result:
Proceed to NEXT
NEXT
Using the GTS, check for Vehicle Control History (RoB).
- Chassis > Brake/EPB > Utility
-
Tester Display Vehicle Control History (RoB) - 50005 435 55
- HINT:
-
If vehicle control history (RoB) is stored when the electronically controlled brake system and electric parking brake system are suspended, the brake system warning light (red indicator) illuminates.
- Result:
Result Proceed to There is no vehicle control history (RoB) for when the electronically controlled brake system was suspended. A There is vehicle control history (RoB) for when the electronically controlled brake system was suspended. B
A
B
- NOTICE:
-
After performing troubleshooting and repair regarding vehicle control history (RoB), clear the vehicle control history (RoB).
- OK:
The brake fluid level warning switch (brake master cylinder reservoir assembly) is normal.
- Result:
Result Proceed to OK (for Optitron Meter Type) A OK (for TFT Meter Type) B NG C
A
B
C
Make sure that there is no looseness at the locking part and the connecting part of the connector.
- OK:
The connector is securely connected.
Disconnect the E17 combination meter assembly connector.
Disconnect the A1 brake fluid level warning switch (brake master cylinder reservoir assembly) connector.
Check both the connector case and the terminals for deformation and corrosion.
- OK:
No deformation or corrosion.
Measure the resistance according to the value(s) in the table below.
- Standard Resistance:
Tester Connection Condition Specified Condition Click Location & Routing(E17,A1)Location & Routingewd_type=routing;type=c,c;code=E17,A1
Click Connector(E17)Instrument Panel>Instrument Panel Wire / Radio Wiring Sub-Assy / Telephone Computer Wire>Combination Meter Assemblyewd_type=component;type=c;code=E17;pinno=12
Click Connector(A1)Engine Compartment>Engine Room Main Wire / Transmission Wire>Brake Master Cylinder Sub-Assemblyewd_type=component;type=c;code=A1;pinno=1,2
E17-12 (SW) - A1-1 Always Below 1 Ω E17-12 (SW) or A1-1 - Body ground Always 10 kΩ or higher A1-2 - Body ground 1 minute or more after disconnecting the cable from the negative (-) battery terminal Below 1 Ω
- Result:
Proceed to OK NG
OK
NG
Perform the Active Test of the combination meter assembly using the GTS.
Check the combination meter assembly.
- Body Electrical > Combination Meter > Active Test
-
Tester Display Brake Warning - 50004 409 107
- OK:
The brake system warning light (red indicator) turns on or off in accordance with GTS operation.
- Result:
Proceed to OK NG
OK
NG
Make sure that there is no looseness at the locking part and the connecting part of the connector.
- OK:
The connector is securely connected.
Disconnect the E143 combination meter assembly connector.
Disconnect the A1 brake fluid level warning switch (brake master cylinder reservoir assembly) connector.
Check both the connector case and the terminals for deformation and corrosion.
- OK:
No deformation or corrosion.
Measure the resistance according to the value(s) in the table below.
- Standard Resistance:
Tester Connection Condition Specified Condition Click Location & Routing(E143,A1)Location & Routingewd_type=routing;type=c,c;code=E143,A1
Click Connector(E143)Instrument Panel>Instrument Panel Wire / Radio Wiring Sub-Assy / Telephone Computer Wire>Combination Meter Assemblyewd_type=component;type=c;code=E143;pinno=11
Click Connector(A1)Engine Compartment>Engine Room Main Wire / Transmission Wire>Brake Master Cylinder Sub-Assemblyewd_type=component;type=c;code=A1;pinno=1,2
E143-11 (SW) - A1-1 Always Below 1 Ω E143-11 (SW) or A1-1 - Body ground Always 10 kΩ or higher A1-2 - Body ground 1 minute or more after disconnecting the cable from the negative (-) battery terminal Below 1 Ω
- Result:
Proceed to OK NG
OK
NG
Perform the Active Test of the combination meter assembly using the GTS.
Check the combination meter assembly.
- Body Electrical > Combination Meter > Active Test
-
Tester Display Multi Display All (White) - 50004 409 20
- OK:
The multi-information display turns on or off in accordance with GTS operation.
- Result:
Proceed to OK NG
OK
NG