WINDOW / GLASS WINDSHIELD GLASS REMOVAL
CAUTION / NOTICE / HINT
The necessary procedures (adjustment, calibration, initialization or registration) that must be performed after parts are removed and installed, or replaced during windshield glass sub-assembly removal/installation are shown below.
| Replaced Part or Performed Procedure | Necessary Procedure | Effect/Inoperative Function when Necessary Procedure not Performed | Link |
|---|---|---|---|
|
*: Even when not replacing the part, it is necessary to perform the specified necessary procedures after installation. |
|||
| Windshield glass* | Adjust forward recognition camera | ·
Front Camera System ·
Automatic High Beam System |
One Time Recognition:( 202304,999999,_95,_139716,_0584196,RM1000000029F5M,) 202304,999999,_95,_139716,_0584196,RM1000000029F5M,)
Driving Adjustment:( 202304,999999,_95,_139716,_0584196,RM1000000029F5O,)
|
| Replaced Part or Performed Procedure | Necessary Procedure | Effect/Inoperative Function when Necessary Procedure not Performed | Link |
|---|---|---|---|
|
*: Even when not replacing the part, it is necessary to perform the specified necessary procedures after installation. |
|||
| Windshield glass | except NR Series Engine
Adjust forward recognition camera* |
·
Front Camera System ·
Automatic High Beam System |
One Time Recognition:(202304,999999,_95,_139716,_0584196,RM1000000029F5M,)
Driving Adjustment:( 202304,999999,_95,_139716,_0584196,RM1000000029F5O,)
|
for NR Series Engine
Adjust forward recognition camera |
·
Dynamic Radar Cruise Control System ·
Lane Control System ·
Front Radar Sensor System ·
Pre-collision System ·
Automatic High Beam System |
(202304,999999,_95,_139716,_0584840,RM1000000029I36,)for One Time Recognition
or ( 202304,999999,_95,_139716,_0584840,RM1000000029I37,)for Sequential Recognition
|
|
CAUTION / NOTICE / HINT
- NOTICE:
-
After the ignition switch is turned off, there may be a waiting time before disconnecting the negative (-) auxiliary battery terminal.
- HINT:
-
When the cable is disconnected / reconnected to the auxiliary battery terminal, systems temporarily stop operating. However, each system has a function that completes learning the first time the system is used.
- ·
for HV Model:
Items for which learning is completed by driving the vehicle Effect/Inoperative Function When Necessary Procedures are not Performed Necessary Procedures Link Front Camera System Drive the vehicle straight ahead at 15 km/h (9 mph) or more for 1 second or more. ( 202304,999999,_95,_139716,_0584193,RM1000000029F4C,)
·for Gasoline Model:
Items for which learning is completed by driving the vehicle Effect/Inoperative Function When Necessary Procedures are not Performed Necessary Procedures Link Stop and Start System Idle the engine for approximately 5 to 60 minutes or drive the vehicle until stop and start control is permitted ( 201906,999999,_51,_080774,_0393362,RM100000001HXHC,)
Pre-collision System Perform steering sensor zero point calibration ( 202304,999999,_95,_139716,_0601175,RM100000002BFOE,)
Lane Tracing Assist System Front Camera System Drive the vehicle straight ahead at 15 km/h (9 mph) or more for 1 second or more. ( 202304,999999,_95,_139716,_0584193,RM1000000029F4C,)
- NOTICE:
-
When replacing the windshield glass of a vehicle equipped with a forward recognition camera, make sure to use a Toyota genuine part. If a non-Toyota genuine part is used, the forward recognition camera may not be able to be installed due to a missing bracket. Also, the dynamic radar cruise control system, lane departure alert system, pre-collision system, forward recognition camera system or automatic high beam system may not operate properly due to a difference in the transmissivity or black ceramic border.
PROCEDURE

 85292B
1.REMOVE FRONT WIPER ARM HEAD CAP
85292B
1.REMOVE FRONT WIPER ARM HEAD CAP
2.REMOVE FRONT WIPER ARM AND BLADE ASSEMBLY LH
3.REMOVE FRONT WIPER ARM AND BLADE ASSEMBLY RH
55754F
4.REMOVE COWL WATER EXTRACT SHIELD LH
55753D
5.REMOVE COWL WATER EXTRACT SHIELD RH
- HINT:
-
Use the same procedure as for the LH side.
55708
6.REMOVE COWL TOP VENTILATOR LOUVER SUB-ASSEMBLY
87810
7.REMOVE INNER REAR VIEW MIRROR ASSEMBLY
8646C
8.REMOVE FORWARD RECOGNITION CAMERA (w/ Pre-collision System)
for NR Series Engine: Click hereADAS / AD>ADVANCED DRIVER ASSISTANCE SYSTEM>FRONT CAMERA (for NR Series Engine)>REMOVAL202304,999999,_95,_139716,_0584840,RM1000000029I33,
except NR Series Engine: Click hereADAS / AD>ADVANCED DRIVER ASSISTANCE SYSTEM>FRONT CAMERA (except NR Series Engine)>REMOVAL202304,999999,_95,_139716,_0584196,RM1000000029F5J,
89941
9.REMOVE RAIN SENSOR (w/ Rain Sensor)
10.REMOVE ROOF HEADLINING ASSEMBLY
11.REMOVE WINDSHIELD GLASS SUB-ASSEMBLY
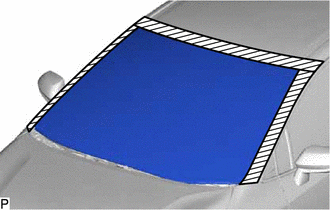

|
Protective Tape |
Apply protective tape to the area around the installation position of the windshield glass sub-assembly on the vehicle body to prevent it from being scratched.
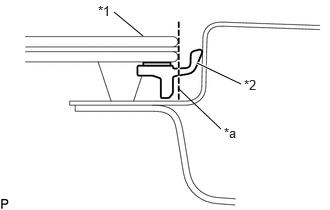
| *1 | Windshield Glass |
| *2 | Windshield Outside Moulding |
| *a | Cut |
Using a knife, cut off the windshield outside moulding as shown in the illustration.
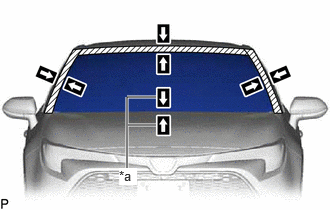
| *a | Matchmark |
Place matchmarks on the windshield glass sub-assembly and vehicle body at the locations indicated in the illustration.
- HINT:
-
Matchmarks are not necessary if the windshield glass is not going to be reused.
When using a windshield knife:
Apply soapy water to the area around the adhesive.
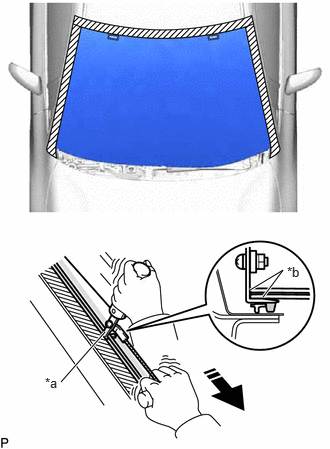
| *a | Windshield Knife |
| *b | Aligned with Windshield Glass Sub-assembly |

|
Pull |
Insert a windshield knife into the adhesive between the windshield glass sub-assembly and vehicle body.
While keeping the windshield knife perpendicular to the outer surface of the windshield glass sub-assembly, cut the adhesive by pulling the windshield knife around the windshield glass sub-assembly.
- NOTICE:
- ·
Do not pry the windshield glass sub-assembly with the windshield knife.
·Do not use a windshield knife to cut the adhesive on the lower side of the windshield glass sub-assembly.
·When separating the windshield glass sub-assembly, be careful not to damage the paint or interior and exterior ornaments.
- HINT:
-
Insert the windshield knife in an area where the gap between windshield glass sub-assembly and vehicle body is large.
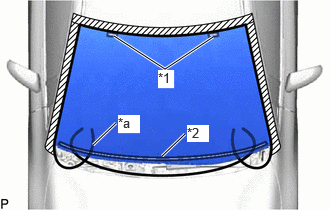
| *1 | Windshield Glass Stopper |
| *2 | Front Window Inner Center Moulding |
| *a | Piano Wire |
When using piano wire:
Pass a piano wire between the vehicle body and windshield glass sub-assembly from the interior.
Tie both wire ends to wooden blocks or similar objects that can serve as handles.
Cut the adhesive by pulling the piano wire around the windshield glass sub-assembly.
- NOTICE:
- ·
When separating the windshield glass sub-assembly, be careful not to damage the paint or interior and exterior ornaments.
·To prevent the safety pad from being scratched when removing the windshield glass sub-assembly, place a plastic sheet between the piano wire and safety pad.
·Be careful not to damage the front window inner center moulding.
Disengage the windshield glass stoppers.
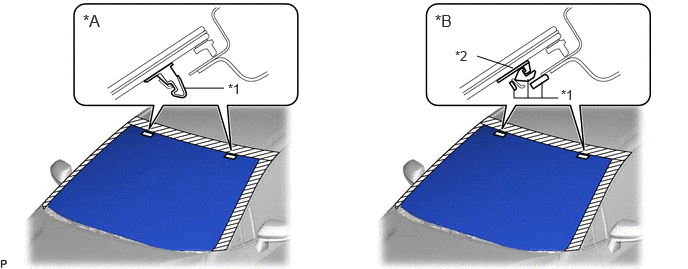
| *A | for 1-piece Type | *B | for 2-piece Type |
| *1 | No. 1 Windshield Glass Stopper | *2 | No. 2 Windshield Glass Stopper |
- NOTICE:
- ·
The No. 1 windshield glass stoppers and No. 2 windshield glass stoppers are installed to the windshield glass sub-assembly as shown in the illustration. Be careful not to damage the windshield glass sub-assembly when cutting the adhesive.
·To prevent the windshield glass sub-assembly from falling when performing this operation, be sure to hold the windshield glass sub-assembly using suction cups.
Using suction cups, remove the windshield glass sub-assembly.
- NOTICE:
- ·
Be careful not to drop the windshield glass sub-assembly.
·Leave as much adhesive on the vehicle body as possible when removing the windshield glass sub-assembly.
56117A
12.REMOVE WINDOW GLASS ADHESIVE DAM
When reusing the windshield glass:
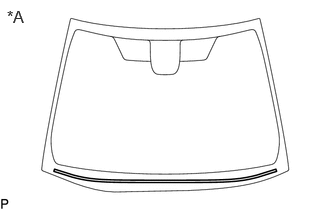
| *A | Back Side |
Using a scraper, remove the window glass adhesive dam.
- NOTICE:
- ·
Be careful not to damage the windshield glass.
·Be sure to replace the window glass adhesive dam with a new one.
13.REMOVE WINDSHIELD OUTSIDE MOULDING
When reusing the windshield glass:
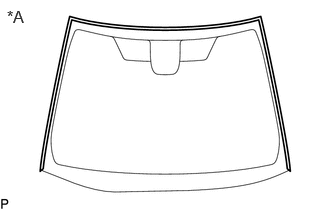
| *A | Back Side |
Using a scraper, remove the windshield outside moulding.
- NOTICE:
- ·
Be careful not to damage the windshield glass.
·Be sure to replace the windshield outside moulding with a new one.
14.REMOVE NO. 1 WINDSHIELD GLASS STOPPER (for 1-piece Type)
When reusing the windshield glass:
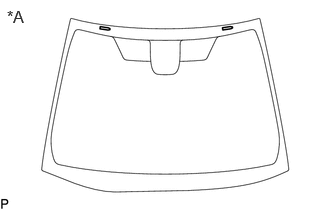
| *A | Back Side |
Using a scraper, remove the 2 No. 1 windshield glass stoppers.
- NOTICE:
- ·
Be careful not to damage the windshield glass.
·Be sure to replace the No. 1 windshield glass stoppers with new ones.
15.REMOVE NO. 2 WINDSHIELD GLASS STOPPER (for 2-piece Type)
When reusing the windshield glass:
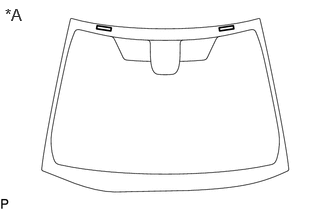
| *A | Back Side |
Using a scraper, remove the 2 No. 2 windshield glass stoppers.
- NOTICE:
- ·
Be careful not to damage the windshield glass.
·Be sure to replace the No. 2 windshield glass stoppers with new ones.
16.REMOVE NO. 1 WINDSHIELD GLASS STOPPER (for 2-piece Type)
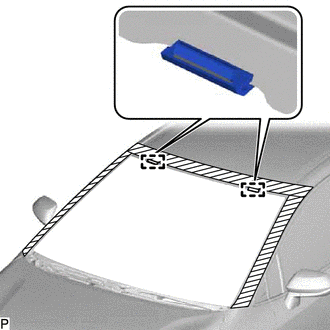
Remove the 2 No. 1 windshield glass stoppers from the vehicle body.
- NOTICE:
-
Be sure to replace the No. 1 windshield glass stoppers with new ones.
56153C
17.REMOVE FRONT WINDOW INNER CENTER MOULDING
- HINT:
-
Perform the following procedure only when replacement of a front window inner center moulding is necessary.
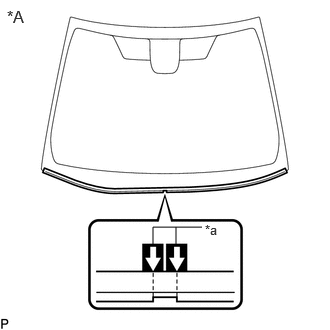
| *A | Back Side |
| *a | Matchmark |
Place matchmarks on the windshield glass at the locations indicated in the illustration.
Using a scraper, remove the front window inner center moulding.
- NOTICE:
- ·
Be careful not to damage the windshield glass.
·Be sure to replace the front window inner center moulding with a new one.
18.CLEAN WINDSHIELD GLASS
When reusing the windshield glass:
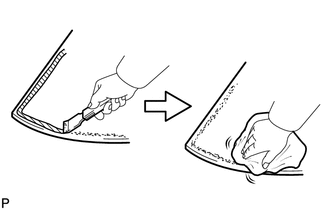
Using a scraper, remove any remaining adhesive dam and adhesive residue from the windshield glass.
- NOTICE:
-
Be careful not to damage the windshield glass.
Clean the outer circumference of the windshield glass with a non-residue solvent.
- NOTICE:
- ·
Do not touch the windshield glass surface after cleaning it.
·Even if using a new windshield glass, clean it with a non-residue solvent.
19.CLEAN VEHICLE BODY
Clean and shape the contact surface of the vehicle body.
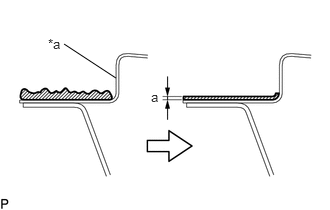
| *a | Vehicle Body |
|
|
Adhesive |
Using a knife, cut off any excess adhesive on the contact surface of the vehicle body as shown in the illustration.
- Standard Dimension:
Area Dimension a 1.0 mm (0.0394 in.) or more
- NOTICE:
-
Be careful not to damage the vehicle body.
- HINT:
-
Leave approximately 1.0 mm (0.0394 in.) of adhesive on the vehicle body.
Clean the contact surface of the vehicle body with a piece of cloth saturated with non-residue solvent.
- HINT:
-
Even if all of the adhesive has been removed, clean the vehicle body.