LIGHTING (EXT) LIGHTING SYSTEM(for NR Series Engine) B2430 LED Headlight LH B2431 LED Headlight RH
DESCRIPTION
These DTCs are stored when the low beam headlights do not illuminate, or a communication malfunction is detected between the light control ECU and main body ECU (multiplex network body ECU).
- HINT:
-
DTC B2430 or DTC B2431 may also be stored if a headlight cooling fan is malfunctioning. In this case, the light control ECU will dim or turn off the malfunctioning low beam headlight.
| DTC No. | Detection Item | DTC Detection Condition | Trouble Area | DTC Output from |
|---|---|---|---|---|
| B2430 | LED Headlight LH | Detection condition:
All of the following conditions are met: -
Engine running -
Low beam headlights on Malfunction Status:
Any of the following conditions is met: -
Light control ECU malfunction -
Headlight assembly LH malfunction -
Light control ECU power source and signal malfunction Malfunction Time:
10 seconds or more |
·
Headlight assembly LH ·
No. 1 integration relay ·
Driver side junction block assembly ·
Main body ECU (multiplex network body ECU) ·
Harness or connector |
Main Body |
| B2431 | LED Headlight RH | Detection condition:
All of the following conditions are met: -
Engine running -
Low beam headlights on Malfunction Status:
Any of the following conditions is met: -
Light control ECU malfunction -
Headlight assembly RH malfunction -
Light control ECU power source and signal malfunction Malfunction Time:
10 seconds or more |
·
Headlight assembly RH ·
No. 1 integration relay ·
Main body ECU (multiplex network body ECU) ·
Harness or connector |
Main Body |
WIRING DIAGRAM
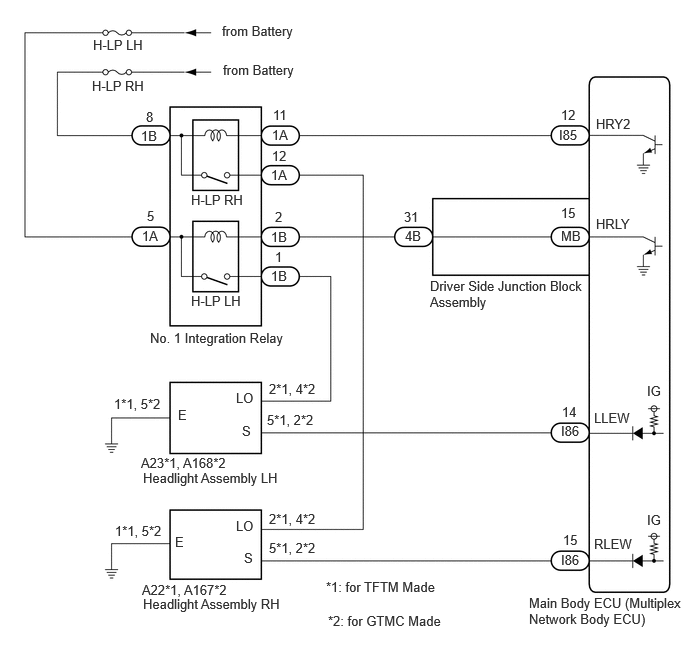
CAUTION / NOTICE / HINT
- NOTICE:
- ·
Inspect the fuses for circuits related to this system before performing the following procedure.
·Before replacing the main body ECU (multiplex network body ECU), refer to Service Bulletin.
PROCEDURE
Connect the GTS to the DLC3.
Turn the ignition switch to ON.
Turn the GTS on.
Enter the following menus: Body Electrical / Main Body / Trouble Codes.
Clear the DTCs.
- Body Electrical > Main Body > Clear DTCs
- 50002 123
- Result:
Proceed to NEXT
NEXT
Connect the GTS to the DLC3.
Start the engine.
Operate the light control switch to turn on the low beam headlights and wait 10 seconds or more.
Turn the GTS on.
Enter the following menus: Body Electrical / Main Body / Trouble Codes.
Check for DTCs.
- Body Electrical > Main Body > Trouble Codes
- 50001 123
- OK:
DTC B2430 and B2431 are not output.
- Result:
Result Proceed to OK A NG (DTC B2430 is output) B NG (DTC B2431 is output) C
A
B
C
for TFTM Made
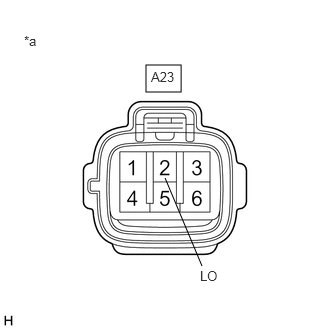
| *a | Front view of wire harness connector
(to Headlight Assembly LH) |
Disconnect the A23 headlight assembly LH connector.
Measure the voltage according to the value(s) in the table below.
- Standard Voltage:
Tester Connection Condition Specified Condition A23-2 (LO) - Body ground Light control switch in head position 11 to 14 V
for GTMC Made
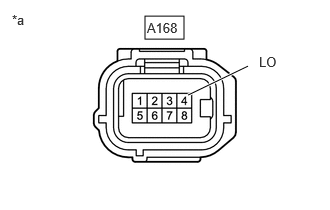
| *a | Front view of wire harness connector
(to Headlight Assembly LH) |
Disconnect the A168 headlight assembly LH connector.
Measure the voltage according to the value(s) in the table below.
- Standard Voltage:
Tester Connection Condition Specified Condition A168-4 (LO) - Body ground Light control switch in head position 11 to 14 V
- Result:
Proceed to OK NG
OK
NG
for TFTM Made
Measure the resistance according to the value(s) in the table below.
- Standard Resistance:
Tester Connection Condition Specified Condition A23-1 (E) - Body ground Always Below 1 Ω
for GTMC Made
Measure the resistance according to the value(s) in the table below.
- Standard Resistance:
Tester Connection Condition Specified Condition A168-5 (E) - Body ground Always Below 1 Ω
- Result:
Proceed to OK NG
OK
NG
for TFTM Made
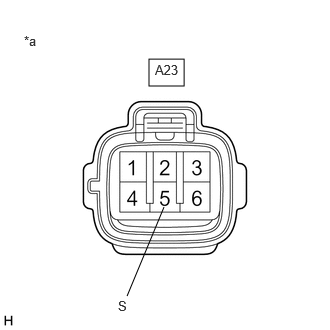
| *a | Front view of wire harness connector
(to Headlight Assembly LH) |
Measure the voltage according to the value(s) in the table below.
- Standard Voltage:
Tester Connection Condition Specified Condition A23-5 (S) - Body ground Light control switch in head position 11 to 14 V
for GTMC Made
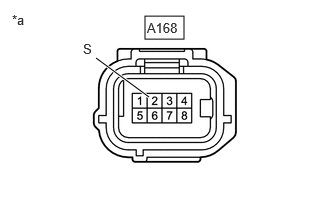
| *a | Front view of wire harness connector
(to Headlight Assembly LH) |
Measure the voltage according to the value(s) in the table below.
- Standard Voltage:
Tester Connection Condition Specified Condition A168-2 (S) - Body ground Light control switch in head position 11 to 14 V
- Result:
Proceed to OK NG
OK
for TFTM Made: Click hereVehicle Exterior>LIGHTING (EXT)>HEADLIGHT ASSEMBLY (for TFTM Made)>REMOVAL202307,999999,_59,_080784,_0393155,RM100000002D1AI,
for GTMC Made: Click hereVehicle Exterior>LIGHTING (EXT)>HEADLIGHT ASSEMBLY (for GTMC Made)>REMOVAL201906,999999,_59,_080784,_0393156,RM100000001HW4M,
NG
Disconnect the I86 main body ECU (multiplex network body ECU) connector.
for TFTM Made
Measure the resistance according to the value(s) in the table below.
- Standard Resistance:
Tester Connection Condition Specified Condition A23-5 (S) - I86-14 (LLEW) Always Below 1 Ω A23-5 (S) or I86-14 (LLEW) - Body ground Always 10 kΩ or higher
for GTMC Made
Measure the resistance according to the value(s) in the table below.
- Standard Resistance:
Tester Connection Condition Specified Condition A168-2 (S) - I86-14 (LLEW) Always Below 1 Ω A168-2 (S) or I86-14 (LLEW) - Body ground Always 10 kΩ or higher
- Result:
Proceed to OK NG
OK
NG
Disconnect the 1B No. 1 integration relay connector.
for TFTM Made
Measure the resistance according to the value(s) in the table below.
- Standard Resistance:
Tester Connection Condition Specified Condition 1B-1 - A23-2 (LO) Always Below 1 Ω 1B-1 or A23-2 (LO) - Body ground Always 10 kΩ or higher
for GTMC Made
Measure the resistance according to the value(s) in the table below.
- Standard Resistance:
Tester Connection Condition Specified Condition 1B-1 - A168-4 (LO) Always Below 1 Ω 1B-1 or A168-4 (LO) - Body ground Always 10 kΩ or higher
- Result:
Proceed to OK NG
OK
NG
Remove the No. 1 integration relay.
Inspect the No. 1 integration relay.
- Result:
Proceed to OK NG
OK
NG
Measure the voltage according to the value(s) in the table below.
- Standard Voltage:
Tester Connection Condition Specified Condition 1A-5 - Body ground Always 11 to 14 V
- Result:
Proceed to OK NG
OK
NG
Disconnect the 4B driver side junction block assembly connector.
Measure the resistance according to the value(s) in the table below.
- Standard Resistance:
Tester Connection Condition Specified Condition 1B-2 - 4B-31 Always Below 1 Ω 1B-2 or 4B-31 - Body ground Always 10 kΩ or higher
- Result:
Proceed to OK NG
OK
NG
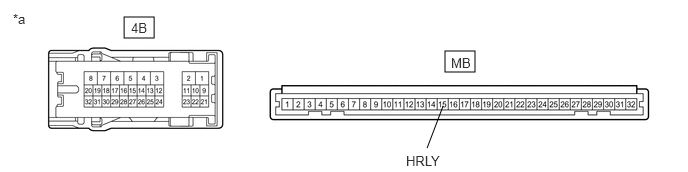
| *a | Component without harness connected
(Driver Side Junction Block Assembly) |
- | - |
Remove the main body ECU (multiplex network body ECU) from the driver side junction block assembly.
Measure the resistance according to the value(s) in the table below.
- Standard Resistance:
Tester Connection Condition Specified Condition 4B-31 - MB-15 (HRLY) Always Below 1 Ω
- Result:
Proceed to OK NG
OK
NG
for TFTM Made
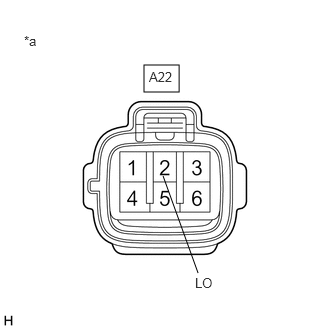
| *a | Front view of wire harness connector
(to Headlight Assembly RH) |
Disconnect the A22 headlight assembly RH connector.
Measure the voltage according to the value(s) in the table below.
- Standard Voltage:
Tester Connection Condition Specified Condition A22-2 (LO) - Body ground Light control switch in head position 11 to 14 V
for GTMC Made
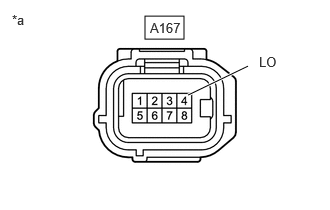
| *a | Front view of wire harness connector
(to Headlight Assembly RH) |
Disconnect the A167 headlight assembly RH connector.
Measure the voltage according to the value(s) in the table below.
- Standard Voltage:
Tester Connection Condition Specified Condition A167-4 (LO) - Body ground Light control switch in head position 11 to 14 V
- Result:
Proceed to OK NG
OK
NG
for TFTM Made
Measure the resistance according to the value(s) in the table below.
- Standard Resistance:
Tester Connection Condition Specified Condition A22-1 (E) - Body ground Always Below 1 Ω
for GTMC Made
Measure the resistance according to the value(s) in the table below.
- Standard Resistance:
Tester Connection Condition Specified Condition A167-5 (E) - Body ground Always Below 1 Ω
- Result:
Proceed to OK NG
OK
NG
for TFTM Made
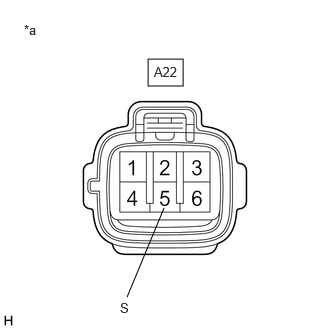
| *a | Front view of wire harness connector
(to Headlight Assembly RH) |
Measure the voltage according to the value(s) in the table below.
- Standard Voltage:
Tester Connection Condition Specified Condition A22-5 (S) - Body ground Ignition switch ON 11 to 14 V
for GTMC Made
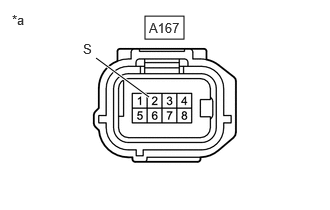
| *a | Front view of wire harness connector
(to Headlight Assembly RH) |
Measure the voltage according to the value(s) in the table below.
- Standard Voltage:
Tester Connection Condition Specified Condition A167-2 (S) - Body ground Light control switch in head position 11 to 14 V
- Result:
Proceed to OK NG
OK
for TFTM Made: Click hereVehicle Exterior>LIGHTING (EXT)>HEADLIGHT ASSEMBLY (for TFTM Made)>REMOVAL202307,999999,_59,_080784,_0393155,RM100000002D1AI,
for GTMC Made: Click hereVehicle Exterior>LIGHTING (EXT)>HEADLIGHT ASSEMBLY (for GTMC Made)>REMOVAL201906,999999,_59,_080784,_0393156,RM100000001HW4M,
NG
Disconnect the I86 main body ECU (multiplex network body ECU) connector.
for TFTM Made
Measure the resistance according to the value(s) in the table below.
- Standard Resistance:
Tester Connection Condition Specified Condition A22-5 (S) - I86-15 (RLEW) Always Below 1 Ω A22-5 (S) or I86-15 (RLEW) - Body ground Always 10 kΩ or higher
for GTMC Made
Measure the resistance according to the value(s) in the table below.
- Standard Resistance:
Tester Connection Condition Specified Condition A167-2 (S) - I86-15 (RLEW) Always Below 1 Ω A167-2 (S) or I86-15 (RLEW) - Body ground Always 10 kΩ or higher
- Result:
Proceed to OK NG
OK
NG
Disconnect the 1A No. 1 integration relay connector.
for TFTM Made
Measure the resistance according to the value(s) in the table below.
- Standard Resistance:
Tester Connection Condition Specified Condition 1A-12 - A22-2 (LO) Always Below 1 Ω 1A-12 or A22-2 (LO) - Body ground Always 10 kΩ or higher
for GTMC Made
Measure the resistance according to the value(s) in the table below.
- Standard Resistance:
Tester Connection Condition Specified Condition 1A-12 - A167-4 (LO) Always Below 1 Ω 1A-12 or A167-4 (LO) - Body ground Always 10 kΩ or higher
- Result:
Proceed to OK NG
OK
NG
Remove the No. 1 integration relay.
Inspect the No. 1 integration relay.
- Result:
Proceed to OK NG
OK
NG
Measure the voltage according to the value(s) in the table below.
- Standard Voltage:
Tester Connection Condition Specified Condition 1B-8 - Body ground Always 11 to 14 V
- Result:
Proceed to OK NG
OK
NG
Disconnect the I85 main body ECU (multiplex network body ECU) connector.
Measure the resistance according to the value(s) in the table below.
- Standard Resistance:
Tester Connection Condition Specified Condition 1A-11 - I85-12 (HRY2) Always Below 1 Ω 1A-11 or I85-12 (HRY2) - Body ground Always 10 kΩ or higher
- Result:
Proceed to OK NG
OK
NG