WINDOW / GLASS POWER WINDOW CONTROL SYSTEM(for NR Series Engine) B2312 Power Window Switch Malfunction
DESCRIPTION
The power window regulator motor assemblies are operated by the multiplex network master switch assembly, power window regulator switch assembly or rear power window regulator switch assemblies. Each power window regulator motor assemblies have motor, regulator and ECU functions.
This DTC is stored when the ECU built into a power window regulator motor assembly and multiplex network master switch assembly determine that the multiplex network master switch assembly, power window regulator switch assembly or rear power window regulator switch assembly is stuck.
| DTC No. | Detection Item | DTC Detection Condition | Trouble Area |
|---|---|---|---|
| B2312 | Power Window Switch Malfunction | ·
Multiplex network master switch assembly stuck ·
Multiplex network master switch assembly held in same position for more than 20 seconds ·
Multiplex network master switch assembly operated for 20 seconds or more |
Multiplex network master switch assembly |
| DTC No. | Detection Item | DTC Detection Condition | Trouble Area |
|---|---|---|---|
| B2312 | Power Window Switch Malfunction | ·
Multiplex network master switch assembly stuck ·
Multiplex network master switch assembly held in same position for more than 20 seconds |
·
Multiplex network master switch assembly ·
Power window regulator motor assembly (for driver door) ·
Wire harness or connector |
| DTC No. | Detection Item | DTC Detection Condition | Trouble Area |
|---|---|---|---|
| B2312 | Power Window Switch Malfunction | ·
Power window regulator switch assembly stuck ·
Power window regulator switch assembly held in same position for more than 20 seconds |
·
Power window regulator switch assembly ·
Power window regulator motor assembly (for front passenger door) ·
Wire harness or connector |
| DTC No. | Detection Item | DTC Detection Condition | Trouble Area |
|---|---|---|---|
| B2312 | Power Window Switch Malfunction | ·
Rear power window regulator switch assembly (for LH door) stuck ·
Rear power window regulator switch assembly (for LH door) held in same position for more than 20 seconds |
·
Rear power window regulator switch assembly (for LH door) ·
Power window regulator motor assembly (for rear LH door) ·
Wire harness or connector |
| DTC No. | Detection Item | DTC Detection Condition | Trouble Area |
|---|---|---|---|
| B2312 | Power Window Switch Malfunction | ·
Rear power window regulator switch assembly (for RH door) stuck ·
Rear power window regulator switch assembly (for RH door) held in same position for more than 20 seconds |
·
Rear power window regulator switch assembly (for RH door) ·
Power window regulator motor assembly (for rear RH door) ·
Wire harness or connector |
WIRING DIAGRAM
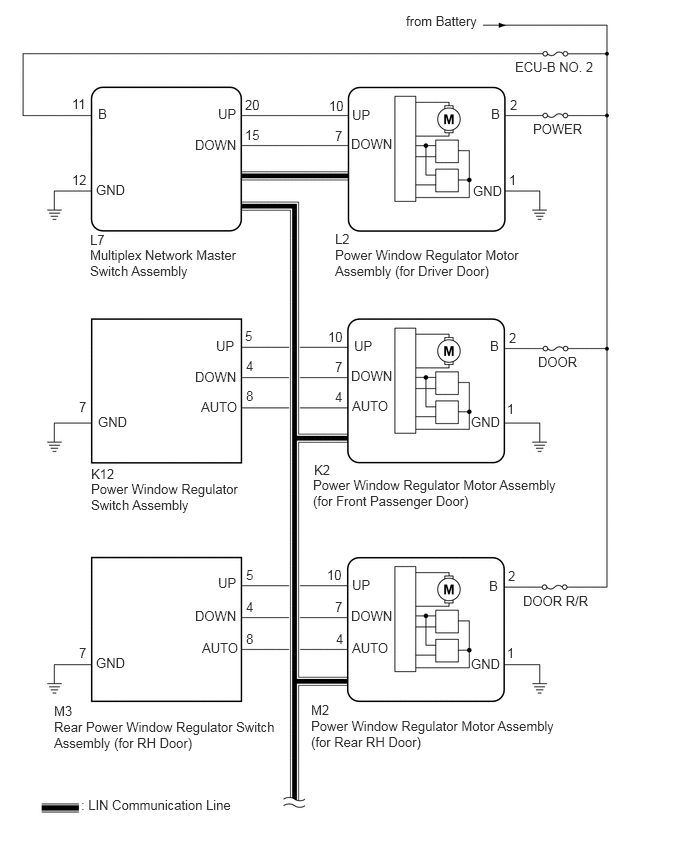
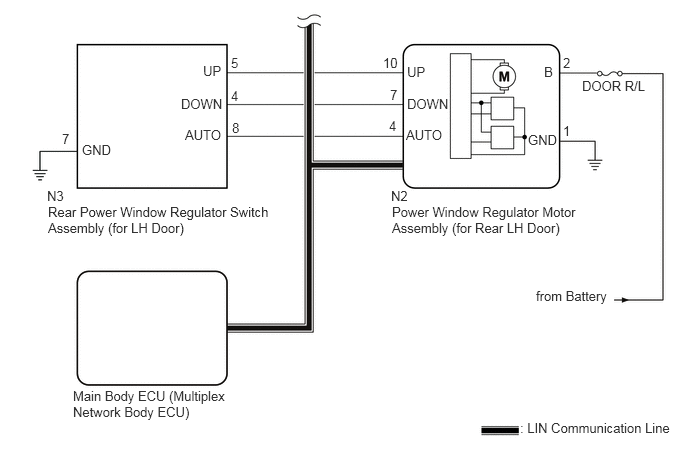
CAUTION / NOTICE / HINT
- NOTICE:
- ·
DTC B2312 is stored in the multiplex network master switch assembly and in each power window regulator motor assembly.
·If a power window regulator motor assembly has been replaced with a new one, initialize the power window control system.
·Inspect the fuses for circuits related to this system before performing the following procedure.
·The power window control system uses the LIN communication system. Inspect the communication function by following How to Proceed with Troubleshooting. Troubleshoot the power window control system after confirming that the communication system is functioning properly.
- HINT:
-
If DTC B2312 is not output again after the DTC has been cleared, the DTC was stored due to the switch being held in the same position continuously.
PROCEDURE
Clear the DTCs.
- Body Electrical > Master Switch > Clear DTCs
- 50002 148
- Body Electrical > D-Door Motor > Clear DTCs
- 50002 124
- Body Electrical > P-Door Motor > Clear DTCs
- 50002 144
- Body Electrical > RL-Door Motor > Clear DTCs
- 50002 146
- Body Electrical > RR-Door Motor > Clear DTCs
- 50002 145
Check for DTCs.
- Body Electrical > Master Switch > Trouble Codes
- 50001 148
- Body Electrical > D-Door Motor > Trouble Codes
- 50001 124
- Body Electrical > P-Door Motor > Trouble Codes
- 50001 144
- Body Electrical > RL-Door Motor > Trouble Codes
- 50001 146
- Body Electrical > RR-Door Motor > Trouble Codes
- 50001 145
- OK:
DTC B2312 is not output.
- Result:
Proceed to OK NG
OK
NG
Check the parts from which this DTC has been output.
- Result:
Result Proceed to DTC output from multiplex network master switch assembly A DTC output from power window regulator motor assembly (for driver door) B DTC output from power window regulator motor assembly (for front passenger door) C DTC output from power window regulator motor assembly (for rear LH door) D DTC output from power window regulator motor assembly (for rear RH door) E
A
B
C
D
E
Connect the GTS to the DLC3.
Turn the ignition switch to ON.
Turn the GTS on.
Enter the following menus: Body Electrical / D-Door Motor / Data List.
Read the Data List according to the display on the GTS.
- Body Electrical > D-Door Motor > Data List
-
Tester Display Measurement Item Range Normal Condition Diagnostic Note D Door P/W Up SW Driver door power window manual up switch signal OFF or ON OFF: Driver door power window manual up switch not being operated
ON: Driver door power window manual up switch being operated- D Door P/W Down SW Driver door power window manual down switch signal OFF or ON OFF: Driver door power window manual down switch not being operated
ON: Driver door power window manual down switch being operated-
- Body Electrical > D-Door Motor > Data List
-
Tester Display D Door P/W Up SW D Door P/W Down SW - 50003 124 2,3
- OK:
On the GTS screen, ON or OFF is displayed accordingly.
- Result:
Proceed to OK NG
OK
NG
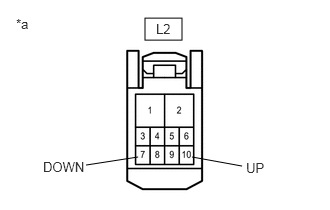
| *a | Front view of wire harness connector
(to Power Window Regulator Motor Assembly (for Driver Door)) |
Disconnect the L2 power window regulator motor assembly (for driver door) connector.
Measure the voltage according to the value(s) in the table below.
- Standard Voltage:
Tester Connection Condition Specified Condition L2-10 (UP) - Body ground Ignition switch ON 11 to 14 V L2-7 (DOWN) - Body ground Ignition switch ON 11 to 14 V
- Result:
Proceed to OK NG
OK
NG
Disconnect the L7 multiplex network master switch assembly connector.
Measure the resistance according to the value(s) in the table below.
- Standard Resistance:
Tester Connection Condition Specified Condition L7-20 (UP) or L2-10 (UP) - Body ground Always 10 kΩ or higher L7-15 (DOWN) or L2-7 (DOWN) - Body ground Always 10 kΩ or higher
- Result:
Proceed to OK NG
OK
NG
Connect the GTS to the DLC3.
Turn the ignition switch to ON.
Turn the GTS on.
Enter the following menus: Body Electrical / P-Door Motor / Data List.
Read the Data List according to the display on the GTS.
- Body Electrical > P-Door Motor > Data List
-
Tester Display Measurement Item Range Normal Condition Diagnostic Note P Door P/W Auto SW Front passenger door power window auto switch signal OFF or ON OFF: Front passenger door power window auto up or auto down switch not being operated
ON: Front passenger door power window auto up or auto down switch being operated- P Door P/W Up SW Front passenger door power window manual up switch signal OFF or ON OFF: Front passenger door power window manual up switch not being operated
ON: Front passenger door power window manual up switch being operated- P Door P/W Down SW Front passenger door power window manual down switch signal OFF or ON OFF: Front passenger door power window manual down switch not being operated
ON: Front passenger door power window manual down switch being operated-
- Body Electrical > P-Door Motor > Data List
-
Tester Display P Door P/W Auto SW P Door P/W Up SW P Door P/W Down SW - 50003 144 1,2,3
- OK:
On the GTS screen, ON or OFF is displayed accordingly.
- Result:
Proceed to OK NG
OK
NG
Remove the power window regulator switch assembly.
Inspect the power window regulator switch assembly.
- Result:
Proceed to OK NG
OK
NG
Disconnect the K2 power window regulator motor assembly (for front passenger door) connector.
Measure the resistance according to the value(s) in the table below.
- Standard Resistance:
Tester Connection Condition Specified Condition K12-5 (UP) or K2-10 (UP) - Body ground Always 10 kΩ or higher K12-8 (AUTO) or K2-4 (AUTO) - Body ground Always 10 kΩ or higher K12-4 (DOWN) or K2-7 (DOWN) - Body ground Always 10 kΩ or higher
- Result:
Proceed to OK NG
OK
NG
Connect the GTS to the DLC3.
Turn the ignition switch to ON.
Turn the GTS on.
Enter the following menus: Body Electrical / RL-Door Motor / Data List.
Read the Data List according to the display on the GTS.
- Body Electrical > RL-Door Motor > Data List
-
Tester Display Measurement Item Range Normal Condition Diagnostic Note RL Door P/W Auto SW Rear LH door power window auto switch signal OFF or ON OFF: Rear LH door power window auto up or auto down switch not being operated
ON: Rear LH door power window auto up or auto down switch being operated- RL Door P/W Up SW Rear LH door power window manual up switch signal OFF or ON OFF: Rear LH door power window manual up switch not being operated
ON: Rear LH door power window manual up switch being operated- RL Door P/W Down SW Rear LH door power window manual down switch signal OFF or ON OFF: Rear LH door power window manual down switch not being operated
ON: Rear LH door power window manual down switch being operated-
- Body Electrical > RL-Door Motor > Data List
-
Tester Display RL Door P/W Auto SW RL Door P/W Up SW RL Door P/W Down SW - 50003 146 1,2,3
- OK:
On the GTS screen, ON or OFF is displayed accordingly.
- Result:
Proceed to OK NG
OK
NG
Remove the rear power window regulator switch assembly (for LH door).
Inspect the rear power window regulator switch assembly (for LH door).
- Result:
Proceed to OK NG
OK
NG
Disconnect the N2 power window regulator motor assembly (for rear LH door) connector.
Measure the resistance according to the value(s) in the table below.
- Standard Resistance:
Tester Connection Condition Specified Condition N3-5 (UP) or N2-10 (UP) - Body ground Always 10 kΩ or higher N3-4 (DOWN) or N2-7 (DOWN) - Body ground Always 10 kΩ or higher N3-8 (AUTO) or N2-4 (AUTO) - Body ground Always 10 kΩ or higher
- Result:
Proceed to OK NG
OK
NG
Connect the GTS to the DLC3.
Turn the ignition switch to ON.
Turn the GTS on.
Enter the following menus: Body Electrical / RR-Door Motor / Data List.
Read the Data List according to the display on the GTS.
- Body Electrical > RR-Door Motor > Data List
-
Tester Display Measurement Item Range Normal Condition Diagnostic Note RR Door P/W Auto SW Rear RH door power window auto switch signal OFF or ON OFF: Rear RH door power window auto up or auto down switch not being operated
ON: Rear RH door power window auto up or auto down switch being operated- RR Door P/W Up SW Rear RH door power window manual up switch signal OFF or ON OFF: Rear RH door power window manual up switch not being operated
ON: Rear RH door power window manual up switch being operated- RR Door P/W Down SW Rear RH door power window manual down switch signal OFF or ON OFF: Rear RH door power window manual down switch not being operated
ON: Rear RH door power window manual down switch being operated-
- Body Electrical > RR-Door Motor > Data List
-
Tester Display RR Door P/W Auto SW RR Door P/W Up SW RR Door P/W Down SW - 50003 145 1,2,3
- OK:
On the GTS screen, ON or OFF is displayed accordingly.
- Result:
Proceed to OK NG
OK
NG
Remove the rear power window regulator switch assembly (for RH door).
Inspect the rear power window regulator switch assembly (for RH door).
- Result:
Proceed to OK NG
OK
NG
Disconnect the M2 power window regulator motor assembly (for rear RH door) connector.
Measure the resistance according to the value(s) in the table below.
- Standard Resistance:
Tester Connection Condition Specified Condition M3-5 (UP) or M2-10 (UP) - Body ground Always 10 kΩ or higher M3-4 (DOWN) or M2-7 (DOWN) - Body ground Always 10 kΩ or higher M3-8 (AUTO) or M2-4 (AUTO) - Body ground Always 10 kΩ or higher
- Result:
Proceed to OK NG
OK
NG