8ZR-FXE ENGINE CONTROL SFI SYSTEM P013611 O2 Sensor Circuit Bank 1 Sensor 2 Circuit Short to Ground P013613 O2 Sensor Circuit Bank 1 Sensor 2 Circuit Open P013614 O2 Sensor Circuit Bank 1 Sensor 2 Circuit Short to Ground or Open P013615 O2 Sensor Circuit Bank 1 Sensor 2 Circuit Short to Battery or Open P013617 O2 Sensor Circuit Bank 1 Sensor 2 Circuit Voltage Above Threshold P013623 O2 Sensor Circuit Bank 1 Sensor 2 Signal Stuck Low P013A00 O2 Sensor Slow Response - Rich to Lean Bank 1 Sensor 2
DESCRIPTION
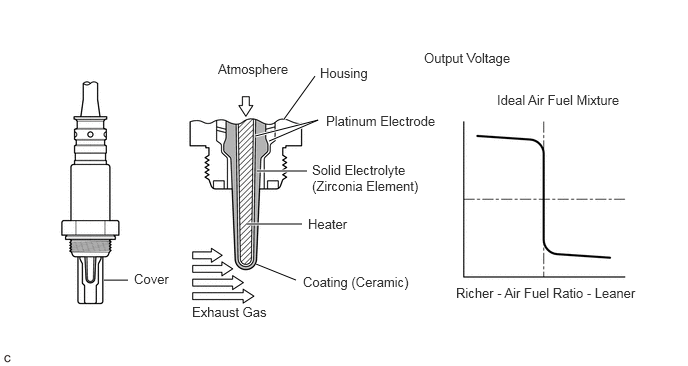
In order to obtain a high purification rate of the carbon monoxide (CO), hydrocarbon (HC) and nitrogen oxide (NOx) components in the exhaust gas, a TWC (Three-Way Catalytic Converter) is used. For the most efficient use of the TWC, the air fuel ratio must be precisely controlled so that it is always close to the stoichiometric air fuel ratio. For the purpose of helping the ECM to deliver accurate air fuel ratio control, a heated oxygen sensor is used.
The heated oxygen sensor is located behind the TWC, and detects the oxygen concentration in the exhaust gas. Since the sensor is integrated with the heater that heats the sensing portion, it is possible to detect the oxygen concentration even when the intake air volume is low (the exhaust gas temperature is low).
When the air fuel ratio becomes lean, the oxygen concentration in the exhaust gas is high. The heated oxygen sensor informs the ECM that the post-TWC air fuel ratio is lean (low voltage, i.e. less than 0.45 V).
Conversely, when the air fuel ratio is richer than the stoichiometric air fuel ratio, the oxygen concentration in the exhaust gas is low. The heated oxygen sensor informs the ECM that the post-TWC air fuel ratio is rich (high voltage, i.e. higher than 0.45 V). The heated oxygen sensor has the property of changing its output voltage drastically when the air fuel ratio is close to the stoichiometric air fuel ratio.
The ECM uses the supplementary information from the heated oxygen sensor to determine whether the air fuel ratio after the TWC is rich or lean, and adjusts the fuel injection duration accordingly. Thus, if the heated oxygen sensor is working improperly due to an internal malfunction, the ECM is unable to compensate for deviations in the primary air fuel ratio control.
| DTC No. | Detection Item | DTC Detection Condition | Trouble Area | MIL | Memory | Note |
|---|---|---|---|---|---|---|
| P013611 | O2 Sensor Circuit Bank 1 Sensor 2 Circuit Short to Ground | Low impedance:
Heated oxygen sensor impedance is less than 5 Ω for 30 seconds or more when ECM presumes sensor is warmed up and operating normally (2 trip detection logic) |
·
Heated oxygen sensor (sensor 2) circuit ·
Heated oxygen sensor (sensor 2) ·
Air fuel ratio sensor (sensor 1) ·
Gas leak from exhaust system ·
EGR valve assembly ·
Fuel pressure ·
Fuel system ·
PCV valve and hose ·
Intake system |
Comes on | DTC stored | SAE Code: P0136 |
| P013613 | O2 Sensor Circuit Bank 1 Sensor 2 Circuit Open | Abnormal output voltage:
During active air fuel ratio control, heated oxygen sensor voltage does not increase to 0.71 V or higher for certain amount of time (2 trip detection logic) |
·
Heated oxygen sensor (sensor 2) circuit ·
Heated oxygen sensor (sensor 2) ·
Air fuel ratio sensor (sensor 1) ·
Gas leak from exhaust system ·
EGR valve assembly ·
Fuel pressure ·
Fuel system ·
PCV valve and hose ·
Intake system |
Comes on | DTC stored | SAE Code: P0136 |
| P013614 | O2 Sensor Circuit Bank 1 Sensor 2 Circuit Short to Ground or Open | High impedance:
Heated oxygen sensor impedance is 15 kΩ or higher for 90 seconds or more when ECM presumes sensor to be warmed up and operating normally (2 trip detection logic) |
·
Heated oxygen sensor (sensor 2) circuit ·
Heated oxygen sensor (sensor 2) ·
Air fuel ratio sensor (sensor 1) ·
Gas leak from exhaust system ·
EGR valve assembly |
Comes on | DTC stored | SAE Code: P0137 |
| P013615 | O2 Sensor Circuit Bank 1 Sensor 2 Circuit Short to Battery or Open | Extremely high voltage (short):
Heated oxygen sensor output voltage exceeds 1.2 V for 10 seconds or more (2 trip detection logic) |
·
Heated oxygen sensor (sensor 2) circuit ·
Heated oxygen sensor (sensor 2) ·
ECM |
Comes on | DTC stored | SAE Code: P0138 |
| P013617 | O2 Sensor Circuit Bank 1 Sensor 2 Circuit Voltage Above Threshold | Low voltage (open):
During active air fuel ratio control, following conditions (a) and (b) met for certain amount of time (2 trip detection logic) (a) Heated oxygen sensor output voltage less than 0.21 V (b) Target air fuel ratio is rich |
·
Heated oxygen sensor (sensor 2) circuit ·
Heated oxygen sensor (sensor 2) ·
Air fuel ratio sensor (sensor 1) ·
Gas leak from exhaust system ·
EGR valve assembly |
Comes on | DTC stored | SAE Code: P0137 |
| P013623 | O2 Sensor Circuit Bank 1 Sensor 2 Signal Stuck Low | Heated oxygen sensor (sensor 2) voltage does not drop to less than 0.2 V immediately after fuel cut starts (2 trip detection logic). | ·
Heated oxygen sensor (sensor 2) circuit ·
Heated oxygen sensor (sensor 2) ·
Gas leak from exhaust system |
Comes on | DTC stored | SAE Code: P0139 |
| P013A00 | O2 Sensor Slow Response - Rich to Lean Bank 1 Sensor 2 | Heated oxygen sensor (sensor 2) voltage does not drop from 0.35 V to 0.2 V immediately after fuel cut starts (1 trip detection logic). | ·
Heated oxygen sensor (sensor 2) circuit ·
Heated oxygen sensor (sensor 2) ·
Gas leak from exhaust system |
Comes on | DTC stored | SAE Code: P013A |
MONITOR DESCRIPTION
Active Air fuel Ratio Control
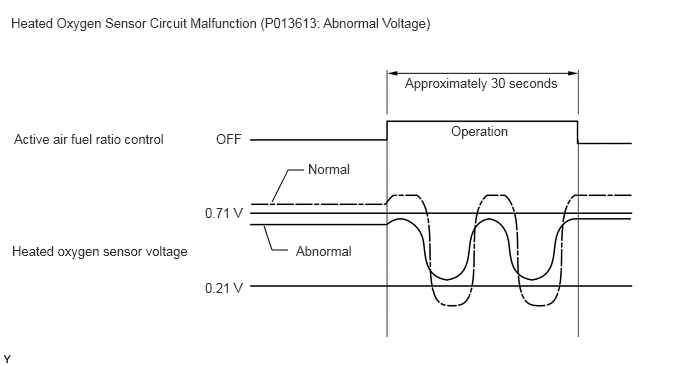
The ECM usually performs air fuel ratio feedback control so that the air fuel ratio sensor output indicates a near stoichiometric air fuel ratio. This vehicle includes active air fuel ratio control in addition to regular air fuel ratio control. The ECM performs active air fuel ratio control to detect any deterioration in the Three-Way Catalytic Converter (TWC) and any malfunctions of the heated oxygen sensor (refer to the diagram below).
Active air fuel ratio control is performed for approximately 30 seconds while driving with a warm engine. During active air fuel ratio control, the air fuel ratio is forcibly regulated to become lean or rich by the ECM. If the ECM detects a malfunction, a DTC is stored.
Abnormal Heated Oxygen Sensor Output Voltage (DTC P013613)
While the ECM is performing active air fuel ratio control, the air fuel ratio is forcibly regulated to become rich or lean. If the sensor is not functioning properly, the variation in output voltage is small. For example, when the heated oxygen sensor voltage does not increase to 0.71 V or higher during active air fuel ratio control, the ECM determines that the sensor output voltage is abnormal and stores DTC P013613.
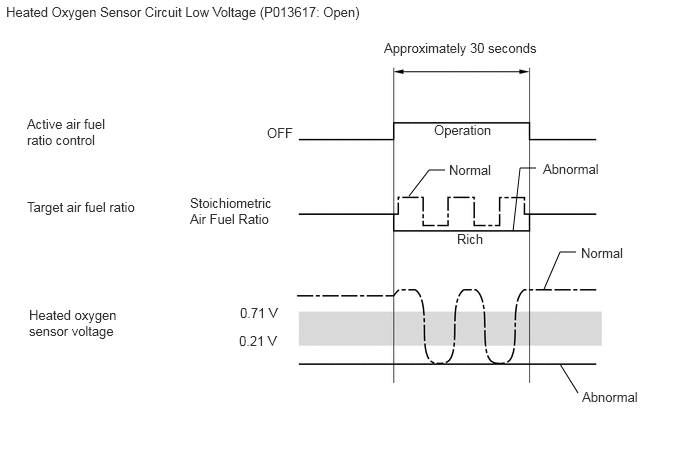
Open in Heated Oxygen Sensor Circuit (DTC P013617)
During active air fuel ratio control, the ECM calculates the Oxygen Storage Capacity (OSC)* of the Three-Way Catalytic Converter (TWC) by forcibly regulating the air fuel ratio to become rich or lean.
If the heated oxygen sensor has an open circuit, or the output voltage of the sensor noticeably decreases, the OSC indicates an extraordinarily high value. Even if the ECM attempts to continue regulating the air fuel ratio to become rich or lean, the heated oxygen sensor output will not change.
While performing active air fuel ratio control, when the target air fuel ratio is rich and the heated oxygen sensor output voltage is less than 0.21 V (lean), the ECM interprets this as an abnormally low sensor output voltage and stores DTC P013617.
- HINT:
-
*: The TWC has the capability to store oxygen. The OSC and the emission purification capacity of the TWC are mutually related. The ECM determines whether the catalyst has deteriorated based on the calculated OSC value.
High or Low Impedance of Heated Oxygen Sensor (DTCs P013611 or P013614)
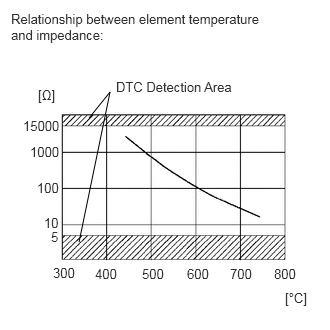
During normal air fuel ratio feedback control, there are small variations in the exhaust gas oxygen concentration. In order to continuously monitor the slight variation of the heated oxygen sensor signal while the engine is running, the impedance* of the sensor is measured by the ECM. The ECM determines that there is a malfunction in the sensor when the measured impedance deviates from the standard range.
*: The effective resistance in an alternating current electrical circuit.
- HINT:
- ·
The impedance cannot be measured using an ohmmeter.
·DTC P013611 indicates the deterioration of the heated oxygen sensor. The ECM stores the DTC by calculating the impedance of the sensor when the typical enabling conditions are satisfied (2 driving cycles).
·DTC P013614 indicates an open or short circuit in the heated oxygen sensor (2 driving cycles). The ECM stores the DTC when the impedance of the sensor exceeds the threshold 15 kΩ.
Extremely High Heated Oxygen Sensor Output Voltage (DTC P013615)
The ECM continuously monitors the heated oxygen sensor output voltage while the engine is running.
DTC P013615 is stored if the heated oxygen sensor voltage output is 1.2 V or higher for 10 seconds or more.
Abnormal Heated Oxygen Sensor Output Voltage During Fuel-cut (DTC P013623)
The sensor output voltage drops to less than 0.2 V (extremely lean status) immediately when the vehicle decelerates and fuel cut is operating. If the voltage does not drop to less than 0.2 V for 6 seconds or more, the ECM determines that the sensor response has deteriorated, illuminates the MIL and stores a DTC.
Abnormal Heated Oxygen Sensor Output Voltage During Fuel-cut from Rich Condition (DTC P013A00)
If the sensor output voltage does not drop from 0.35 to 0.2 V immediately when the vehicle decelerates and fuel cut is operating, the ECM illuminates the MIL and stores a DTC.
MONITOR STRATEGY
| Required Sensors/Components (Main) | Heated oxygen sensor (sensor 2) |
| Required Sensors/Components (Related) | Crankshaft position sensor
Engine coolant temperature sensor Mass air flow meter sub-assembly Throttle position sensor Air fuel ratio sensor |
| Frequency of Operation | Once per driving cycle: Active air fuel ratio control detection, heated oxygen sensor abnormal voltage during fuel cut
Continuous: Other |
TYPICAL ENABLING CONDITIONS
| Auxiliary battery voltage | 11 V or higher |
| Estimated heated oxygen sensor temperature | Less than 700°C (1292°F) |
| Auxiliary battery voltage | 11 V or higher |
| Intake air temperature | -10°C (14°F) or higher |
| Engine coolant temperature | 75°C (167°F) or higher |
| Atmospheric pressure | 76 kPa(abs) [11 psi(abs)] or higher |
| Engine speed | Less than 4500 rpm |
| Air fuel ratio sensor status | Activated |
| Fuel system status | Closed loop |
| Engine load | 10% or higher, and less than 80% |
| Auxiliary battery voltage | 11 V or higher |
| Estimated heated oxygen sensor temperature | 450°C (842°F) or higher, and less than 750°C (1382°F) |
| Auxiliary battery voltage | 11 V or higher |
| Time after engine start | 2 seconds or more |
| Engine coolant temperature | 75°C (167°F) or higher |
| Estimate catalyst temperature | 450°C (842°F) or higher |
| Fuel cut | On |
| Auxiliary battery voltage | 11 V or higher |
| Engine coolant temperature | 75°C (167°F) or higher |
| Estimate catalyst temperature | 450°C (842°F) or higher |
| Fuel cut | On |
TYPICAL MALFUNCTION THRESHOLDS
| Duration of following condition | 30 seconds or more |
| Heated oxygen sensor impedance | Less than 5 Ω |
| All of the following conditions (a), (b) and (c) met | - |
| (a) OSC (Oxygen Storage Capacity) of catalyst | 1.9 g or more |
| (b) Commanded air fuel ratio | 14.4 or less |
| (c) Heated oxygen sensor voltage | 0.21 V or higher, and less than 0.71 V |
| Duration of following condition | 90 seconds or more |
| Heated oxygen sensor impedance | 15 kΩ or higher |
| Duration of following condition | 10 seconds or more |
| Heated oxygen sensor voltage | 1.2 V or higher |
| All of the following conditions (a), (b) and (c) met | - |
| (a) OSC (Oxygen Storage Capacity) of catalyst | 1.9 g or more |
| (b) Commanded air fuel ratio | 14.4 or less |
| (c) Heated oxygen sensor voltage | Less than 0.21 V |
| Duration until heated oxygen sensor voltage drops to 0.2 V during fuel cut | 6 seconds or more |
| Duration that heated oxygen sensor voltage drops from 0.35 to 0.2 V during fuel cut (Normalized) | 1 or more |
CONFIRMATION DRIVING PATTERN
- HINT:
- ·
This confirmation driving pattern is used for the "Perform Confirmation Driving Pattern" procedure of the following diagnostic troubleshooting procedure.
·Performing this confirmation driving pattern will activate the heated oxygen sensor monitor (the catalyst monitor is performed simultaneously). This is very useful for verifying the completion of a repair.
·After repair has been completed, clear the DTC and then check that the vehicle has returned to normal by performing the following All Readiness check procedure.
·When clearing the permanent DTCs, refer to the "CLEAR PERMANENT DTC" procedure.
- P013611, P013613, P013614, P013615 and P013617
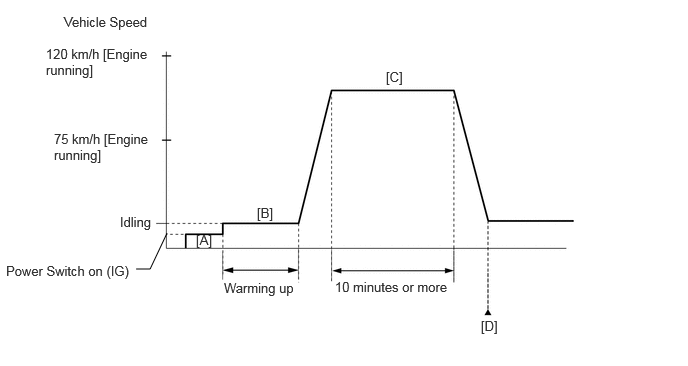
Connect the GTS to the DLC3.
Turn the power switch on (IG).
Turn the GTS on.
Clear the DTCs (even if no DTCs are stored, perform the clear DTC procedure).
Turn the power switch off and wait for at least 30 seconds.
Turn the power switch on (IG) [A].
Turn the GTS on.
Put the engine in Inspection Mode (Maintenance Mode).
Start the engine and warm it up until the engine coolant temperature is 75°C (167°F) or higher [B].
With the engine running, drive the vehicle at 75 to 120 km/h (46 to 75 mph) for 10 minutes or more [C].
- CAUTION:
-
When performing the confirmation driving pattern, obey all speed limits and traffic laws.
- HINT:
-
If the engine stops, further depress the accelerator pedal to restart the engine.
Enter the following menus: Powertrain / Engine / Trouble Codes [D].
Read the pending DTCs.
- HINT:
- ·
If a pending DTC is output, the system is malfunctioning.
·If a pending DTC is not output, perform the following procedure.
Enter the following menus: Powertrain / Engine / Utility / All Readiness.
Input the DTC: P013611, P013613, P013614, P013615 and P013617.
Check the DTC judgment result.
| GTS Display | Description |
|---|---|
| NORMAL | ·
DTC judgment completed ·
System normal |
| ABNORMAL | ·
DTC judgment completed ·
System abnormal |
| INCOMPLETE | ·
DTC judgment not completed ·
Perform driving pattern after confirming DTC enabling conditions |
- HINT:
- ·
If the judgment result is NORMAL, the system is normal.
·If the judgment result is ABNORMAL, the system is malfunctioning.
·If the judgment result is INCOMPLETE, perform steps [C] through [D] again.
·[A] to [D]: Normal judgment procedure.
The normal judgment procedure is used to complete DTC judgment and also used when clearing permanent DTCs.
·When clearing the permanent DTCs, do not disconnect the cable from the auxiliary battery terminal or attempt to clear the DTCs during this procedure, as doing so will clear the universal trip and normal judgment histories.
- P013623 and P013A00
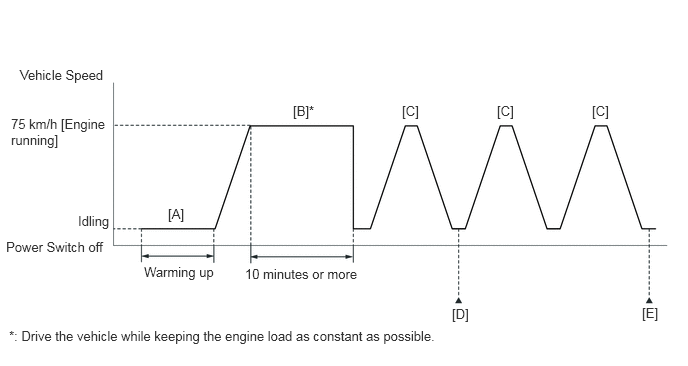
Connect the GTS to the DLC3.
Turn the power switch on (IG).
Turn the GTS on.
Clear the DTCs (even if no DTCs are stored, perform the clear DTC procedure).
Turn the power switch off and wait for at least 30 seconds.
Turn the power switch on (IG).
Turn the GTS on.
Put the engine in Inspection Mode (Maintenance Mode).
Start the engine and warm it up until the engine coolant temperature is 75°C (167°F) or higher with park (P) selected [A].
- HINT:
-
In order to keep the idle stable, turn off the A/C and all other electric loads and do not perform any shift operations.
With the engine running, drive the vehicle at approximately 75 km/h (46 mph) for 10 minutes or more [B].
- CAUTION:
-
When performing the confirmation driving pattern, obey all speed limits and traffic laws.
- HINT:
- ·
Drive the vehicle while keeping the engine load as constant as possible.
·If the engine stops, further depress the accelerator pedal to restart the engine.
With brake (B) selected and the engine running, drive the vehicle at 75 km/h (46 mph), and then decelerate the vehicle by releasing the accelerator pedal for 5 seconds or more to perform the fuel-cut [C].
- CAUTION:
-
When performing the confirmation driving pattern, obey all speed limits and traffic laws.
- HINT:
-
If the engine stops, further depress the accelerator pedal to restart the engine.
Repeat step [C] 2 times or more in one driving cycle.
Enter the following menus: Powertrain / Engine / Trouble Codes / Pending [D].
Read the pending DTCs.
- HINT:
- ·
If a pending DTC is output, the system is malfunctioning.
·If a pending DTC is not output, perform the following procedure.
Enter the following menus: Powertrain / Engine / Utility / All Readiness.
Input the DTC: P013623 or P013A00.
Check the DTC judgment result.
| GTS Display | Description |
|---|---|
| NORMAL | ·
DTC judgment completed ·
System normal |
| ABNORMAL | ·
DTC judgment completed ·
System abnormal |
| INCOMPLETE | ·
DTC judgment not completed ·
Perform driving pattern after confirming DTC enabling conditions |
- HINT:
- ·
If the judgment result is NORMAL, the system is normal.
·If the judgment result is ABNORMAL, the system is malfunctioning.
·If the judgment result is INCOMPLETE, drive the vehicle with brake (B) selected, and then perform step [C] again.
·[A] to [D]: Normal judgment procedure.
The normal judgment procedure is used to complete DTC judgment and also used when clearing permanent DTCs.
·When clearing the permanent DTCs, do not disconnect the cable from the auxiliary battery terminal or attempt to clear the DTCs during this procedure, as doing so will clear the universal trip and normal judgment histories.
WIRING DIAGRAM
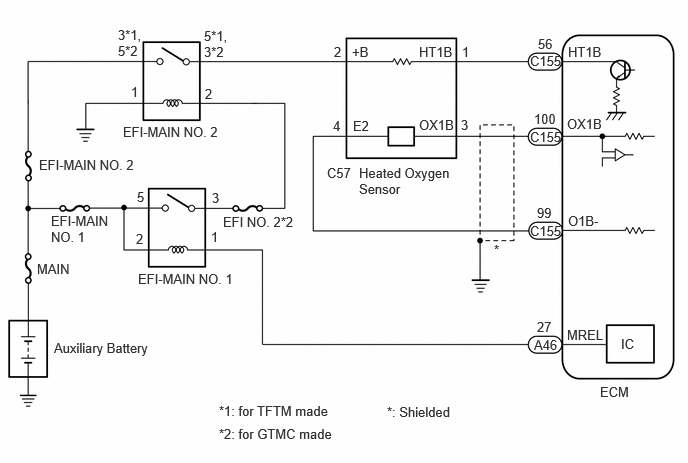
CAUTION / NOTICE / HINT
- HINT:
-
Malfunctioning areas can be identified by performing the Active Test [Control the Injection Volume for A/F Sensor]. This Active Test can help to determine whether the air fuel ratio sensor, heated oxygen sensor and other potential trouble areas are malfunctioning.
-
The following procedure describes how to perform the Active Test [Control the Injection Volume for A/F Sensor] using the GTS.
Connect the GTS to the DLC3.
Turn the power switch on (IG).
Turn the GTS on.
Put the engine in Inspection Mode (Maintenance Mode).
Start the engine and warm it up until the engine coolant temperature is 75°C (167°F) or higher.
Idle the engine for 5 minutes or more with park (P) selected.
Enter the following menus: Powertrain / Engine / Active Test / Control the Injection Volume for A/F Sensor / Data List / A/F (O2) Sensor Voltage B1S1 and O2 Sensor Voltage B1S2.
Perform the Active Test with the engine idling (change the fuel injection volume).
Monitor the output voltage of the air fuel ratio sensor (A/F (O2) Sensor Voltage B1S1) and heated oxygen sensor (O2 Sensor Voltage B1S2) displayed on the GTS.
- HINT:
- ·
The Active Test [Control the Injection Volume for A/F Sensor] can be used to lower the fuel injection volume by 12.5% or increase the injection volume by 12.5%.
·Each sensor reacts in accordance with the increase and decrease in the fuel injection volume.
| GTS Display (Sensor) | Injection Volume | Status | Voltage |
|---|---|---|---|
| A/F (O2) Sensor Voltage B1S1
(Air fuel ratio) |
12.5% | Rich | Below 3.1 V |
| -12.5% | Lean | Higher than 3.4 V | |
| O2 Sensor Voltage B1S2
(Heated oxygen) |
12.5% | Rich | Higher than 0.55 V |
| -12.5% | Lean | Below 0.4 V |
- NOTICE:
-
The air fuel ratio sensor has an output delay of a few seconds and the heated oxygen sensor has a maximum output delay of approximately 20 seconds.
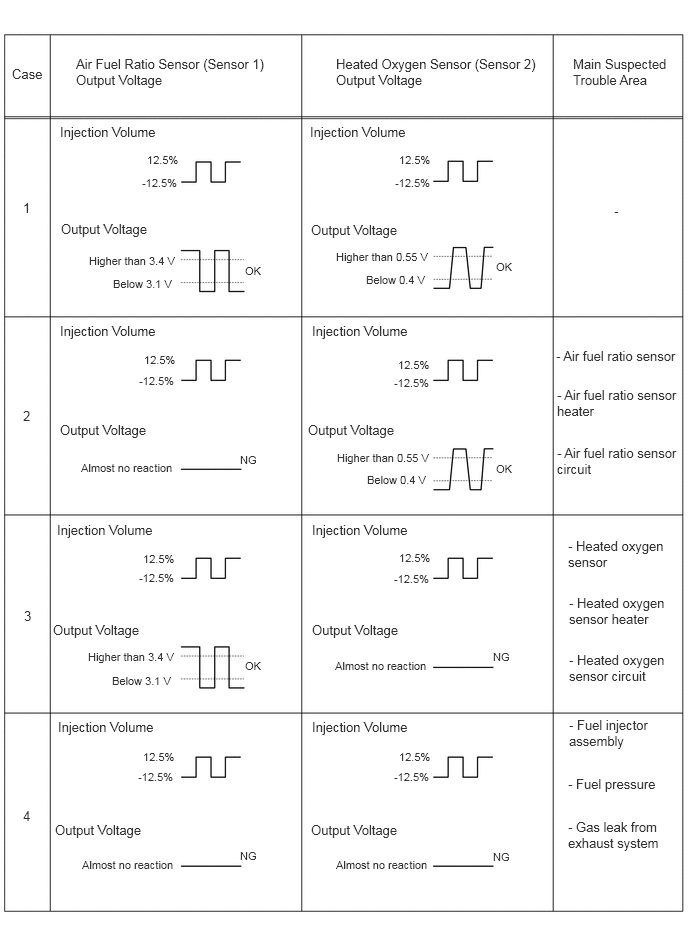
Performing the Active Test [Control the Injection Volume for A/F Sensor] allows the output voltage of the air fuel ratio sensor and heated oxygen sensor to be checked and graphed.
- NOTICE:
- ·
Vehicle Control History may be stored in the hybrid vehicle control ECU if the engine is malfunctioning. Certain vehicle condition information is recorded when Vehicle Control History is stored. Reading the vehicle conditions recorded in both the Freeze Frame Data and Vehicle Control History can be useful for troubleshooting.
(Select Powertrain in Health Check and then check the time stamp data.)
·If any "Engine Malfunction" Vehicle Control History item has been stored in the hybrid vehicle control ECU, make sure to clear it. However, as all Vehicle Control History items are cleared simultaneously, if any Vehicle Control History items other than "Engine Malfunction" are stored, make sure to perform any troubleshooting for them before clearing Vehicle Control History.
·Inspect the fuses for circuits related to this system before performing the following procedure.
- HINT:
- ·
Sensor 1 refers to the sensor closest to the engine assembly.
·Sensor 2 refers to the sensor farthest away from the engine assembly.
·Read Freeze Frame Data using the GTS. Freeze Frame Data records the engine condition when malfunctions are detected. When troubleshooting, Freeze Frame Data can help determine if the vehicle was moving or stationary, if the engine was warmed up or not, if the air fuel ratio was lean or rich, and other data from the time the malfunction occurred.
PROCEDURE
Connect the GTS to the DLC3.
Turn the power switch on (IG).
Turn the GTS on.
Enter the following menus: Powertrain / Engine / Trouble Codes.
Read the DTCs.
- Powertrain > Engine > Trouble Codes
- 50001 372
- Result:
Result Proceed to P013615 is output A P013614 or P013617 is output B P013611 or P013613 is output C P013623 or P013A00 is output D P013611, P013613, P013614, P013615, P013617, P013623 or P013A00 and other DTCs are output E
- HINT:
-
If any DTCs other than P013611, P013613, P013614, P013615, P013617, P013623 or P013A00 are output, troubleshoot those DTCs first.
A
B
C
D
E
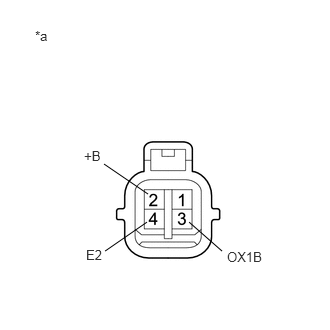
| *a | Component without harness connected
(Heated Oxygen Sensor) |
Disconnect the heated oxygen sensor connector.
Measure the resistance according to the value(s) in the table below.
- Standard Resistance:
Tester Connection Condition Specified Condition 2 (+B) - 4 (E2) Always 10 kΩ or higher 2 (+B) - 3 (OX1B) Always 10 kΩ or higher
- HINT:
-
Perform "Inspection After Repair" after replacing the heated oxygen sensor.
- Result:
Proceed to OK NG
OK
NG
Turn the power switch off and wait for 5 minutes or more.
Disconnect the ECM connector.
Measure the resistance according to the value(s) in the table below.
- Standard Resistance:
Tester Connection Condition Specified Condition C155-56 (HT1B) - C155-100 (OX1B) Always 10 kΩ or higher
- Result:
Proceed to OK NG
OK
NG
Connect the GTS to the DLC3.
Turn the power switch on (IG).
Turn the GTS on.
Put the engine in Inspection Mode (Maintenance Mode).
- Powertrain > Hybrid Control > Utility
-
Tester Display Inspection Mode - 50005 397 2103
Start the engine and warm it up until the engine coolant temperature is 75°C (167°F) or higher.
Idle the engine for 5 minutes or more with park (P) selected.
Enter the following menus: Powertrain / Engine / Active Test / Control the Injection Volume for A/F Sensor / Data List / Coolant Temperature and O2 Sensor Voltage B1S2.
- Powertrain > Engine > Active Test
-
Active Test Display Control the Injection Volume for A/F Sensor -
Data List Display Coolant Temperature O2 Sensor Voltage B1S2 - 50004 372 8 205,218
Change the fuel injection volume using the GTS, and monitor the output voltage of the heated oxygen sensor (O2 Sensor Voltage B1S2) displayed on the GTS.
- HINT:
- ·
The Active Test [Control the Injection Volume for A/F Sensor] can be used to lower the fuel injection volume by 12.5% or increase the injection volume by 12.5%.
·The heated oxygen sensor has a maximum output delay of approximately 20 seconds.
- Standard Voltage:
Fluctuates between 0.4 V or less, and 0.55 V or higher.
- Result:
Proceed to OK NG
OK
NG
Connect the GTS to the DLC3.
Turn the power switch on (IG).
Turn the GTS on.
Put the engine in Inspection Mode (Maintenance Mode).
- Powertrain > Hybrid Control > Utility
-
Tester Display Inspection Mode - 50005 397 2103
Start the engine and warm it up until the engine coolant temperature is 75°C (167°F) or higher.
Idle the engine for 5 minutes or more with park (P) selected.
Enter the following menus: Powertrain / Engine / Active Test / Control the Injection Volume for A/F Sensor / Data List / Coolant Temperature, A/F (O2) Sensor Voltage B1S1 and O2 Sensor Voltage B1S2.
- Powertrain > Engine > Active Test
-
Active Test Display Control the Injection Volume for A/F Sensor -
Data List Display Coolant Temperature A/F (O2) Sensor Voltage B1S1 O2 Sensor Voltage B1S2 - 50004 372 8 205,225,218
Change the fuel injection volume using the GTS, and monitor the output voltage of the air fuel ratio sensor (A/F (O2) Sensor Voltage B1S1) and heated oxygen sensor (O2 Sensor Voltage B1S2) displayed on the GTS.
- HINT:
- ·
The Active Test [Control the Injection Volume for A/F Sensor] can be used to lower the fuel injection volume by 12.5% or increase the injection volume by 12.5%.
·The air fuel ratio sensor is displayed as A/F (O2) Sensor Voltage B1S1, and the heated oxygen sensor is displayed as O2 Sensor Voltage B1S2 on the GTS.
·The air fuel ratio sensor has an output delay of a few seconds and the heated oxygen sensor has a maximum output delay of approximately 20 seconds.
·If the sensor output voltage does not change (almost no reaction) while performing the Active Test, the sensor may be malfunctioning.
- Result:
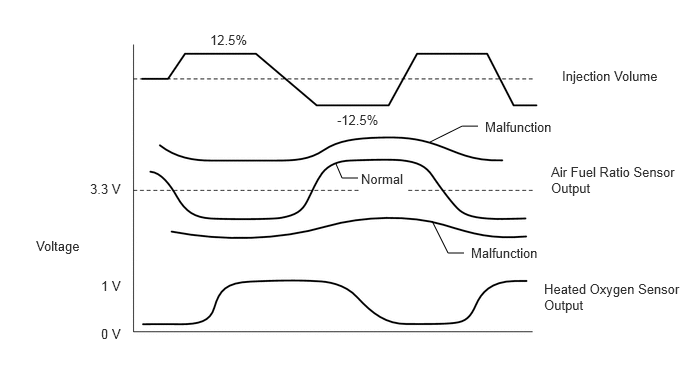
GTS Display (Sensor) Voltage Variation Proceed to A/F (O2) Sensor Voltage B1S1 (Air fuel ratio) Alternates between higher and less than 3.3 V OK Remains at higher than 3.3 V NG Remains at less than 3.3 V
- HINT:
-
A normal heated oxygen sensor voltage (O2 Sensor Voltage B1S2) reacts in accordance with increases and decreases in the fuel injection volume. When the air fuel ratio sensor voltage (A/F (O2) Sensor Voltage B1S1) remains at either less or higher than 3.3 V despite the heated oxygen sensor indicating a normal reaction, the air fuel ratio sensor is malfunctioning.
OK
NG
Connect the GTS to the DLC3.
Turn the power switch on (IG).
Turn the GTS on.
Put the engine in Inspection Mode (Maintenance Mode).
- Powertrain > Hybrid Control > Utility
-
Tester Display Inspection Mode - 50005 397 2103
Start the engine and warm it up until the engine coolant temperature is 75°C (167°F) or higher.
- HINT:
-
The A/C switch and all accessories should be off.
Enter the following menus: Powertrain / Engine / Active Test / Control the EGR Step Position / Data List / Intake Manifold Absolute Pressure, Coolant Temperature and Engine Independent.
- Powertrain > Engine > Active Test
-
Active Test Display Control the EGR Step Position -
Data List Display Intake Manifold Absolute Pressure Coolant Temperature Engine Independent - 50004 372 25 385,205,428
Confirm that the value of Data List item Engine Independent is "Operate" then check the value of Intake Manifold Absolute Pressure while performing the Active Test.
- NOTICE:
- ·
Do not leave the EGR valve open for 10 seconds or more during the Active Test.
·Be sure to return the EGR valve to step 0 when the Active Test is completed.
·Do not open the EGR valve 30 steps or more during the Active Test.
- OK:
The value of Intake Manifold Absolute Pressure changes in response to the EGR step position when the value of Engine Independent is "Operate".
- Standard:
- Control the EGR Step Position (Active Test) 0 Steps 0 to 30 Steps Intake Manifold Absolute Pressure
(Data List)(EGR valve is fully closed) Intake Manifold Absolute Pressure value is at least +10 kPa (1.45 psi) higher than when EGR valve is fully closed
- HINT:
- ·
If the value of Data List item Engine Independent is "Not Opr" when the engine is idling, charge control is being performed. Perform the Active Test after charge control is complete ("Operate" is displayed).
·While performing the Active Test, if the increase in the value of Intake Manifold Absolute Pressure is small, the EGR valve assembly may be malfunctioning.
·Even if the EGR valve assembly is malfunctioning, rough idling or an increase in the value of Intake Manifold Absolute Pressure may occur while performing the Active Test. However, the amount that the value of Intake Manifold Absolute Pressure increases will be smaller than normal.
- Result:
Proceed to OK NG
OK
NG
Remove the EGR valve assembly.
Check if the EGR valve is stuck open.
- OK:
EGR valve is tightly closed.
- HINT:
-
Perform "Inspection After Repair" after replacing the EGR valve assembly.
- Result:
Proceed to OK NG
OK
NG
Replace the air fuel ratio sensor.
- HINT:
-
Perform "Inspection After Repair" after replacing the air fuel ratio sensor.
- Result:
Proceed to NEXT
NEXT
Connect the GTS to the DLC3.
Turn the power switch on (IG).
Turn the GTS on.
Clear the DTCs.
- Powertrain > Engine > Clear DTCs
- 50002 372
Turn the power switch off and wait for at least 30 seconds.
- Result:
Proceed to NEXT
NEXT
Drive the vehicle in accordance with the driving pattern described in Confirmation Driving Pattern.
Enter the following menus: Powertrain / Engine / Utility / All Readiness.
- Powertrain > Engine > Utility
-
Tester Display All Readiness - 50005 372 20
Input the DTC: P013611 or P013613.
Check that the DTC judgment result is NORMAL. If the DTC judgment result is INCOMPLETE, perform the confirmation drive pattern again but increase the vehicle speed.
- Result:
Result Proceed to NORMAL
(DTCs are not output)A ABNORMAL
(DTC P013611 or P013613 is output)B
- HINT:
-
Perform "Inspection After Repair" after replacing the heated oxygen sensor.
A
B
Check for exhaust gas leaks.
- OK:
No gas leaks in exhaust system.
- HINT:
-
Perform "Inspection After Repair" after repairing or replacing the exhaust system.
- Result:
Proceed to OK NG
OK
NG
Inspect the heated oxygen sensor.
- HINT:
-
Perform "Inspection After Repair" after replacing the heated oxygen sensor.
- Result:
Proceed to OK NG
OK
NG
Disconnect the heated oxygen sensor connector.
Disconnect the ECM connector.
Measure the resistance according to the value(s) in the table below.
- Standard Resistance:
Tester Connection Condition Specified Condition C57-1 (HT1B) - C155-56 (HT1B) Always Below 1 Ω C57-3 (OX1B) - C155-100 (OX1B) Always Below 1 Ω C57-4 (E2) - C155-99 (O1B-) Always Below 1 Ω C57-1 (HT1B) or C155-56 (HT1B) - Body ground and other terminals Always 10 kΩ or higher C57-3 (OX1B) or C155-100 (OX1B) - Body ground and other terminals Always 10 kΩ or higher
- Result:
Proceed to OK NG
OK
NG
Connect the GTS to the DLC3.
Turn the power switch on (IG).
Turn the GTS on.
Put the engine in Inspection Mode (Maintenance Mode).
- Powertrain > Hybrid Control > Utility
-
Tester Display Inspection Mode - 50005 397 2103
Start the engine and warm it up until the engine coolant temperature is 75°C (167°F) or higher.
- HINT:
-
The A/C switch and all accessories should be off.
Enter the following menus: Powertrain / Engine / Active Test / Control the EGR Step Position / Data List / Intake Manifold Absolute Pressure, Coolant Temperature and Engine Independent.
- Powertrain > Engine > Active Test
-
Active Test Display Control the EGR Step Position -
Data List Display Intake Manifold Absolute Pressure Coolant Temperature Engine Independent - 50004 372 25 385,205,428
Confirm that the value of Data List item Engine Independent is "Operate" then check the value of Intake Manifold Absolute Pressure while performing the Active Test.
- NOTICE:
- ·
Do not leave the EGR valve open for 10 seconds or more during the Active Test.
·Be sure to return the EGR valve to step 0 when the Active Test is completed.
·Do not open the EGR valve 30 steps or more during the Active Test.
- OK:
The value of Intake Manifold Absolute Pressure changes in response to the EGR step position when the value of Engine Independent is "Operate".
- Standard:
- Control the EGR Step Position (Active Test) 0 Steps 0 to 30 Steps Intake Manifold Absolute Pressure
(Data List)(EGR valve is fully closed) Intake Manifold Absolute Pressure value is at least +10 kPa (1.45 psi) higher than when EGR valve is fully closed
- HINT:
- ·
If the value of Data List item Engine Independent is "Not Opr" when the engine is idling, charge control is being performed. Perform the Active Test after charge control is complete ("Operate" is displayed).
·While performing the Active Test, if the increase in the value of Intake Manifold Absolute Pressure is small, the EGR valve assembly may be malfunctioning.
·Even if the EGR valve assembly is malfunctioning, rough idling or an increase in the value of Intake Manifold Absolute Pressure may occur while performing the Active Test. However, the amount that the value of Intake Manifold Absolute Pressure increases will be smaller than normal.
- Result:
Proceed to OK NG
OK
NG
Remove the EGR valve assembly.
Check if the EGR valve is stuck open.
- OK:
EGR valve is tightly closed.
- HINT:
-
Perform "Inspection After Repair" after replacing the EGR valve assembly.
- Result:
Proceed to OK NG
OK
NG
Replace the heated oxygen sensor.
- HINT:
-
Perform "Inspection After Repair" after replacing the heated oxygen sensor.
- Result:
Proceed to NEXT
NEXT
Connect the GTS to the DLC3.
Turn the power switch on (IG).
Turn the GTS on.
Clear the DTCs.
- Powertrain > Engine > Clear DTCs
- 50002 372
Turn the power switch off and wait for at least 30 seconds.
- Result:
Proceed to NEXT
NEXT
Drive the vehicle in accordance with the driving pattern described in Confirmation Driving Pattern.
Enter the following menus: Powertrain / Engine / Utility / All Readiness.
- Powertrain > Engine > Utility
-
Tester Display All Readiness - 50005 372 20
Input the DTC: P013611, P013613, P013614, P013615 or P013617.
Check that the DTC judgment result is NORMAL. If the DTC judgment result is INCOMPLETE, perform the confirmation drive pattern again but increase the vehicle speed.
- Result:
Result Proceed to NORMAL
(DTCs are not output)A ABNORMAL
(DTC P013611, P013613, P013614, P013615 or P013617 is output)B
- HINT:
-
Perform "Inspection After Repair" after replacing the air fuel ratio sensor.
A
B
Check for exhaust gas leaks.
- OK:
No gas leaks in exhaust system.
- HINT:
-
Perform "Inspection After Repair" after repairing or replacing the exhaust system.
- Result:
Proceed to OK NG
OK
NG
Turn the power switch off and wait for 5 minutes or more.
Disconnect the ECM connector.
Measure the resistance according to the value(s) in the table below.
- Standard Resistance:
Tester Connection Condition Specified Condition C155-56 (HT1B) - C155-100 (OX1B) Always 10 kΩ or higher
- Result:
Proceed to OK NG
OK
NG
Connect the GTS to the DLC3.
Turn the power switch on (IG).
Turn the GTS on.
Clear the DTCs.
- Powertrain > Engine > Clear DTCs
- 50002 372
Turn the power switch off and wait for at least 30 seconds.
- Result:
Proceed to NEXT
NEXT
Drive the vehicle in accordance with the driving pattern described in Confirmation Driving Pattern.
Enter the following menus: Powertrain / Engine / Utility / All Readiness.
- Powertrain > Engine > Utility
-
Tester Display All Readiness - 50005 372 20
Input the DTC: P013623 or P013A00.
Check that the DTC judgment result is NORMAL. If the DTC judgment result is INCOMPLETE, perform the confirmation drive pattern again but increase the vehicle speed.
- Result:
Result Proceed to NORMAL
(DTCs are not output)A ABNORMAL
(DTC P013623 or P013A00 is output)B
- HINT:
-
Perform "Inspection After Repair" after replacing the heated oxygen sensor.
A
B