8ZR-FXE ENGINE CONTROL ECM REMOVAL
CAUTION / NOTICE / HINT
The necessary procedures (adjustment, calibration, initialization or registration) that must be performed after parts are removed and installed, or replaced during ECM removal/installation are shown below.
| Replaced Part or Performed Procedure | Necessary Procedure | Effect/Inoperative Function when Necessary Procedure not Performed | Link |
|---|---|---|---|
| Replacement of ECM | Vehicle Identification Number (VIN) or frame number registration | DTC stored | ( 202304,999999,_51,_080778,_0393982,RM100000002BDLH,) 202304,999999,_51,_080778,_0393982,RM100000002BDLH,)
|
| ECU configuration | - | (202304,999999,_V1,_143216,_0598316,RM100000002B3MK,)
|
|
| Update ECU security key | Vehicle Control History (RoB) are stored | (202304,999999,_V1,_143216,_0598316,RM100000002B3ML,)
|
|
| Perform Total Short Trip Estimate Registration | - | (202304,999999,_51,_080778,_0393982,RM100000002BDLH,)
|
- NOTICE:
-
If the ECM has been struck or dropped, replace it.
- HINT:
-
When the cable is disconnected / reconnected to the auxiliary battery terminal, systems temporarily stop operating. However, each system has a function that completes learning the first time the system is used.
Learning completes when vehicle is driven Effect/Inoperative Function when Necessary Procedure not Performed Necessary Procedure Link Front Camera System Drive the vehicle straight ahead at 15 km/h (9 mph) or more for 1 second or more. ( 202304,999999,_95,_139716,_0584193,RM1000000029F4C,)
PROCEDURE

 1. PRECAUTION
- NOTICE:
- ·
After turning the power switch off, waiting time may be required before disconnecting the cable from the negative (-) auxiliary battery terminal.
·Do not replace the battery ECU assembly and ECM at the same time as the HV battery learning values will be lost. However, if it is necessary to replace both ECUs at the same time, replace them by following the procedure below.
·Do not replace the battery ECU assembly or ECM with a used one from another vehicle.
HV battery learning values are stored in the battery ECU assembly and ECM and are used to detect malfunctions and illuminate the hybrid battery indicator light in the combination meter assembly. When either of these ECUs is replaced, the new ECU receives the HV battery learning values from the other ECU and stores them.
Procedure when replacing both battery ECU assembly and ECM:
Disconnect the cable from the negative (-) auxiliary battery terminal.
Replace either ECU.
Connect the cable to the negative (-) auxiliary battery terminal.
Turn the power switch on (READY) and wait for 5 minutes or more.
Turn the power switch off and disconnect the cable from the negative (-) auxiliary battery terminal.
Replace the other ECU.
Connect the cable to the negative (-) auxiliary battery terminal.
Check that the power switch can be turned on (READY).
- HINT:
-
If the battery ECU assembly and ECM are replaced at the same time without following the above procedure, replace either the battery ECU assembly and ECM with its original one and then replace it again by following the above procedure. If the correct procedure is not followed, perform the procedure again from the beginning.
2. GPF DEPOSITION VALUES (w/ Differential Pressure Sensor)
- NOTICE:
-
Before replacing the ECM, store the volumes of accumulated ash (metal oxide) and PM (Particulate Matter). After replacing the ECM, write the volumes of accumulated ash and PM to a new ECM.
3. TOTAL SHORT TRIP ESTIMATE
- HINT:
-
It requires when replacing the ECM.
4.REMOVE AUXILIARY BATTERY
89661
5.REMOVE ECM
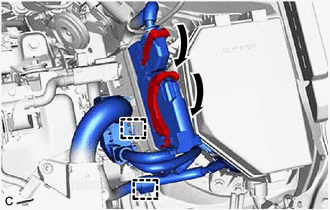
Raise the 2 levers while pushing the locks on the levers, and disconnect the 2 ECM connectors.
- NOTICE:
-
After disconnecting the ECM connectors, make sure that dirt, water or other foreign matter does not contact the connecting parts of the ECM connectors.
Disengage the 2 clamps.
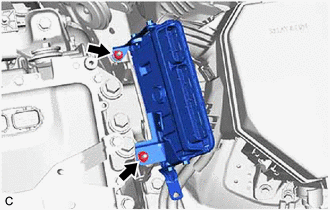
Remove the 2 nuts and ECM from the engine mounting insulator LH.
- NOTICE:
-
If the ECM has been struck or dropped, replace it.
89667E
6.REMOVE NO. 1 ECM BRACKET
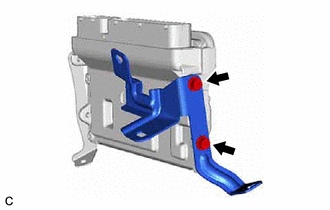
Remove the 2 screws and No. 1 ECM bracket from the ECM.
89668
7.REMOVE NO. 2 ECM BRACKET
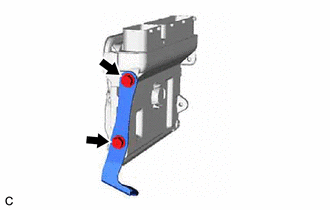
Remove the 2 screws and No. 2 ECM bracket from the ECM.