WINDOW / GLASS WINDSHIELD GLASS REMOVAL
CAUTION / NOTICE / HINT
The necessary procedures (adjustment, calibration, initialization or registration) that must be performed after parts are removed and installed, or replaced during windshield glass removal/installation are shown below.
| Replaced Part or Performed Procedure | Necessary Procedure | Effect/Inoperative Function When Necessary Procedures are not Performed | Link |
|---|---|---|---|
·
Forward recognition camera ·
Windshield glass (Including removal and installation) |
Adjust forward recognition camera | ·
Front camera system ·
Lane control system ·
Road sign assist system ·
Front radar sensor system ·
Pre-collision system ·
Automatic high beam system |
One time recognition:( 201906,202208,_51,_078884,_0384728,RM100000001IUI2,202208,999999,_51,_078884,_0384728,RM1000000024I1G,) 201906,202208,_51,_078884,_0384728,RM100000001IUI2,202208,999999,_51,_078884,_0384728,RM1000000024I1G,)
or Sequential recognition:( 201906,202208,_51,_078884,_0384728,RM100000001IULT,202208,999999,_51,_078884,_0384728,RM1000000024I1H,)
|
PROCEDURE

 1. PRECAUTION
- NOTICE:
-
When replacing the windshield glass of a vehicle equipped with a forward recognition camera, make sure to use a Toyota genuine part. If a non-Toyota genuine part is used, the forward recognition camera may not be able to be installed due to a missing bracket. Also, the front camera system, lane control system, road sign assist system, front radar sensor system, pre-collision system or automatic high beam system may not operate properly due to a difference in the transmissivity or black ceramic border.
85192
2.REMOVE WINDSHIELD WIPER ARM COVER
3.REMOVE WINDSHIELD WIPER ARM AND BLADE ASSEMBLY LH
4.REMOVE WINDSHIELD WIPER ARM AND BLADE ASSEMBLY RH
53867H
5.REMOVE FRONT FENDER TO COWL SIDE SEAL LH
53866J
6.REMOVE FRONT FENDER TO COWL SIDE SEAL RH
- HINT:
-
Use the same procedure described for the LH side.
53808G
7.REMOVE FENDER APRON MUDGUARD SEAL SUB-ASSEMBLY LH
53807G
8.REMOVE FENDER APRON MUDGUARD SEAL SUB-ASSEMBLY RH
- HINT:
-
Use the same procedure described for the LH side.
55708
9.REMOVE COWL TOP VENTILATOR LOUVER SUB-ASSEMBLY
62312B
10.REMOVE FRONT DOOR OPENING TRIM WEATHERSTRIP LH
62311B
11.REMOVE FRONT DOOR OPENING TRIM WEATHERSTRIP RH
- HINT:
-
Use the same procedure described for the LH side.
74680
12.REMOVE PILLAR ASSIST GRIP ASSEMBLY
- HINT:
-
Use the same procedure for the other side.
62212
13.REMOVE FRONT PILLAR GARNISH LH
62211
14.REMOVE FRONT PILLAR GARNISH RH
- HINT:
-
Use the same procedure described for the LH side.
74320
15.REMOVE VISOR ASSEMBLY LH
74310
16.REMOVE VISOR ASSEMBLY RH
- HINT:
-
Use the same procedure described for the LH side.
74348
17.REMOVE VISOR HOLDER
18.REMOVE ASSIST GRIP ASSEMBLY (w/ Assist Grip)
19.REMOVE MAP LIGHT ASSEMBLY
86466D
20.REMOVE NO. 1 FORWARD RECOGNITION COVER (w/ Pre-collision System)
87810
21.REMOVE INNER REAR VIEW MIRROR ASSEMBLY (w/ EC Mirror)
87810
22.REMOVE INNER REAR VIEW MIRROR ASSEMBLY (w/o EC Mirror)
87810
23.REMOVE INNER REAR VIEW MIRROR ASSEMBLY (for Digital Inner Mirror)
86464A
24.REMOVE FORWARD RECOGNITION LATCH (w/ Pre-collision System)
8646C
25.REMOVE FORWARD RECOGNITION CAMERA (w/ Pre-collision System)
86401
26.REMOVE FORWARD RECOGNITION WITH HEATER HOOD SUB-ASSEMBLY (w/ Pre-collision System)
86768
27.REMOVE ROOF ANTENNA COVER (w/ Digital Audio Broadcasting Antenna)
89941
28.REMOVE RAIN SENSOR (w/ Rain Sensor)
63438F
29.REMOVE NO. 1 INNER ROOF RACK COVER (for High Roof)
63439D
30.REMOVE NO. 2 INNER ROOF RACK COVER (for High Roof)
63413C
31.REMOVE FRONT INNER ROOF RACK BOARD (for High Roof)
32.REMOVE ROOF HEADLINING ASSEMBLY
- HINT:
-
Remove a sufficient amount of the front portion of the roof headlining assembly so that windshield glass removal and installation procedures can be performed.
Partially remove the roof headlining.
for Semi-trim, for Standard Roof:
for Full-trim, for Standard Roof:
56111A
33.REMOVE WINDSHIELD GLASS
- NOTICE:
-
The windshield glass may fall while performing this procedure. Therefore, use suction cups to hold the windshield glass from the outside of the vehicle.
w/ Windshield Deicer:
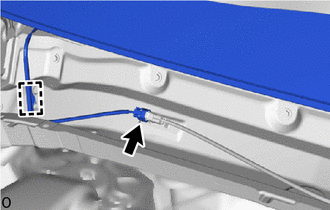
Detach the clamp and disconnect the windshield deicer connector.
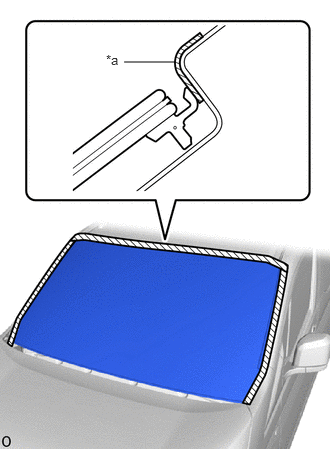
| *a | Apply protective tape |

|
Protective Tape |
Apply protective tape on the body surface around the outer edge of the windshield glass to the left, right and top sides.
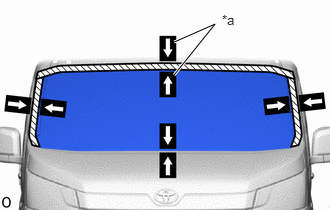
| *a | Matchmarks |
When reusing the windshield glass:
Place matchmarks over the glass and vehicle body at the locations indicated in the illustration.
Install the suction cups to the windshield glass.
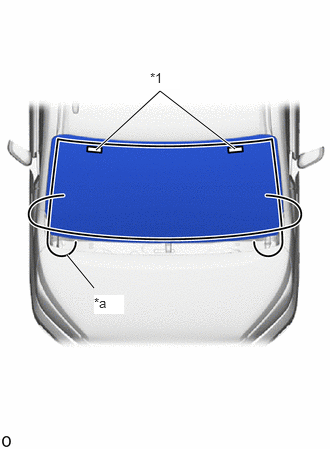
| *1 | Windshield Glass Stopper |
| *a | Piano Wire |
From the interior, insert a piano wire between the vehicle body and glass as shown in the illustration.
Tie objects that can serve as handles (for example, wooden blocks) to both wire ends.
- NOTICE:
- ·
When separating the glass from the vehicle, be careful not to damage the vehicle paint or interior/exterior ornaments.
·To prevent the safety pad from being scratched when removing the windshield glass sub-assembly, place a plastic sheet between the piano wire and safety pad.
Cut through the adhesive by pulling the piano wire around the glass.
- NOTICE:
-
Leave as much adhesive on the vehicle body as possible when cutting through the adhesive.
Using suction cups, detach the 2 windshield glass stoppers and windshield glass retainers and remove the windshield glass.
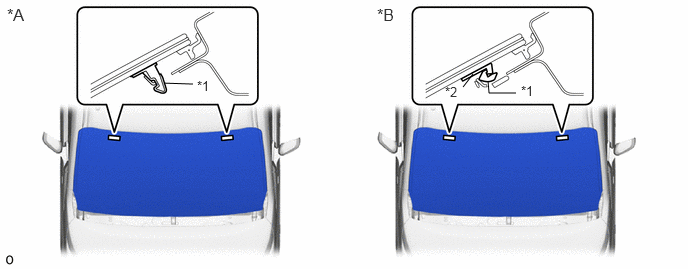
| *A | for 1-piece Type | *B | for 2-piece Type |
| *1 | No. 1 Windshield Glass Stopper | *2 | No. 2 Windshield Glass Stopper |
56115C
34.REMOVE NO. 1 WINDSHIELD GLASS STOPPER
When reusing the windshield glass:
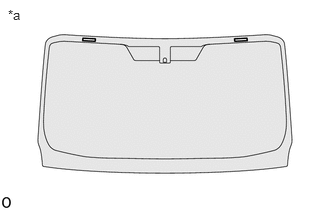
| *a | Backside |
for 1-piece Type:
Using a gasket scraper, remove the 2 No. 1 window glass stoppers from the windshield glass.
- NOTICE:
-
Be careful not to damage the windshield glass.
- HINT:
-
Only 2-piece type windshield glass stoppers are provided as supply parts. Use 2-piece type stoppers as replacements even if 1-piece type stoppers were originally installed.
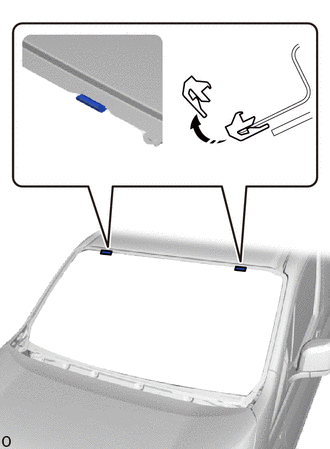

|
Remove in this Direction |
for 2-piece Type:
Using a gasket scraper, remove the 2 No. 1 window glass stoppers from the body.
- NOTICE:
- ·
Be careful not to damage the windshield glass.
·Be sure to replace the No. 1 windshield glass stopper with a new one.
56116C
35.REMOVE NO. 2 WINDSHIELD GLASS STOPPER (for 2-piece Type)
| *a | Backside |
When reusing the windshield glass:
Using a gasket scraper, remove the 2 No. 2 window glass stoppers from the windshield glass.
- NOTICE:
- ·
Be careful not to damage the windshield glass.
·Be sure to replace the No. 2 window glass stoppers with a new one.
56153C
36.REMOVE FRONT WINDOW INNER CENTER MOULDING
- HINT:
-
Perform the following procedure only when replacement of the front window inner center moulding is necessary.
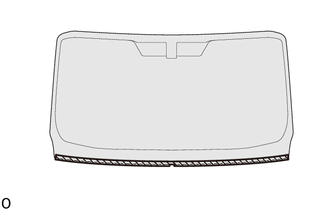
Using a scraper, remove the front window inner center moulding.
- NOTICE:
- ·
Be careful not to damage the windshield glass.
·Be sure to replace the front window inner center moulding with a new one.
82217A
37.REMOVE FRONT WINDOW DEFOGGER WIRE (for Windshield Deicer)
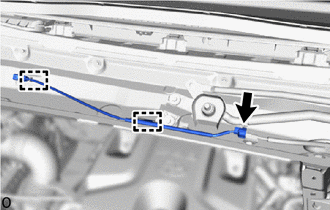
for LHD:
Disconnect the connector and detach the wire harness clamp to remove the front window defogger wire.