SUPPLEMENTAL RESTRAINT SYSTEMS SIDE AIRBAG SENSOR(for Center Pillar) INSTALLATION
CAUTION / NOTICE / HINT
- HINT:
- ·
Use the same procedure for RHD and LHD vehicles.
·The procedure listed below is for LHD vehicles.
·Use the same procedure for the RH and LH sides.
·The procedure listed below is for the LH side.
PROCEDURE

 89831A
1.INSTALL NO. 1 SIDE AIRBAG SENSOR
89831A
1.INSTALL NO. 1 SIDE AIRBAG SENSOR
Check that the ignition switch is off.
Check that the cable is disconnected from the negative (-) battery terminal.
- CAUTION:
- ·
Wait at least 90 seconds after disconnecting the cable from the negative (-) battery terminal to disable the SRS system.
·If the airbag deploys for any reason, it may cause a serious accident.
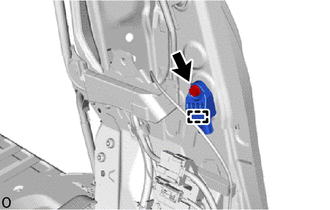
Attach the guide and hold the No. 1 side airbag sensor in place.
- NOTICE:
- ·
If the No. 1 side airbag sensor has been dropped, replace it with a new one.
·When installing the No. 1 side airbag sensor, be careful that the SRS wiring does not interfere with or is not pinched between other parts.
Install the bolt.
- Torque:
- 9.0 N*m (92 kgf*cm, 80 in.*lbf)
- NOTICE:
-
Tighten the bolt while holding the No. 1 side airbag sensor because the No. 1 side airbag sensor guide is easily damaged.
Check that there is no looseness in the installation parts of the No. 1 side airbag sensor.
Connect the airbag connector.
- NOTICE:
-
When connecting any airbag connector, take care not to damage the airbag wire harness.
- HINT:
-
Refer to How to Connect or Disconnect Airbag Connector:
- ··
62414A
2.INSTALL LOWER CENTER PILLAR GARNISH LH
Install the lower center pillar garnish LH.
- HINT:
-
Use the same procedure described for the RH side.
Return the front door opening trim weatherstrip LH to its original position.
for Slide Door Side:
Return the No. 1 slide door weatherstrip LH to its original position.
for Wagon:
- HINT:
-
Use the same procedure described for the RH side.
except Wagon:
- HINT:
-
Use the same procedure described for the RH side.
74680
3.INSTALL PILLAR ASSIST GRIP ASSEMBLY B (except Wagon, w/ Assist Grip)
74617A
4.INSTALL ASSIST GRIP PLUG (except Wagon, w/ Assist Grip)
74680
5.INSTALL PILLAR ASSIST GRIP ASSEMBLY B (for Wagon)
74617A
6.INSTALL ASSIST GRIP PLUG (for Wagon)
73220
7.INSTALL FRONT SEAT OUTER BELT ASSEMBLY LH (FLOOR ANCHOR)
73233D
8.INSTALL OUTER LAP BELT ANCHOR COVER
67918D
9.INSTALL REAR DOOR SCUFF PLATE LH (for Slide Door Side)
- HINT:
-
Use the same procedure described for the RH side.
67914B
10.INSTALL FRONT DOOR SCUFF PLATE LH
67912A
11.INSTALL FRONT DOOR OUTSIDE SCUFF PLATE LH
12.CONNECT CABLE TO NEGATIVE BATTERY TERMINAL
13. INITIALIZATION AFTER RECONNECTING BATTERY TERMINAL
- HINT:
-
When disconnecting and reconnecting the battery, there is an automatic learning function that completes learning when the respective system is used.
14.PERFORM DIAGNOSTIC SYSTEM CHECK
15.CHECK SRS WARNING LIGHT
16.PERFORM SYSTEM INITIALIZATION AND CALIBRATION