HEATING / AIR CONDITIONING AIR CONDITIONING SYSTEM(for Automatic Air Conditioning System) Rear Blower Motor Circuit
DESCRIPTION
The blower motor assembly reads the signal and controls operation and speed changes of the blower motor.
If the blower air volume is weak, or there are any other blower malfunctions such as the temperature or air volume cannot be changed, the following causes are possible.
| Malfunction Status | Factor |
|---|---|
·
Blower does not operate at all. (No air comes out.) ·
Blower airflow volume cannot be changed. ·
Blower airflow volume is continuously weak. ·
Blower airflow volume is sometimes weak. ·
Cooling is poor. (w/ Integration Control Panel (for Rear Automatic Cooler)) ·
Takes time to cool down. (w/ Integration Control Panel (for Rear Automatic Cooler)) |
Rear blower motor circuit |
WIRING DIAGRAM
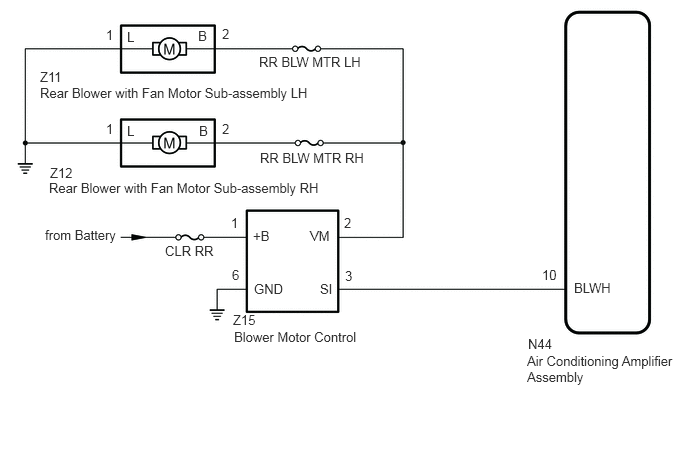
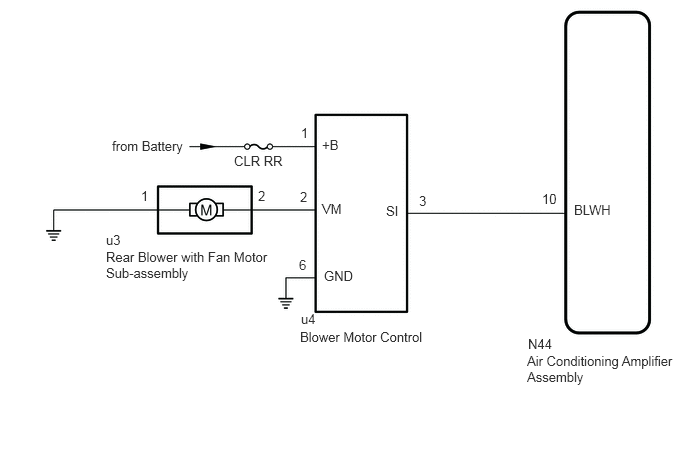
CAUTION / NOTICE / HINT
- NOTICE:
-
Inspect the fuses for circuits related to this system before performing the following procedure.
PROCEDURE
- Result:
Result Proceed to for Rear Automatic Cooler A for Rear Automatic Air Conditioning B
A
B
Connect the GTS to the DLC3.
Turn the ignition switch to ON.
Turn the GTS on.
Enter the following menus: Body Electrical / Air Conditioner / Active Test.
Perform the Active Test according to the display on the GTS.
- Body Electrical > Air Conditioner > Active Test
-
Tester Display Measurement Item Control Range Diagnostic Note Rear Blower Motor Rear blower with fan motor sub-assembly Min.: 0
Max.: 31-
- Body Electrical > Air Conditioner > Active Test
-
Tester Display Rear Blower Motor - 50004 121 35
- Result:
Result Proceed to Rear blower with fan motor sub-assembly does not operate A Rear blower with fan motor sub-assembly operates but does not change speed B
A
B
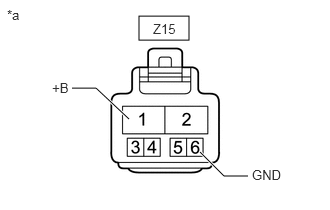
| *a | Front view of wire harness connector
(to Blower Motor Control) |
Disconnect the blower motor control connector.
Measure the resistance according to the value(s) in the table below.
- Standard Resistance:
Tester Connection Condition Specified Condition Z15-6 (GND) - Body ground Always Below 1 Ω
Measure the voltage according to the value(s) in the table below.
- Standard Voltage:
Tester Connection Condition Specified Condition Z15-1 (+B) - Body ground Always 11 to 14 V
- Result:
Proceed to OK NG
OK
NG
Remove the rear blower with fan motor sub-assembly.
Inspect the rear blower with fan motor sub-assembly.
- Result:
Proceed to OK NG
OK
NG
Disconnect the Z11 rear blower with fan motor sub-assembly LH connector.
Disconnect the Z12 rear blower with fan motor sub-assembly RH connector.
Disconnect the Z15 blower motor control connector.
Measure the resistance according to the value(s) in the table below.
- Standard Resistance:
- for LH:
Tester Connection Condition Specified Condition Z11-2 (B) - Z15-2 (VM) Always Below 1 Ω Z11-1 (L) - Body ground Always Below 1 Ω Z11-2 (B) or Z15-2 (VM) - Other terminals and body ground Always 10 kΩ or higher
- for RH:
Tester Connection Condition Specified Condition Z12-2 (B) - Z15-2 (VM) Always Below 1 Ω Z12-1 (L) - Body ground Always Below 1 Ω Z12-2 (B) or Z15-2 (VM) - Other terminals and body ground Always 10 kΩ or higher
- Result:
Proceed to OK NG
OK
NG
Disconnect the Z15 blower motor control connector.
Disconnect the N44 air conditioning amplifier assembly connector.
Measure the resistance according to the value(s) in the table below.
- Standard Resistance:
Tester Connection Condition Specified Condition Z15-3 (SI) - N44-10 (BLWH) Always Below 1 Ω Z15-3 (SI) or N44-10 (BLWH) - Other terminals and body ground Always 10 kΩ or higher
- Result:
Proceed to OK NG
OK
NG
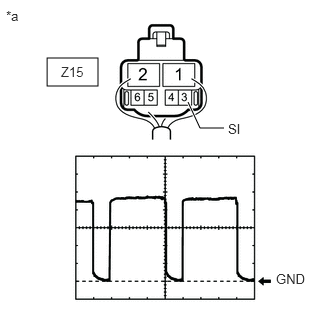
| *a | Component with harness connected
(Blower Motor Control) |
Using an oscilloscope, check the waveform.
| Item | Content |
|---|---|
| Terminal No. (Symbol) | Z15-3 (SI) - Body ground |
| Tool Setting | 1 V/DIV., 500 μs./DIV. |
| Condition | ·
Ignition switch ON ·
Blower switch: LO |
- OK:
Waveform is as shown in the illustration.
- HINT:
-
Waveform varies with the blower level.
- Result:
Proceed to OK NG
OK
NG
Connect the GTS to the DLC3.
Turn the ignition switch to ON.
Turn the GTS on.
Enter the following menus: Body Electrical / Air Conditioner / Active Test.
Perform the Active Test according to the display on the GTS.
- Body Electrical > Air Conditioner > Active Test
-
Tester Display Measurement Item Control Range Diagnostic Note Rear Blower Motor Rear blower with fan motor sub-assembly Min.: 0
Max.: 31-
- Body Electrical > Air Conditioner > Active Test
-
Tester Display Rear Blower Motor - 50004 121 35
- Result:
Result Proceed to Rear blower with fan motor sub-assembly does not operate A Rear blower with fan motor sub-assembly operates but does not change speed B
A
B
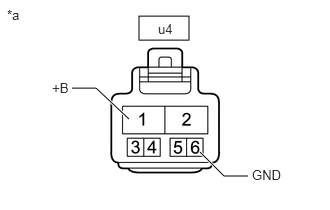
| *a | Front view of wire harness connector
(to Blower Motor Control) |
Disconnect the blower motor control connector.
Measure the resistance according to the value(s) in the table below.
- Standard Resistance:
Tester Connection Condition Specified Condition u4-6 (GND) - Body ground Always Below 1 Ω
Measure the voltage according to the value(s) in the table below.
- Standard Voltage:
Tester Connection Condition Specified Condition u4-1 (+B) - Body ground Always 11 to 14 V
- Result:
Proceed to OK NG
OK
NG
Remove the rear blower with fan motor sub-assembly.
Inspect the rear blower with fan motor sub-assembly.
- Result:
Proceed to OK NG
OK
NG
Disconnect the u3 rear blower with fan motor sub-assembly connector.
Disconnect the u4 blower motor control connector.
Measure the resistance according to the value(s) in the table below.
- Standard Resistance:
Tester Connection Condition Specified Condition u3-2 - u4-2 (VM) Always Below 1 Ω u3-1 - Body ground Always Below 1 Ω u3-2 or u4-2 (VM) - Other terminals and body ground Always 10 kΩ or higher
- Result:
Proceed to OK NG
OK
NG
Disconnect the u4 blower motor control connector.
Disconnect the N44 air conditioning amplifier assembly connector.
Measure the resistance according to the value(s) in the table below.
- Standard Resistance:
Tester Connection Condition Specified Condition u4-3 (SI) - N44-10 (BLWH) Always Below 1 Ω u4-3 (SI) or N44-10 (BLWH) - Other terminals and body ground Always 10 kΩ or higher
- Result:
Proceed to OK NG
OK
NG
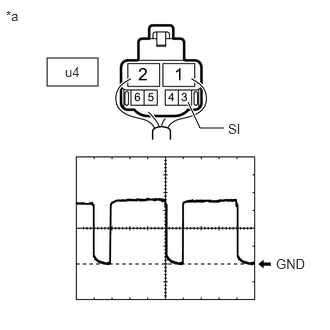
| *a | Component with harness connected
(Blower Motor Control) |
Using an oscilloscope, check the waveform.
| Item | Content |
|---|---|
| Terminal No. (Symbol) | u4-3 (SI) - Body ground |
| Tool Setting | 1 V/DIV., 500 μs./DIV. |
| Condition | ·
Ignition switch ON ·
Blower switch: LO |
- OK:
Waveform is as shown in the illustration.
- HINT:
-
Waveform varies with the blower level.
- Result:
Proceed to OK NG
OK
NG