THEFT DETERRENT / KEYLESS ENTRY THEFT DETERRENT SYSTEM Unlock Warning Switch Circuit
DESCRIPTION
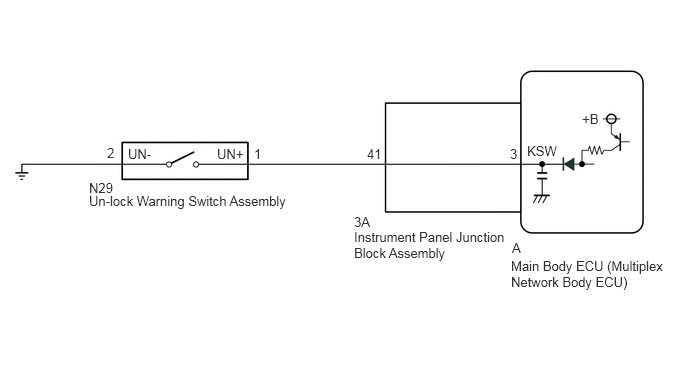
The key unlock warning switch assembly comes on when the ignition key is inserted into the ignition key cylinder and goes off when the ignition key is removed.
WIRING DIAGRAM
PROCEDURE
Connect the GTS to the DLC3.
Turn the ignition switch to ON.
Turn the GTS on.
Enter the following menus: Body Electrical / Main Body / Data List.
According to the display on the GTS, read the Data List.
- Body Electrical > Main Body > Data List
-
Tester Display Measurement Item Range Normal Condition Diagnostic Note Key Unlock Warning SW Un-lock warning switch ON or OFF ON: Key inserted into ignition key cylinder
OFF: Key removed from ignition key cylinder-
- Body Electrical > Main Body > Data List
-
Tester Display Key Unlock Warning SW - 50003 123 32
- OK:
When the key is in the ignition key cylinder, "ON" appears on the screen.
- Result:
Proceed to OK NG
OK
NG
Remove the un-lock warning switch assembly.
Inspect the un-lock warning switch assembly.
- Result:
Proceed to OK NG
OK
NG
Disconnect the 3A instrument panel junction block assembly connector.
Disconnect the N29 un-lock warning switch assembly connector.
Measure the resistance according to the value(s) in the table below.
- Standard Resistance:
Tester Connection Condition Specified Condition 3A-41 - N29-1 (UN+) Always Below 1 Ω 3A-41 or N29-1 (UN+) - Other terminals and body ground Always 10 kΩ or higher N29-2 (UN-) - Body ground Always Below 1 Ω
- Result:
Proceed to OK NG
OK
NG
Remove the instrument panel junction block assembly.
for LHD:
for RHD:
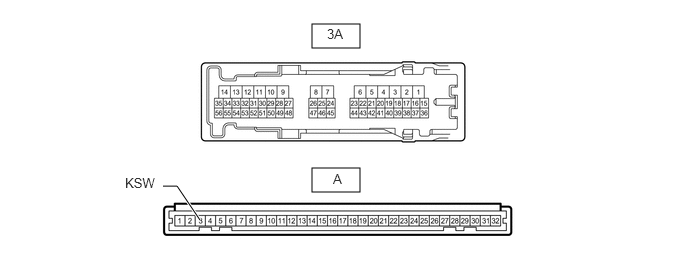
Measure the resistance according to the value(s) in the table below.
- Standard Resistance:
Tester Connection Condition Specified Condition 3A-41 - A-3 (KSW) Always Below 1 Ω
- Result:
Proceed to OK NG
OK
for LHD:
for RHD:
NG
for LHD:
for RHD: