M20C-FKS, M20D-FKS COOLING RADIATOR REMOVAL
CAUTION / NOTICE / HINT
The necessary procedures (adjustment, calibration, initialization, or registration) that must be performed after parts are removed and installed, or replaced during radiator assembly removal/installation are shown below.
| Replaced Part or Performed Procedures | Necessary Procedures | Effect/Inoperative Function When Necessary Procedures are not Performed | Link |
|---|---|---|---|
|
*: Even when not replacing the part, it is necessary to perform the specified necessary procedures after installation. |
|||
·
Front bumper assembly* ·
Front television camera assembly* ·
Radiator grille sub-assembly* |
Front television camera view adjustment | Panoramic View Monitor System | ( 202409,999999,_56,_111825,_0500432,RM100000002O1F6,) 202409,999999,_56,_111825,_0500432,RM100000002O1F6,)
|
| Replacement or removal and installation of 2 or more parts:
·
Front television camera assembly, radiator grille sub-assembly or front bumper assembly ·
Rear television camera assembly ·
Side television camera assembly LH or outer rear view mirror assembly LH ·
Side television camera assembly RH or outer rear view mirror assembly RH |
Television camera view adjustment | Panoramic View Monitor System | (202409,999999,_56,_111825,_0500432,RM100000002O1F6,)
|
PROCEDURE

 53896B
1.REMOVE FRONT FENDER FRONT SPLASH SHIELD LH
53896B
1.REMOVE FRONT FENDER FRONT SPLASH SHIELD LH
53895B
2.REMOVE FRONT FENDER FRONT SPLASH SHIELD RH
51441
3.REMOVE NO. 1 ENGINE UNDER COVER
51420
4.REMOVE NO. 2 ENGINE UNDER COVER ASSEMBLY
5.DRAIN ENGINE COOLANT
6.REMOVE FRONT BUMPER ASSEMBLY
for SFTM Made: Click hereVehicle Exterior>EXTERIOR PANELS / TRIM>FRONT BUMPER (for SFTM Made)>REMOVAL202303,999999,_59,_111849,_0500095,RM100000002AYNE,
for GTMC Made: Click hereVehicle Exterior>EXTERIOR PANELS / TRIM>FRONT BUMPER (for GTMC Made)>REMOVAL202303,999999,_59,_111849,_0524334,RM100000002AYNC,
52614
7.REMOVE FRONT NO. 2 BUMPER ENERGY ABSORBER
for SFTM Made: Click hereVehicle Exterior>EXTERIOR PANELS / TRIM>FRONT BUMPER (for SFTM Made)>DISASSEMBLY202111,999999,_59,_111849,_0500095,RM100000001Z1C2_01_0343,
for GTMC Made: Click hereVehicle Exterior>EXTERIOR PANELS / TRIM>FRONT BUMPER (for GTMC Made)>DISASSEMBLY202203,999999,_59,_111849,_0524334,RM1000000022090_01_0343,
52021
8.REMOVE FRONT BUMPER REINFORCEMENT SUB-ASSEMBLY
for SFTM Made: Click hereVehicle Exterior>EXTERIOR PANELS / TRIM>FRONT BUMPER (for SFTM Made)>DISASSEMBLY202111,999999,_59,_111849,_0500095,RM100000001Z1C2_01_0342,
for GTMC Made: Click hereVehicle Exterior>EXTERIOR PANELS / TRIM>FRONT BUMPER (for GTMC Made)>DISASSEMBLY202203,999999,_59,_111849,_0524334,RM1000000022090_01_0342,
17750A
9.REMOVE INLET AIR CLEANER ASSEMBLY
16681A
10.REMOVE UPPER RADIATOR AIR GUIDE PLATE
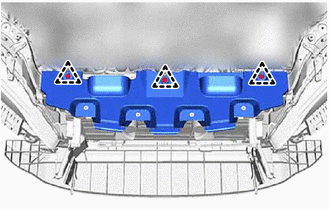
Remove the 3 clips and upper radiator air guide plate.
88790B
11.REMOVE THERMISTOR ASSEMBLY
16595B
12.REMOVE NO. 1 RADIATOR AIR GUIDE LH
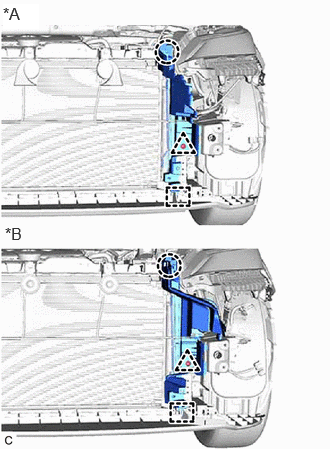
| *A | for SFTM Made |
| *B | for GTMC Made |
Remove the clip and disengage the claw.
Disengage the guide to remove the No. 1 radiator air guide LH.
16593B
13.REMOVE NO. 1 RADIATOR AIR GUIDE RH
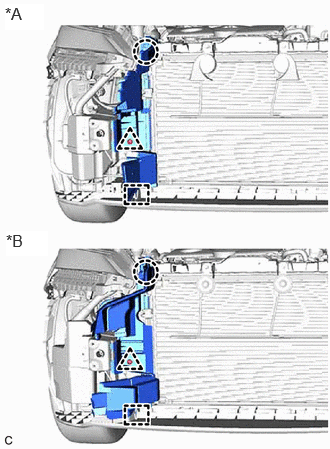
| *A | for SFTM Made |
| *B | for GTMC Made |
Remove the clip and disengage the claw.
Disengage the guide to remove the No. 1 radiator air guide RH.
53510
14.REMOVE HOOD LOCK ASSEMBLY
53630
15.DISCONNECT HOOD LOCK CONTROL CABLE ASSEMBLY
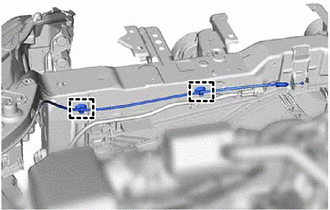
Disengage the 2 clamps to disconnect the hood lock control cable assembly from the upper radiator support sub-assembly.
53205
16.REMOVE UPPER RADIATOR SUPPORT SUB-ASSEMBLY
Disconnect the 2 horn connectors.
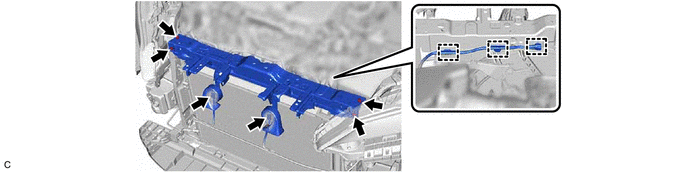
Disengage the 3 clamps to disconnect the wire harness from the upper radiator support sub-assembly.
Remove the 4 bolts and upper radiator support sub-assembly.
16282F
17.DISCONNECT NO. 5 WATER BY-PASS HOSE
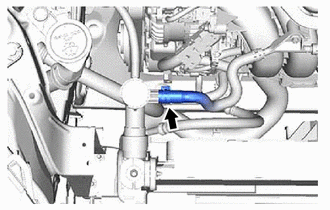
Slide the clip and disconnect the No. 5 water by-pass hose from the radiator assembly.
16283D
18.DISCONNECT NO. 6 WATER BY-PASS HOSE
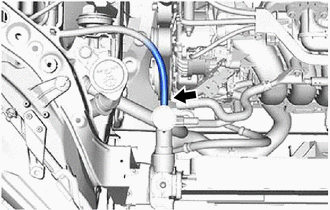
Disconnect the No. 6 water by-pass hose from the radiator assembly.
16571C
19.DISCONNECT NO. 1 RADIATOR HOSE
Disengage the clamp to disconnect the No. 1 radiator hose from the fan with motor assembly.
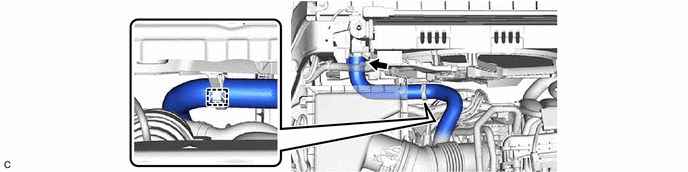
Slide the clip and disconnect the No. 1 radiator hose from the radiator assembly.
16572D
20.DISCONNECT NO. 2 RADIATOR HOSE
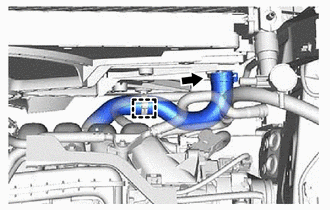
Disengage the clamp to disconnect the No. 2 radiator hose from the fan with motor assembly.
Slide the clip and disconnect the No. 2 radiator hose from the radiator assembly.
16400
21.REMOVE RADIATOR ASSEMBLY
Disengage the claw and raise the lock lever to disconnect the cooling fan motor connector as shown in the illustration.
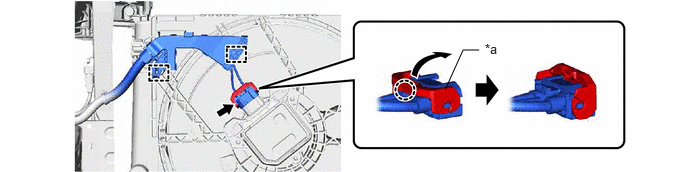
| *a | Lock Lever | - | - |
- NOTICE:
-
After disconnecting the cooling fan motor connector, make sure that dirt, water or other foreign matter does not contact the connecting parts of the cooling fan motor connector.
Disengage the 2 clamps to disconnect the wire harness from the fan with motor assembly.
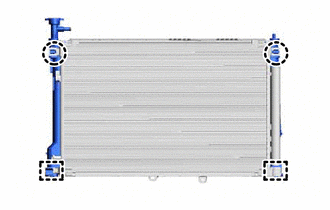
Disengage the 2 claws.
Disengage the 2 guides to separate the cooler condenser assembly from the radiator assembly.
- NOTICE:
-
Make sure not to damage the cooler condenser assembly or radiator assembly when separating the cooler condenser assembly.
Remove the radiator assembly with the fan with motor assembly from the vehicle body.
- NOTICE:
-
Do not apply excessive force to the cooler condenser assembly or pipe when removing the radiator assembly with the fan with motor assembly.
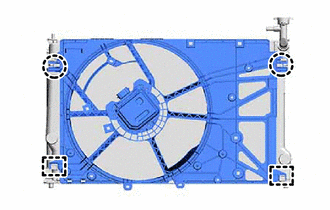
Disengage the 2 claws.
Disengage the 2 guides to remove the fan with motor assembly from the radiator assembly.
- NOTICE:
-
Do not damage the radiator assembly when removing the fan with motor assembly.
16523A
22.REMOVE RADIATOR SUPPORT CUSHION
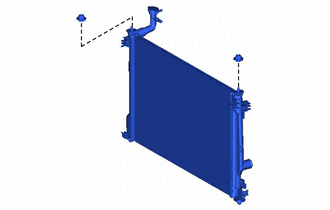
Remove the 2 radiator support cushions from the radiator assembly.
16535
23.REMOVE LOWER RADIATOR SUPPORT
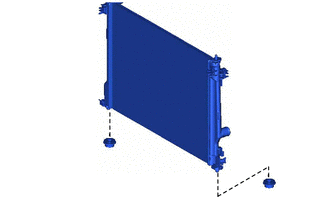
Remove the 2 lower radiator supports from the radiator assembly.
16897A
24.REMOVE FILLER NECK
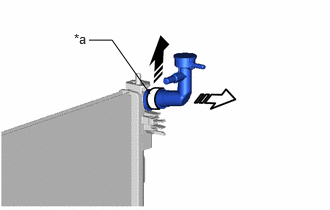
| *a | Retainer |

|
Pulling in this Direction |

|
Remove in this Direction |
Pull out the retainer to disengage the lock claws and pull off the filler neck.