NAVIGATION / MULTI INFO DISPLAY NAVIGATION SYSTEM B1ACA71 Front Right Speaker Cable Actuator Stuck
DESCRIPTION
This DTC is stored when the stereo component amplifier assembly detects an open in the front speaker RH circuit by energizing the speaker line.
| DTC No. | Detection Item | DTC Detection Condition | Trouble Area |
|---|---|---|---|
| B1ACA71 | Front Right Speaker Cable Actuator Stuck | Open in the front speaker RH circuit is detected.
(1 trip detection logic) |
·
Harness or connector ·
Stereo component amplifier assembly ·
Front No. 1 speaker assembly RH ·
Front No. 2 speaker assembly RH ·
Front No. 3 speaker assembly RH ·
Telematics Transceiver |
WIRING DIAGRAM
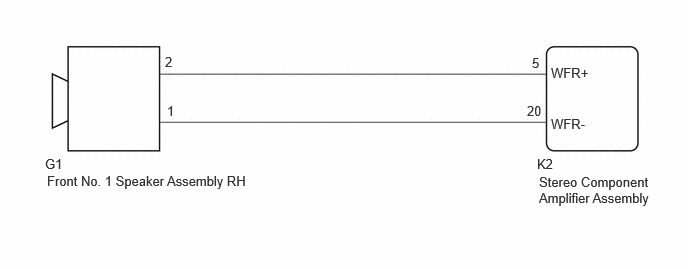
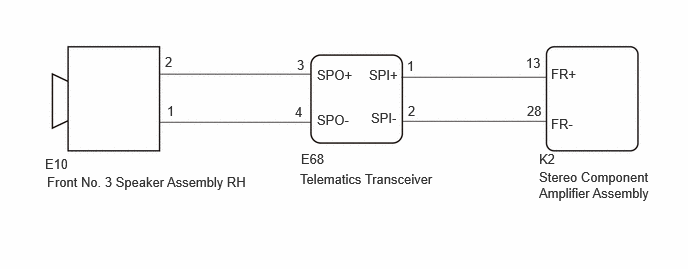
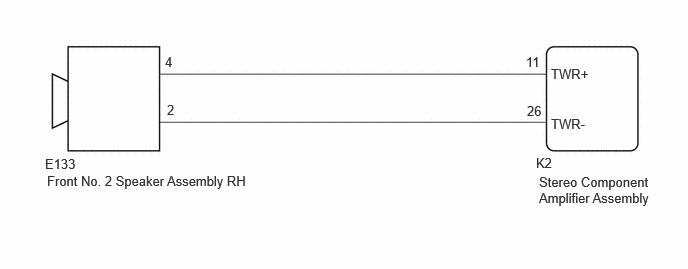
PROCEDURE
Confirm the problem symptoms and proceed to the respective link.
- Result:
Result Proceed to No sound is output from the front No. 1 speaker assembly RH A No sound is output from the front No. 3 speaker assembly RH B No sound is output from the front No. 2 speaker assembly RH C
A
B
C
Disconnect the K2 stereo component amplifier assembly connector.
Disconnect the G1 front No. 1 speaker assembly RH connector.
Measure the resistance according to the value(s) in the table below.
- Standard Resistance:
Tester Connection Condition Specified Condition Click Location & Routing(K2,G1)Location & Routingewd_type=routing;type=c,c;code=K2,G1
Click Connector(K2)Body>Floor Wire>Stereo Component Amplifier Assemblyewd_type=component;type=c;code=K2;pinno=5,20
Click Connector(G1)Body>Front Door Wire RH / Front Door Wire LH>Front No. 1 Speaker Assembly RHewd_type=component;type=c;code=G1;pinno=2,1
K2-5 (WFR+) - G1-2 Always Below 1 Ω K2-20 (WFR-) - G1-1 Always Below 1 Ω
- Result:
Proceed to OK NG
OK
NG
- Result:
Proceed to OK NG
OK
NG
Disconnect the K2 stereo component amplifier assembly connector.
Disconnect the E10 front No. 3 speaker assembly RH connector.
Disconnect the E68 Telematics Transceiver connector.
Measure the resistance according to the value(s) in the table below.
- Standard Resistance:
Tester Connection Condition Specified Condition Click Location & Routing(K2,E68,E10)Location & Routingewd_type=routing;type=c,c,c;code=K2,E68,E10
Click Connector(K2)Body>Floor Wire>Stereo Component Amplifier Assemblyewd_type=component;type=c;code=K2;pinno=13,28
Click Connector(E68)Instrument Panel>Instrument Panel Wire / Telephone Computer Wire>Telephone Transceiverewd_type=component;type=c;code=E68;pinno=1,2,3,4
Click Connector(E10)Instrument Panel>Instrument Panel Wire / Telephone Computer Wire>Front No. 2 Speaker Assembly RHewd_type=component;type=c;code=E10;pinno=2,1
K2-13 (FR+) - E68-1 (SPI+) Always Below 1 Ω K2-28 (FR-) - E68-2 (SPI-) Always Below 1 Ω E68-3 (SPO+) - E10-2 Always Below 1 Ω E68-4 (SPO-) - E10-1 Always Below 1 Ω
- Result:
Proceed to OK NG
OK
NG
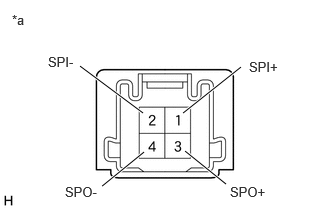
| *a | Component without harness connected
(Telematics Transceiver) |
Disconnect the telematics transceiver connector.
Measure the resistance according to the value(s) in the table below.
- Standard Resistance:
Tester Connection Condition Specified Condition 1 (SPI+) - 3 (SPO+) Always Below 1 Ω 2 (SPI-) - 4 (SPO-) Always Below 1 Ω 1 (SPI+) - 2 (SPI-) Always 10 kΩ or higher 3 (SPO+) - 4 (SPO-) Always 10 kΩ or higher
- Result:
Proceed to OK NG
OK
NG
- Result:
Proceed to OK NG
OK
NG
Disconnect the K2 stereo component amplifier assembly connector.
Disconnect the E133 front No. 2 speaker assembly RH connector.
Measure the resistance according to the value(s) in the table below.
- Standard Resistance:
Tester Connection Condition Specified Condition Click Location & Routing(K2,E133)Location & Routingewd_type=routing;type=c,c;code=K2,E133
Click Connector(K2)Body>Floor Wire>Stereo Component Amplifier Assemblyewd_type=component;type=c;code=K2;pinno=11,26
Click Connector(E133)Instrument Panel>Instrument Panel Wire / Telephone Computer Wire>Front No. 3 Speaker Assembly RHewd_type=component;type=c;code=E133;pinno=4,2
K2-11 (TWR+) - E133-4 Always Below 1 Ω K2-26 (TWR-) - E133-2 Always Below 1 Ω
- Result:
Proceed to OK NG
OK
NG
Replace the speaker assembly with a new or known good one.
- HINT:
- Result:
Proceed to NEXT
NEXT
Clear the DTCs.
- Body Electrical > Navigation System > Clear DTCs
- 50002 496
In accordance with the display of the GTS, perform a speaker circuit energization inspection.
- Body Electrical > Navigation System > Utility
-
Tester Display Speaker Line Electricity Check - 50005 496 4768
Check for DTCs and proceed to the following step.
- Body Electrical > Navigation System > Trouble Codes
- 50001 496
- Result:
Result Proceed to DTCs are not output A DTC B1ACA71 is output B
A
B