TIRE / WHEEL TIRE AND WHEEL SYSTEM INSPECTION
PROCEDURE

 1.INSPECT TIRES
Inspect the tires for wear and proper inflation pressure.
- Cold Tire Inflation Pressure:
Tire Size Cold Tire Inflation Pressure Front Rear 195/65R15 91H 230 kPa (2.3 kgf/cm2, 33 psi) 230 kPa (2.3 kgf/cm2, 33 psi) 205/55R16 91V 220 kPa (2.2 kgf/cm2, 32 psi) 220 kPa (2.2 kgf/cm2, 32 psi) 225/45R17 91W
225/40R18 92Y230 kPa (2.3 kgf/cm2, 33 psi) 210 kPa (2.1 kgf/cm2, 30 psi)
- Cold Tire Inflation Pressure (for Compact Spare Tire):
Tire Size Cold Tire Inflation Pressure T125/70D17 98M 420 kPa (4.2 kgf/cm2, 60 psi)
Perform initialization.
for Gasoline Model (for Type A): Click hereSuspension>TIRE PRESSURE MONITORING>TIRE PRESSURE WARNING SYSTEM (for Gasoline Model (for Type A))>INITIALIZATION202304,999999,_53,_080780,_0393955,RM100000002BB37,
for Gasoline Model (for Type B): Click hereSuspension>TIRE PRESSURE MONITORING>TIRE PRESSURE WARNING SYSTEM (for Gasoline Model (for Type B))>INITIALIZATION202304,999999,_53,_080780,_0592791,RM100000002AHU8,
for HV Model: Click hereSuspension>TIRE PRESSURE MONITORING>TIRE PRESSURE WARNING SYSTEM (for HV Model)>INITIALIZATION202304,999999,_53,_080780,_0393956,RM100000002AI0Q,
Tire pressure adjustment method when warm:
Turn the ignition switch (for Gasoline Model) or power switch (for HV Model) off.
Connect the GTS to the DLC3.
Turn the ignition switch (for Gasoline Model) to ON or the power switch (for HV Model) on (IG).
Turn the GTS on.
Enter the following menus: Chassis / Tire Pressure Monitor / Data List.
Adjust the tire pressure so that the displayed value is equal to the set pressure.
Perform initialization and check that initialization completes.
for Gasoline Model (for Type A): Click hereSuspension>TIRE PRESSURE MONITORING>TIRE PRESSURE WARNING SYSTEM (for Gasoline Model (for Type A))>INITIALIZATION202304,999999,_53,_080780,_0393955,RM100000002BB37,
for Gasoline Model (for Type B): Click hereSuspension>TIRE PRESSURE MONITORING>TIRE PRESSURE WARNING SYSTEM (for Gasoline Model (for Type B))>INITIALIZATION202304,999999,_53,_080780,_0592791,RM100000002AHU8,
for HV Model: Click hereSuspension>TIRE PRESSURE MONITORING>TIRE PRESSURE WARNING SYSTEM (for HV Model)>INITIALIZATION202304,999999,_53,_080780,_0393956,RM100000002AI0Q,
Check and record the value of the Data List item "Temperature in Tire". (Ts)
Check and record the ambient temperature during tire pressure adjustment. (Tm)
Readjust the tire pressure according to the difference between the tire internal temperature (Ts) and the ambient temperature (Tm). (P)
- HINT:
-
Tire internal temperature: Ts, Ambient temperature: Tm, Tire pressure readjustment value: P
-
P = (Specified Pressure) + (Ts - Tm)
Check the pressure adjustment value with the Data List item "Tire Inflation Pressure".
- Chassis > Tire Pressure Monitor > Data List
-
Tester Display ID 1 Tire Inflation Pressure ID 2 Tire Inflation Pressure ID 3 Tire Inflation Pressure ID 4 Tire Inflation Pressure ID 5 Tire Inflation Pressure - 50003 203 36,37,38,39,40
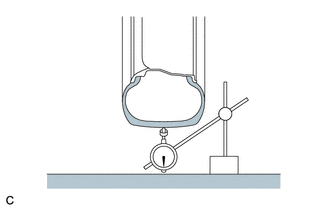
Using a dial indicator, check the runout of the tires.
- Maximum Tire Runout:
1.4 mm (0.0551 in.)
2. ROTATE TIRES
Remove the wheel assembly.
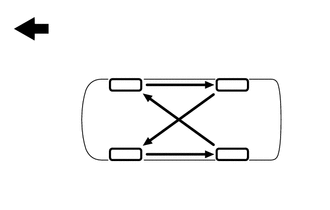

|
Front |
Rotate the tires as shown in the illustration.
Install the wheel assembly.
Perform initialization.
for Gasoline Model (for Type A): Click hereSuspension>TIRE PRESSURE MONITORING>TIRE PRESSURE WARNING SYSTEM (for Gasoline Model (for Type A))>INITIALIZATION202304,999999,_53,_080780,_0393955,RM100000002BB37,
for Gasoline Model (for Type B): Click hereSuspension>TIRE PRESSURE MONITORING>TIRE PRESSURE WARNING SYSTEM (for Gasoline Model (for Type B))>INITIALIZATION202304,999999,_53,_080780,_0592791,RM100000002AHU8,
for HV Model: Click hereSuspension>TIRE PRESSURE MONITORING>TIRE PRESSURE WARNING SYSTEM (for HV Model)>INITIALIZATION202304,999999,_53,_080780,_0393956,RM100000002AI0Q,
3.INSPECT AND ADJUST WHEEL BALANCE
Inspect and adjust the off-the-car balance.
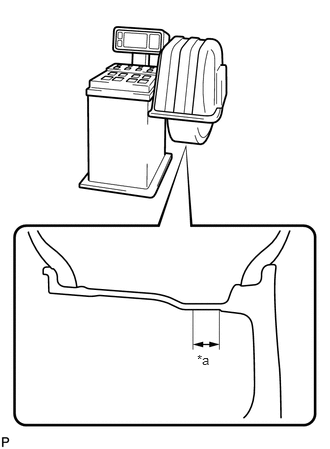
| *a | 25 mm (0.984 in.) |
for Alloy Wheel (except 18 inch):
- Maximum Wheel Imbalance:
8.0 g (0.0176 lb)
- NOTICE:
- ·
Use a cleaning detergent to remove dirt, oil and water from the surface where the balance weight is to be adhered.
·Do not touch the adhesive surface of the balance weight.
·Adhere a stick-on type balance weight to the flat surface*a shown in the illustration.
·Push the balance weight with your finger to securely adhere it to the desired position.
·Do not reuse balance weights.
·Use only TOYOTA genuine stick-on type balance weights or equivalent.
- HINT:
- ·
Use clip-on type balance weights for the inner side, and stick-on type balance weights for the outer side.
·If the tires vibrate even after the off-the-car balance adjustment, adjust the wheel balance with on-the-car balancing as necessary.
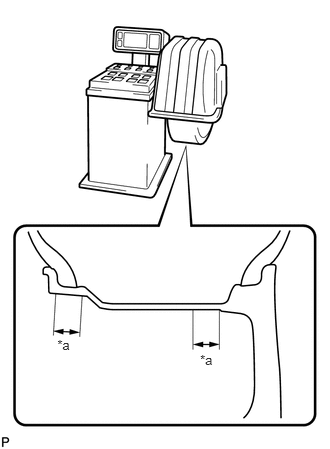
| *a | 25 mm (0.984 in.) |
for Alloy Wheel (for 18 inch):
- Maximum Wheel Imbalance:
8.0 g (0.0176 lb)
- NOTICE:
- ·
Use a cleaning detergent to remove dirt, oil and water from the surface where the balance weight is to be adhered.
·Do not touch the adhesive surface of the balance weight.
·Adhere a stick-on type balance weight to the flat surface*a shown in the illustration.
·Push the balance weight with your finger to securely adhere it to the desired position.
·Do not reuse balance weights.
·Use only TOYOTA genuine stick-on type balance weights or equivalent.
- HINT:
- ·
Use stick-on type balance weights for both the inner and outer side.
·If the tires vibrate even after the off-the-car balance adjustment, adjust the wheel balance with on-the-car balancing as necessary.
4.INSPECT FRONT AXLE HUB BEARING
5.INSPECT REAR AXLE HUB BEARING
for Torsion Beam Type Suspension: Click hereDrivetrain>AXLE AND DIFFERENTIAL>REAR AXLE HUB (for Torsion Beam Type Suspension)>ON-VEHICLE INSPECTION202304,999999,_52,_080786,_0596192,RM100000002AW32,
for Double Wishbone Type Suspension with Electric Parking Brake: Click hereDrivetrain>AXLE AND DIFFERENTIAL>REAR AXLE HUB (for Double Wishbone Type Suspension with Electric Parking Brake)>ON-VEHICLE INSPECTION202304,202307,_52,_080786,_0392503,RM100000002BA62,202307,999999,_52,_080786,_0392503,RM100000002CWH4,