AC60E AUTOMATIC TRANSMISSION / TRANSAXLE AUTOMATIC TRANSMISSION ASSEMBLY(for 7GR-FKS) INSTALLATION
PROCEDURE

 32000
1.INSTALL TORQUE CONVERTER ASSEMBLY
32000
1.INSTALL TORQUE CONVERTER ASSEMBLY
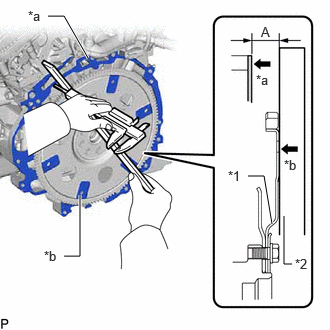
| *1 | Flywheel |
| *2 | Straightedge |
| *a | Engine Assembly Surface |
| *b | Drive Plate Surface |
Using a vernier caliper and straightedge, measure the dimension (A) between the automatic transmission assembly contact surface of the engine assembly (*a) and the torque converter assembly contact surface of the drive plate (*b).
- Measurement Method:
(a) - (b) = (A)
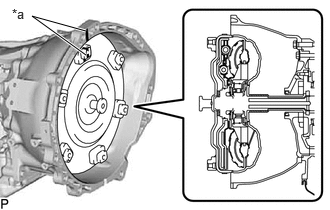
| *a | Matchmark |
Align the matchmark on the automatic transmission case sub-assembly with the one on the torque converter assembly and engage the splines of the input shaft with the turbine runner splines.
- NOTICE:
-
Install the torque converter assembly to the input shaft while keeping it horizontal.
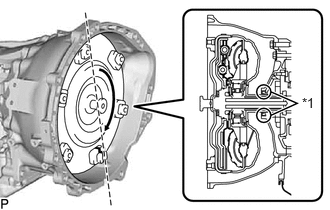
| *1 | Front Oil Pump Oil Seal |
Rotate the torque converter assembly approximately 180° and engage the splines of the stator shaft with the stator assembly.
- NOTICE:
- ·
Do not damage the front oil pump oil seal.
·Install the torque converter assembly to the input shaft while keeping it horizontal.
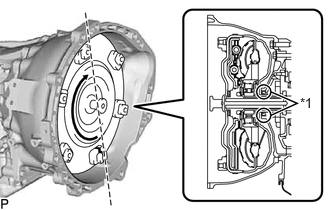
| *1 | Front Oil Pump Oil Seal |
Rotate the torque converter assembly approximately 180° again, align the matchmark on the torque converter assembly with the one on the automatic transmission case sub-assembly and insert the key of the torque converter assembly into the groove of the oil pump drive gear.
- NOTICE:
- ·
Do not push the torque converter assembly excessively when rotating it.
·Do not damage the front oil pump oil seal.
·Install the torque converter assembly to the input shaft while keeping it horizontal.
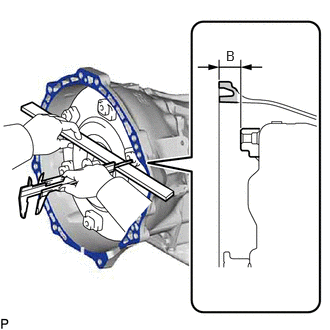
Using a vernier caliper and straightedge, measure the dimension shown in the illustration and check that the dimension is more than the dimension (A), which was measured in the previous step.
- Standard Distance:
B = A + 1 mm (0.0394 in.) or more
- NOTICE:
- ·
Make sure to deduct the thickness of the straightedge.
·If the automatic transmission assembly is installed to the engine assembly with the torque converter assembly not sufficiently inserted, the torque converter assembly may be damaged.
33826A
2.INSTALL NO. 2 TRANSMISSION CONTROL CABLE BRACKET
Install the No. 2 transmission control cable bracket to the automatic transmission assembly with the bolt.
- Torque:
- 5.5 N*m (56 kgf*cm, 49 in.*lbf)
33829E
3.INSTALL TRANSMISSION CONTROL CABLE BRACKET
Install the transmission control cable bracket to the automatic transmission assembly with the 2 bolts.
- Torque:
- 28 N*m (286 kgf*cm, 21 ft.*lbf)
33825
4.INSTALL TRANSMISSION CONTROL CABLE INSULATOR
Install the transmission control cable insulator to the transmission control cable bracket and No. 2 transmission control cable bracket with the 2 bolts.
- Torque:
- 5.5 N*m (56 kgf*cm, 49 in.*lbf)
5.INSTALL WIRE HARNESS CLAMP BRACKET
Install the 4 wire harness clamp brackets to the automatic transmission assembly with the 5 bolts.
- Torque:
- 13 N*m (133 kgf*cm, 10 ft.*lbf)
35000
6.INSTALL AUTOMATIC TRANSMISSION ASSEMBLY
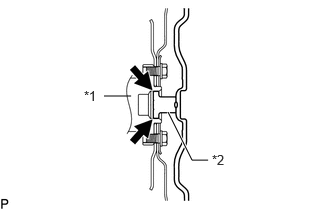
| *1 | Crankshaft |
| *2 | Torque Converter Assembly Centerpiece |

|
Clutch Spline Grease |
Apply clutch spline grease to the surface of the crankshaft that contacts the torque converter assembly centerpiece.
- Clutch Spline Grease:
Toyota Genuine Clutch Spline Grease or equivalent
- Maximum Grease Amount:
Approximately 1 g (0.0353 oz.)
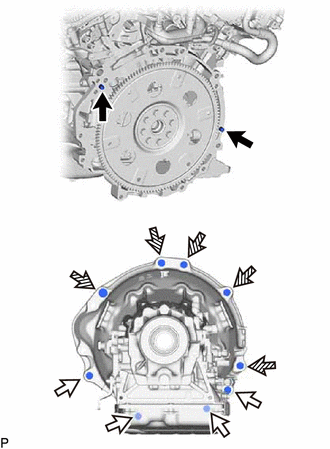
|
|
Knock Pin |

|
Bolt A |

|
Bolt B |
Confirm that the 2 knock pins are installed on the engine assembly and are not damaged.
While keeping the engine assembly and automatic transmission assembly horizontal, align the 2 knock pins with the holes in the automatic transmission assembly and install the 9 bolts.
- Torque:
- for bolt A : 37 N*m (377 kgf*cm, 27 ft.*lbf)
- for bolt B : 71 N*m (724 kgf*cm, 52 ft.*lbf)
- NOTICE:
- ·
Do not use excessive force when installing the automatic transmission assembly.
·Check that the torque converter assembly rotates.
·Make sure that the wire harness or other similar items are not pinched between the contact surfaces.
12380
7.INSTALL REAR ENGINE MOUNTING INSULATOR ASSEMBLY
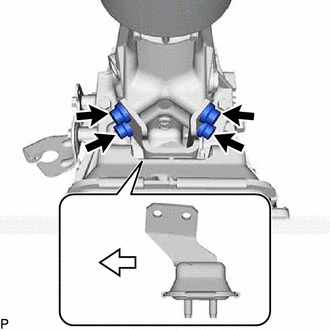
|
|
Front of the Vehicle |
Install the rear engine mounting insulator assembly to the automatic transmission assembly with the 4 bolts.
- Torque:
- 48 N*m (489 kgf*cm, 35 ft.*lbf)
57209B
8.INSTALL REAR ENGINE MOUNTING MEMBER SUB-ASSEMBLY
Install the rear engine mounting member sub-assembly to the rear engine mounting insulator assembly with the 3 nuts.
- Torque:
- 48 N*m (489 kgf*cm, 35 ft.*lbf)
11361J
9.INSTALL FLYWHEEL HOUSING UNDER COVER
Attach the 2 claws and install the flywheel housing under cover to the engine assembly.
32101A
10.INSTALL DRIVE PLATE AND TORQUE CONVERTER ASSEMBLY SETTING BOLT
Turn the crankshaft to gain access to the installation locations of the 6 drive plate and torque converter assembly setting bolts and install each bolt while holding the crankshaft pulley bolt with a wrench.
- Torque:
- 48 N*m (489 kgf*cm, 35 ft.*lbf)
- NOTICE:
-
Install the black colored bolt first, and then the remaining 5 silver colored bolts.
32921
11.CONNECT NO. 1 OIL COOLER INLET TUBE AND NO. 1 OIL COOLER OUTLET TUBE
36478A
12.INSTALL TRANSMISSION BREATHER BRACKET
Install the clamp to the transmission breather bracket.
- HINT:
-
It is not necessary to remove the clamp it is being replaced.
Install the transmission breather bracket to the automatic transmission assembly with the bolt.
- Torque:
- 6.5 N*m (66 kgf*cm, 58 in.*lbf)
Connect the breather hose and attach the wire harness clamp to the transmission breather bracket.
82121
13.CONNECT ENGINE WIRE
Connect the engine wire and attach the 7 wire harness clamps to the 4 wire harness clamp brackets.
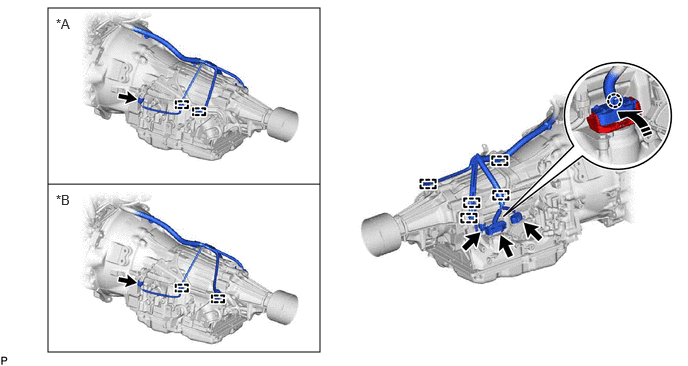
| *A | w/ Secondary Air Injection System | *B | w/o Secondary Air Injection System |

|
Push Up | - | - |
Connect the park/neutral position switch assembly connector, transmission wire connector and 2 transmission revolution sensor connectors.
- HINT:
-
Push up the lever until the claw of the transmission wire connector makes a connection sound.
3516A
14.INSTALL TRANSMISSION OIL PAN HEAT INSULATOR
Install the transmission oil pan heat insulator to the automatic transmission assembly with the 3 bolts.
- Torque:
- 21 N*m (214 kgf*cm, 15 ft.*lbf)
35979B
15.INSTALL TRANSMISSION INSULATOR RH
Install the transmission insulator RH to the automatic transmission assembly with the 3 bolts.
- Torque:
- 21 N*m (214 kgf*cm, 15 ft.*lbf)
16.INSTALL ENGINE ASSEMBLY WITH AUTOMATIC TRANSMISSION ASSEMBLY
17.CONNECT CABLE TO NEGATIVE BATTERY TERMINAL
18. INITIALIZATION AFTER RECONNECTING BATTERY TERMINAL
- HINT:
-
When disconnecting and reconnecting the battery, there is an automatic learning function that completes learning when the respective system is used.
19. RESET MEMORY
- NOTICE:
-
If automatic transmission parts have been replaced, refer to the Parts Replacement Compensation Table to determine if any additional operations are necessary.