DOOR / HATCH SLIDE DOOR(except Wagon) ADJUSTMENT
CAUTION / NOTICE / HINT
The necessary procedures (adjustment, calibration, initialization, or registration) that must be performed after parts are removed and installed, or replaced during slide door adjustment are shown below.
| Replaced Part or Performed Procedure | Effect/Inoperative Function when Necessary Procedure not Performed | Necessary Procedure | Link |
|---|---|---|---|
| Removal and installation of battery terminal | Parking assist monitor system | Memorize steering angle neutral point | ( 201902,999999,_56,_079315,_0385736,RM100000001GNRA,) 201902,999999,_56,_079315,_0385736,RM100000001GNRA,)
|
- HINT:
-
When the cable is disconnected / reconnected to the battery terminal, systems temporarily stop operating. However, each system has a function that completes learming the first time the system is used.
- ·
Learning completes when vehicle is driven
Effect/Inoperative Function When Necessary Procedures are not Performed Necessary Procedures Link *: w/ Stop and start system
Stop and start system* Drive the vehicle until stop and start control is permitted (approximately 5 to 60 minutes). ( 201902,999999,_51,_078825,_0382334,RM100000001GBQ1,)
Lane control system Drive the vehicle straight ahead at 15 km/h (10 mph) or more for 1 second or more. ( 201902,999999,_58,_078886,_0382740,RM100000001G6XB,)
Pre-collision system
·Learning completes when vehicle is operated normally
Effect/Inoperative Function When Necessary Procedures are not Performed Necessary Procedures Link Power slide door system Fully close the slide door by hand.
- HINT:
-
Initialization is not necessary if the above procedures are performed while the slide door is closed.
( 201902,999999,_59,_078503,_0381017,RM100000001FWXM,)
Air conditioning system After the ignition switch is turned to ON, the servo motor standard position is recognized. -
·Use the same procedure for RHD and LHD vehicles.
·The procedure listed below is for LHD vehicles.
·Use the same procedure for the RH and LH sides.
·Use the same procedure described for the RH side.
PROCEDURE

 1. PRECAUTION (w/ Rear Curtain Shield Airbag)
- CAUTION:
-
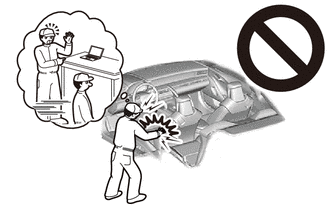
-
Be sure to read Precaution thoroughly before servicing.
- NOTICE:
-
After turning the ignition switch off, waiting time may be required before disconnecting the cable from the negative (-) battery terminal.
2.DISCONNECT CABLE FROM NEGATIVE BATTERY TERMINAL (w/ Rear Curtain Shield Airbag)
Click hereGeneral>MAINTENANCE>1GD-FTV BATTERY>REMOVAL201906,999999,_V1,_078672,_0387106,RM100000001IWLA,
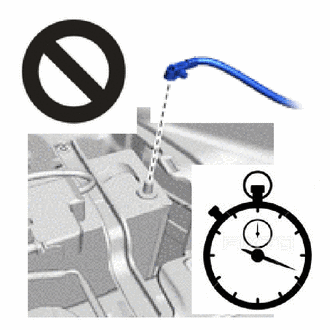
- CAUTION:
- ·
Wait at least 90 seconds after disconnecting the cable from the negative (-) battery terminal to disable the SRS system.
·If the airbag deploys for any reason, it may cause a serious accident.
67004
3.INSPECT REAR DOOR PANEL SUB-ASSEMBLY LH
for Standard Roof:
Check that the clearance measurements of areas A to N are within the standard ranges.
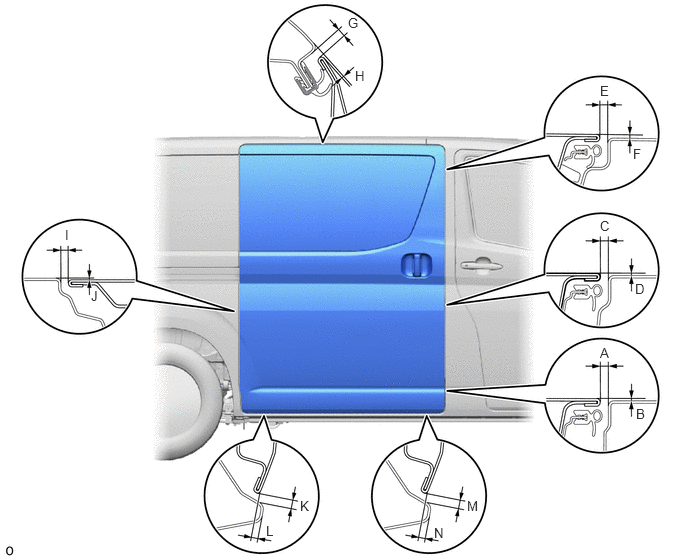
- Standard Clearance:
Area Measurement
(for Glass Type)
(except Glass Type)Area Measurement
(for Glass Type)
(except Glass Type)A 3.6 to 6.6 mm (0.142 to 0.260 in.)
3.6 to 6.6 mm (0.142 to 0.260 in.)B -1.5 to 1.5 mm (-0.0591 to 0.0591 in.)
-1.6 to 1.4 mm (-0.0630 to 0.0551 in.)C 3.6 to 6.6 mm (0.142 to 0.260 in.)
3.6 to 6.6 mm (0.142 to 0.260 in.)D -1.2 to 1.8 mm (-0.0472 to 0.0709 in.)
-1.4 to 1.6 mm (-0.0551 to 0.0630 in.)E 3.6 to 6.6 mm (0.142 to 0.260 in.)
3.6 to 6.6 mm (0.142 to 0.260 in.)F -1.4 to 1.6 mm (-0.0551 to 0.0630 in.)
-1.5 to 1.5 mm (-0.0591 to 0.0591 in.)G 4.4 to 7.4 mm (0.173 to 0.291 in.)
4.5 to 7.5 mm (0.177 to 0.295 in.)H -2.4 to 0.6 mm (-0.0945 to 0.0236 in.)
-2.2 to 0.8 mm (-0.0866 to 0.0315 in.)I 3.2 to 6.2 mm (0.126 to 0.244 in.)
3.2 to 6.2 mm (0.126 to 0.244 in.)J -1.5 to 1.5 mm (-0.0591 to 0.0591 in.)
-1.5 to 1.5 mm (-0.0591 to 0.0591 in.)K 5.0 to 8.0 mm (0.197 to 0.315 in.)
5.0 to 8.0 mm (0.197 to 0.315 in.)L -6.0 to -3.0 mm (-0.236 to -0.118 in.)
-6.2 to -3.2 mm (-0.244 to -0.126 in.)M 5.0 to 8.0 mm (0.197 to 0.315 in.)
5.0 to 8.0 mm (0.197 to 0.315 in.)N -5.9 to -2.9 mm (-0.232 to -0.114 in.)
-6.1 to -3.1 mm (-0.240 to -0.122 in.)
for High Roof:
Check that the clearance measurements of areas A to N are within the standard ranges.
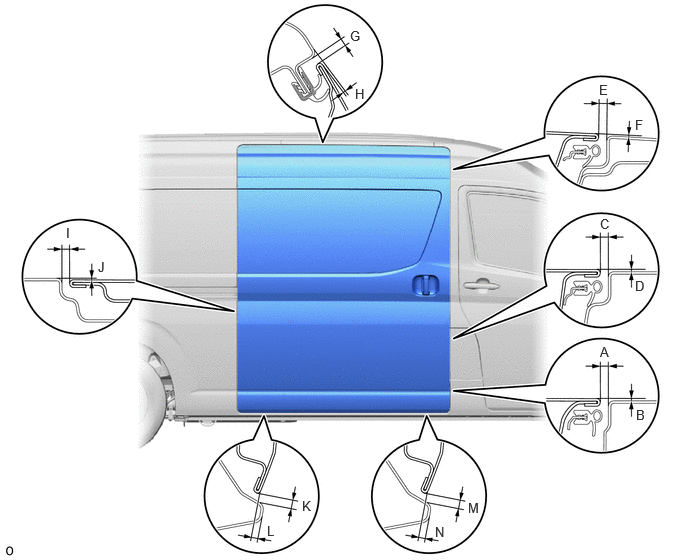
- Standard Clearance:
Area Measurement
(for Glass Type)
(except Glass Type)Area Measurement
(for Glass Type)
(except Glass Type)A 3.6 to 6.6 mm (0.142 to 0.260 in.)
3.6 to 6.6 mm (0.142 to 0.260 in.)B -1.4 to 1.6 mm (-0.0551 to 0.0630 in.)
-1.4 to 1.6 mm (-0.0551 to 0.0630 in.)C 3.6 to 6.6 mm (0.142 to 0.260 in.)
3.6 to 6.6 mm (0.142 to 0.260 in.)D -1.4 to 1.6 mm (-0.0551 to 0.0630 in.)
-1.4 to 1.6 mm (-0.0551 to 0.0630 in.)E 3.8 to 6.8 mm (0.150 to 0.268 in.)
3.8 to 6.8 mm (0.150 to 0.268 in.)F -1.5 to 1.5 mm (-0.0591 to 0.0591 in.)
-1.6 to 1.4 mm (-0.0630 to 0.0551 in.)G 4.6 to 7.6 mm (0.181 to 0.299 in.)
4.8 to 7.8 mm (0.189 to 0.307 in.)H -1.1 to 1.9 mm (-0.0433 to 0.0748 in.)
-0.7 to 2.3 mm (-0.0276 to 0.0906 in.)I 3.2 to 6.2 mm (0.126 to 0.244 in.)
3.2 to 6.2 mm (0.126 to 0.244 in.)J -1.5 to 1.5 mm (-0.0591 to 0.0591 in.)
-1.5 to 1.5 mm (-0.0591 to 0.0591 in.)K 4.9 to 7.9 mm (0.193 to 0.311 in.)
4.9 to 7.9 mm (0.193 to 0.311 in.)L -6.3 to -3.3 mm (-0.248 to -0.130 in.)
-6.3 to -3.3 mm (-0.248 to -0.130 in.)M 5.0 to 8.0 mm (0.197 to 0.315 in.)
5.0 to 8.0 mm (0.197 to 0.315 in.)N -5.9 to -2.9 mm (-0.232 to -0.114 in.)
-5.9 to -2.9 mm (-0.232 to -0.114 in.)
67667A
4.REMOVE SLIDE DOOR WINDOW GARNISH RH (for Full-trim, for Standard Roof)
67667A
5.REMOVE SLIDE DOOR WINDOW GARNISH RH (for Full-trim, for High Roof)
67603
6.REMOVE REAR DOOR TRIM BOARD SUB-ASSEMBLY RH (for Semi-trim, w/o Power Slide Door)
67603
7.REMOVE REAR DOOR TRIM BOARD SUB-ASSEMBLY RH (for Semi-trim, w/ Power Slide Door)
67680B
8.REMOVE SLIDE DOOR TRIM BOARD ASSEMBLY RH (for Full-trim, for Standard Roof)
67680B
9.REMOVE SLIDE DOOR TRIM BOARD ASSEMBLY RH (for Full-trim, for High Roof)
67004H
10.ADJUST SLIDE DOOR SUB-ASSEMBLY LH
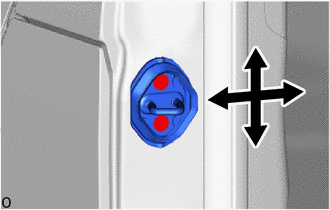
To adjust the door position vertically or horizontally at the slide door front lock striker plate assembly, loosen the bolts for the slide door down female stopper, loosen the striker screws using a T40 "TORX"socket wrench so that the striker can move, and then using a brass bar and hammer, adjust the striker position by tapping it lightly.
- Torque:
- 23 N*m (235 kgf*cm, 17 ft.*lbf)
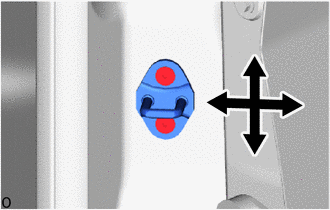
To adjust the door position vertically or horizontally at the slide door lock striker plate assembly, loosen the striker screws using a T40 "TORX" socket wrench, and then using a brass bar and hammer, adjust the position by tapping it lightly.
- Torque:
- 23 N*m (235 kgf*cm, 17 ft.*lbf)
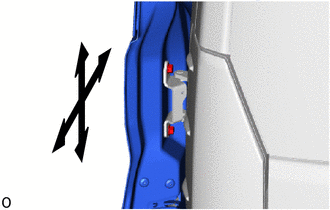
To adjust the door position in the vertical or front-to-back directions at the rear edge of the door, loosen the bolts of the center slide door hinge assembly LH before making an adjustment.
- Torque:
- 19.5 N*m (199 kgf*cm, 14 ft.*lbf)
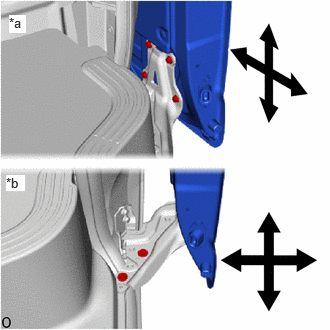
| *a | Door Side |
| *b | Vehicle Body Side |
To adjust the lower door seating position on the vehicle body surface vertically or to adjust the door position in the vertical and front-to-back directions, fully close the slide door, loosen the bolt of the lower slide door roller arm LH, and then check and adjust the door position.
- Torque:
- Door Side : 19.5 N*m (199 kgf*cm, 14 ft.*lbf)
- Vehicle Body Side : 19 N*m (194 kgf*cm, 14 ft.*lbf)
- HINT:
-
To adjust the slide door lower roller base on the vehicle body side, detach the slide door full open stop lock assembly and temporarily install the bolts.
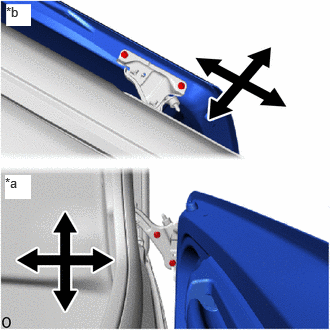
| *a | Door Side |
| *b | Vehicle Body Side |
To adjust the door position in the vertical, horizontal or front-to-back direction, loosen the bolts of the upper slide door roller assembly LH before making an adjustment.
- Torque:
- Door Side : 11.5 N*m (117 kgf*cm, 8 ft.*lbf)
- Vehicle Body Side : 30 N*m (306 kgf*cm, 22 ft.*lbf)
Temporarily tighten the slide door down female stopper, fully close the slide door to settle the stopper, and then fully tighten the stopper.
- Torque:
- 7.5 N*m (76 kgf*cm, 66 in.*lbf)
After adjusting the door position, check the operation of the electric door lock system, slide door closer system, and power slide door system (w/ Power Slide Door).
- HINT:
-
If something contacts the power slide door touch sensor during an automatic closing operation, the door will reverse.
67603
11.INSTALL REAR DOOR TRIM BOARD SUB-ASSEMBLY RH (for Semi-trim, w/o Power Slide Door)
67603
12.INSTALL REAR DOOR TRIM BOARD SUB-ASSEMBLY RH (for Semi-trim, w/ Power Slide Door)
67680B
13.INSTALL SLIDE DOOR TRIM BOARD ASSEMBLY RH (for Full-trim, for Standard Roof)
67680B
14.INSTALL SLIDE DOOR TRIM BOARD ASSEMBLY RH (for Full-trim, for High Roof)
67667A
15.INSTALL SLIDE DOOR WINDOW GARNISH RH (for Full-trim, for Standard Roof)
67667A
16.INSTALL SLIDE DOOR WINDOW GARNISH RH (for Full-trim, for High Roof)
17.CONNECT CABLE TO NEGATIVE BATTERY TERMINAL (w/ Rear Curtain Shield Airbag)
18. INITIALIZATION AFTER RECONNECTING BATTERY TERMINAL (w/ Rear Curtain Shield Airbag)
- HINT:
-
When disconnecting and reconnecting the battery, there is an automatic learning function that completes learning when the respective system is usel.
19.INSPECT SRS WARNING LIGHT (w/ Rear Curtain Shield Airbag)
20. PERFORM DIAGNOSTIC SYSTEM CHECK (w/ Rear Curtain Shield Airbag)
21. INITIALIZE POWER SLIDE DOOR SYSTEM