SEAT BELT REAR SEAT OUTER BELT ASSEMBLY(for Manual Captain Seat) INSTALLATION
CAUTION / NOTICE / HINT
- CAUTION:
- ·
Wear protective gloves. Sharp areas on the parts may injure your hands.
·There is risk of injury.
- HINT:
- ·
Use the same procedure for RHD and LHD vehicles.
·The procedures listed below are for LHD vehicles.
·Use the same procedure for the RH and LH sides.
·The procedure listed below is for the LH side.
·The procedure listed below is a representative example.
·Use the same procedure for first row and second row, unless otherwise specified.
PROCEDURE

 73390
1.INSPECT REAR SEAT 3 POINT TYPE BELT ASSEMBLY LH
73390
1.INSPECT REAR SEAT 3 POINT TYPE BELT ASSEMBLY LH
73390
2.INSTALL REAR SEAT 3 POINT TYPE BELT ASSEMBLY LH
Push the seatback forwards, and then push it backwards until it reaches the first position where it locks.
for LH Side:
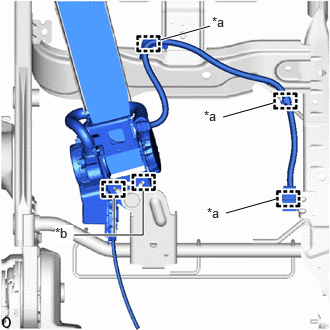
| *a | Clamp |
| *b | Guide |
Attach the guide.
for First Row:
Attach the clamp.
for RH Side:
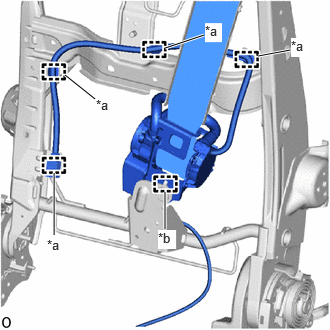
| *a | Clamp |
| *b | Guide |
Attach the guide.
for First Row:
Attach the clamp.
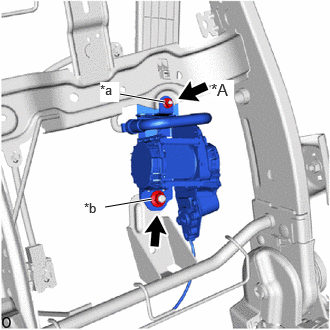
| *A | for First Row |
| *a | Nut A |
| *b | Nut B |
Temporarily install the rear seat 3 point type belt assembly LH with the nut A and nut B.
for First Row:
Tighten the nut A.
- Torque:
- 12.5 N*m (127 kgf*cm, 9 ft.*lbf)
Tighten the nut B.
- Torque:
- 42 N*m (428 kgf*cm, 31 ft.*lbf)
Temporarily install the reclining sensor with the 3 nuts.
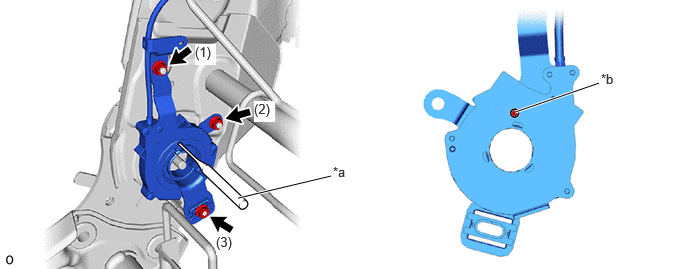
| *a | Pin Punch 3 | *b | Zero Point Alignment Hole |
Insert pin punch 3 into the zero point alignment hole of the rear seat 3 point type belt assembly LH.
Tighten the 3 nuts in the order shown in the illustration.
- Torque:
- 3.5 N*m (36 kgf*cm, 31 in.*lbf)
Pull out pin punch 3.
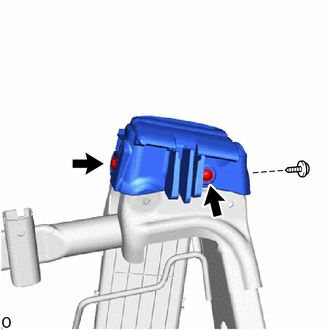
Install the 3 screws.
for First Row:
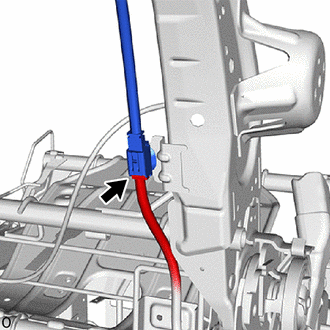
Connect the connector.
73373W
3.INSTALL NO. 1 SEAT NO. 2 SHOULDER BELT COVER LH
71H75X
4.INSTALL LH SEAT RECLINING ADJUSTER INSIDE COVER
71695L
5.INSTALL NO. 1 SEATBACK PROTECTOR LH
6.INSTALL SEPARATE TYPE REAR SEAT CUSHION COVER WITH PAD
79959K
7.INSTALL NO. 2 SEAT NO. 2 LEG COVER LH (for Second Row)
79077G
8.INSTALL NO. 2 SEAT INNER LEG COVER SUB-ASSEMBLY RH (for Second Row, w/o Power Supply Unit)
79077G
9.INSTALL NO. 2 SEAT OUTER LEG COVER SUB-ASSEMBLY LH (for Second Row)
79959J
10.INSTALL NO. 2 SEAT NO. 1 LEG COVER LH (for Second Row)
79959F
11.INSTALL NO. 1 SEAT LEG COVER LH (for First Row)
79076M
12.INSTALL NO. 1 SEAT INNER LEG COVER SUB-ASSEMBLY RH (for First Row)
79076N
13.INSTALL NO. 1 SEAT OUTER LEG COVER SUB-ASSEMBLY LH (for First Row)
14.INSTALL SEPARATE TYPE REAR SEATBACK COVER WITH PAD
73390
15.INSTALL REAR SEAT 3 POINT TYPE BELT ASSEMBLY LH (ANCHOR)
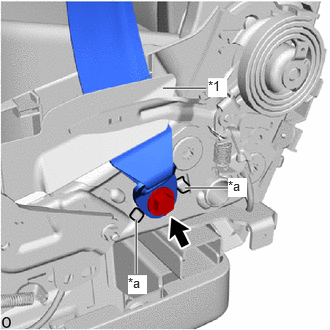
| *1 | LH Seat Reclining Adjuster Inside Cover LH |
| *a | Protruding Part |
Install the anchor of the rear seat 3 point type belt assembly LH with the bolt.
- Torque:
- 42 N*m (428 kgf*cm, 31 ft.*lbf)
- NOTICE:
- ·
The anchor part of the rear seat 3 point type belt assembly LH must not overlap the protruding part.
·Pass the belt through the LH seat reclining adjuster inside cover LH.
Check that the ELR locks.
With the rear seat 3 point type belt assembly LH installed to the vehicle, check that the belt locks when it is pulled out quickly.
73375
16.INSTALL REAR SEAT SHOULDER BELT COVER LH
72890C
17.INSTALL LH SEAT NO. 1 SEAT ARMREST ASSEMBLY LH
72880C
18.INSTALL LH SEAT NO. 1 SEAT ARMREST ASSEMBLY RH
- HINT:
-
Use the same procedure described for the LH side.
72848D
19.INSTALL NO. 1 SEAT NO. 1 ARMREST CAP LH
71826A
20.INSTALL NO. 1 SEAT INNER CUSHION MOULDING RH
78060C
21.INSTALL NO. 1 SEAT SIDE TABLE ASSEMBLY (for First Row, RH Side)
71849K
22.INSTALL SEAT SIDE TABLE ADJUSTER COVER CAP (for First Row, RH Side)
71834J
23.INSTALL NO. 1 SEAT OUTER NO. 1 RECLINING COVER LH
71324Q
24.INSTALL NO. 1 SEAT CUSHION LH (for First Row)
72526J
25.INSTALL NO. 1 SEAT RECLINING ADJUSTER RELEASE HANDLE LH
72216B
26.INSTALL NO. 1 SEAT TRACK HANDLE CONTROL LEVER LH
71849L
27.INSTALL NO. 1 SEAT ADJUSTER COVER CAP LH
28.INSTALL REAR SEAT ASSEMBLY LH
29.CONNECT CABLE TO NEGATIVE BATTERY TERMINAL (for First Row)
30. INITIALIZATION AFTER RECONNECTING BATTERY TERMINAL (for First Row)
- HINT:
-
When disconnecting and reconnecting the battery, there is an automatic learning function that completes learning when the respective system is used.
31. PERFORM DIAGNOSTIC SYSTEM CHECK (for First Row)
32.CHECK SRS WARNING LIGHT (for First Row)
33.INSPECT SEAT BELT WARNING SYSTEM