WINDOW / GLASS WINDSHIELD GLASS INSTALLATION
CAUTION / NOTICE / HINT
- NOTICE:
- ·
When replacing the windshield glass of a vehicle equipped with a forward recognition camera, make sure to use a Toyota genuine part. If a non-Toyota genuine part is used, the forward recognition camera may not be able to be installed due to a missing bracket. Also, the front camera system, lane control system, road sign assist system, front radar sensor system, pre-collision system or automatic high beam system may not operate properly due to a difference in the transmissivity or black ceramic border.
·Make sure to use Toyota Genuine Windshield Glass Adhesive (High Modulus Type) or equivalent.
PROCEDURE

 82217A
1.INSTALL FRONT WINDOW DEFOGGER WIRE (for Windshield Deicer)
82217A
1.INSTALL FRONT WINDOW DEFOGGER WIRE (for Windshield Deicer)
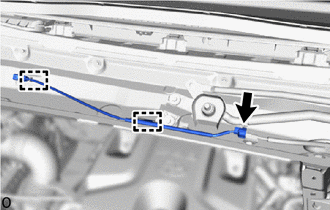
for LHD:
Connect the connector and attach the wire harness clamp to install the front window defogger wire.
56111A
2.CLEAN WINDSHIELD GLASS
When reusing the windshield glass:
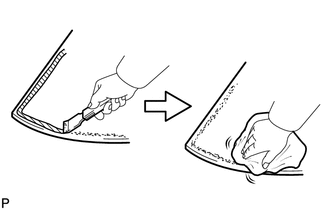
Using a gasket scraper, remove any remaining stopper, cover, moulding, adhesive dam, double-sided tape and adhesive residue from the windshield glass.
- NOTICE:
-
Be careful not to damage the windshield glass.
Clean the outer circumference of the windshield glass with a non-residue solvent.
- NOTICE:
- ·
Do not touch the windshield glass surface after cleaning it.
·Even if using a new windshield glass, clean the windshield glass with a non-residue solvent.
56115C
3.INSTALL NO. 1 WINDSHIELD GLASS STOPPER (for 2-piece Type)


|
Install in this Direction |
Install 2 new No. 1 windshield glass stoppers to the vehicle body as shown in the illustration.
- HINT:
-
Only 2-piece type windshield glass stoppers are provided as supply parts. Use 2-piece type stoppers as replacements even if 1-piece type stoppers were originally installed.
56116C
4.INSTALL NO. 2 WINDSHIELD GLASS STOPPER
Using a brush or sponge, apply the glass primer to the 2 No. 2 windshield glass stoppers installation area of the windshield glass.
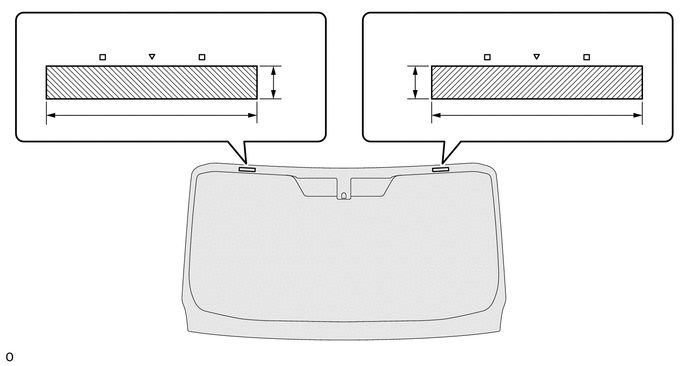
| *a | Backside | *b | Ceramic Notch |

|
Glass Primer Application Area | - | - |
- NOTICE:
-
Do not apply too much primer.
- Standard Dimension:
Area Dimension a 82 mm (3.23 in.) b 20 mm (0.787 in.)
Remove the peeling paper from a new No. 2 windshield glass stopper.
- HINT:
-
After removing the peeling paper, keep the exposed adhesive free from foreign matter.
Install the 2 No. 2 windshield stoppers to the windshield glass as shown in the illustration.
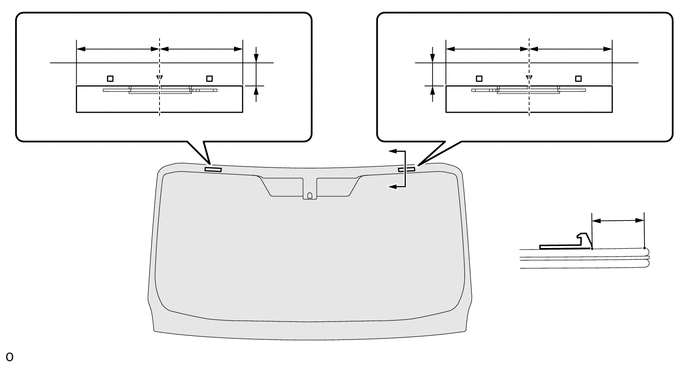
| *a | Backside | *b | Stopper Center Line |
| *c | Ceramic Notch | *d | Windshield Glass Edge Side |
- NOTICE:
- ·
Allow the primer to dry for 3 minutes or more.
·Make sure to install the No. 2 windshield glass stopper in the correct orientation.
- HINT:
-
Only 2-piece type windshield glass stoppers are provided as supply parts. Use 2-piece type stoppers as replacements even if 1-piece type stoppers were originally installed.
- Standard Dimension:
Area Dimension a 13 mm (0.512 in.) b 40 mm (1.57 in.)
75544B
5.INSTALL NO. 2 WINDSHIELD OUTSIDE MOULDING LH
Using a brush or sponge, apply the glass primer to the No. 2 windshield outside moulding LH installation surface of the windshield glass.
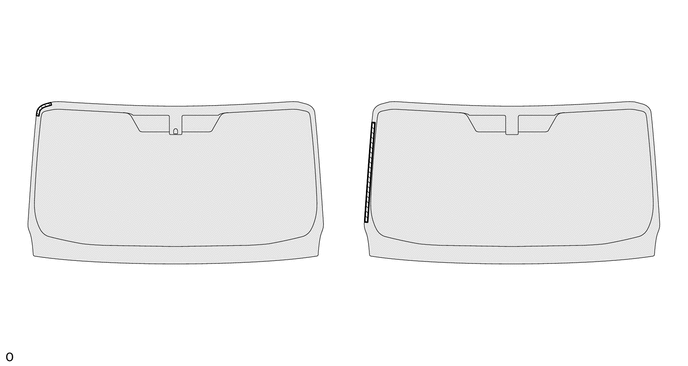
| *a | Backside | *b | Front Side |
|
|
Glass Primer | - | - |
- NOTICE:
-
Do not apply too much primer.
Remove the peeling paper from a new No. 2 windshield outside moulding LH.
- HINT:
-
After removing the peeling paper, keep the exposed adhesive free from foreign matter.
Install the No. 2 windshield outside moulding LH to the windshield glass as shown in the illustration.
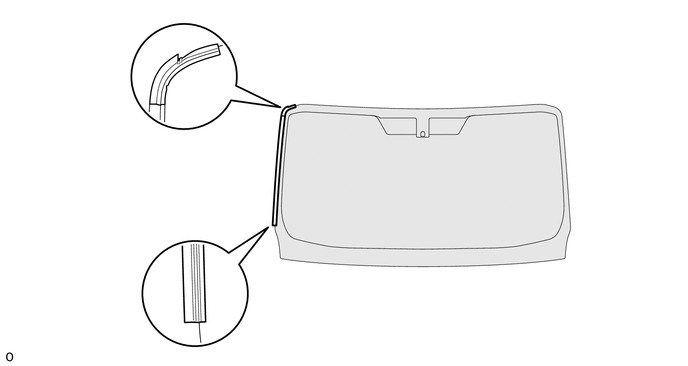
| *1 | No. 2 Windshield Outside Moulding LH | - | - |
| *a | Backside | - | - |
- NOTICE:
-
Allow the primer to dry for 3 minutes or more.
75543D
6.INSTALL NO. 2 WINDSHIELD OUTSIDE MOULDING RH
Using a brush or sponge, apply the glass primer to the No. 2 windshield outside moulding RH installation surface of the windshield glass.
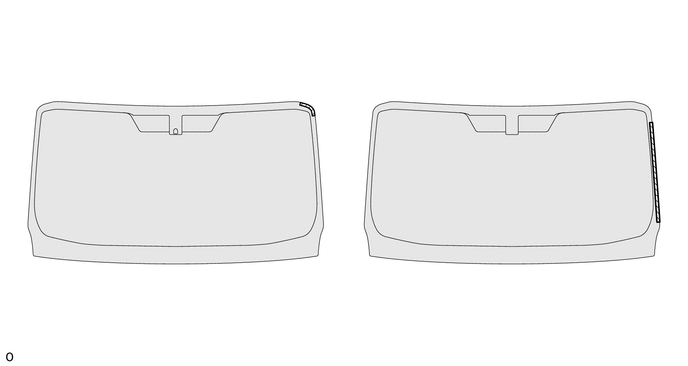
| *a | Backside | *b | Front Side |
|
|
Glass Primer | - | - |
- NOTICE:
-
Do not apply too much primer.
Remove the peeling paper from a new No. 2 windshield outside moulding RH.
- HINT:
-
After removing the peeling paper, keep the exposed adhesive free from foreign matter.
Install the No. 2 windshield outside moulding RH to the windshield glass as shown in the illustration.
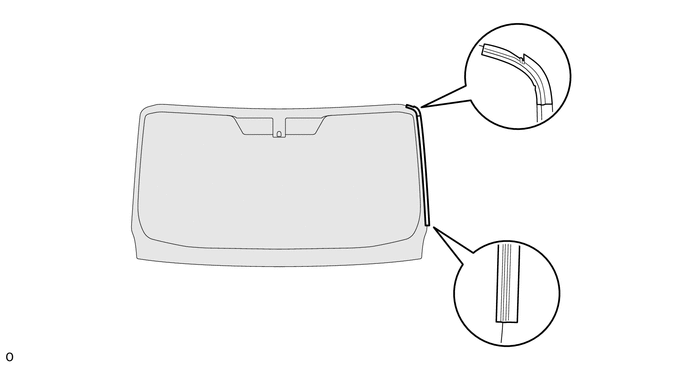
| *1 | No. 2 Windshield Outside Moulding LH | - | - |
| *a | Backside | - | - |
- NOTICE:
-
Allow the primer to dry for 3 minutes or more.
75533G
7.INSTALL WINDSHIELD OUTSIDE MOULDING
Using a brush or sponge, apply the glass primer to the windshield outside moulding installation surface of the windshield glass.
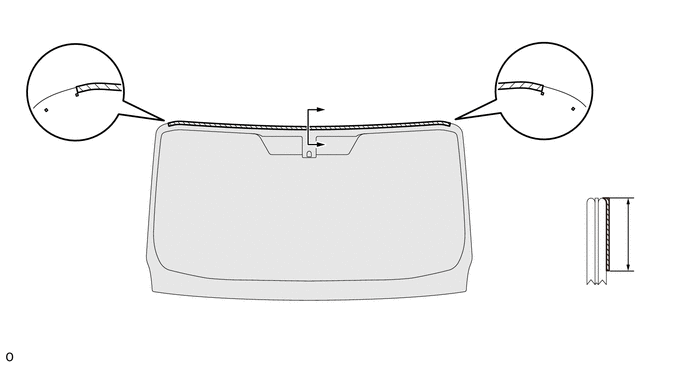
| *a | Backside | *b | Ceramic Notch |
|
|
Glass Primer | - | - |
- NOTICE:
-
Do not apply too much primer.
- Standard Dimension:
Area Dimension a 9.5 mm (0.374 in.)
Remove the peeling paper from a new windshield outside moulding.
- HINT:
-
After removing the peeling paper, keep the exposed adhesive free from foreign matter.
Install the windshield outside moulding to the windshield glass as shown in the illustration.
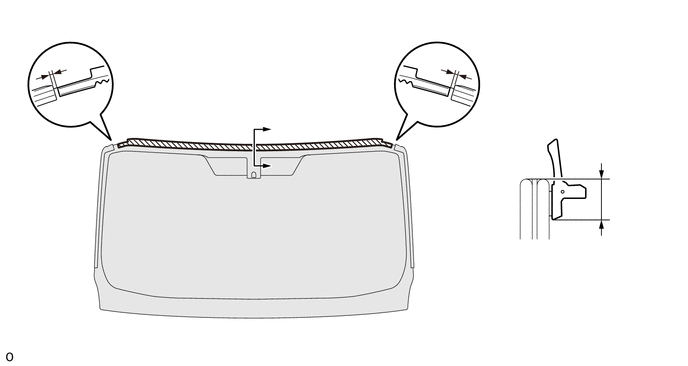
| *a | Backside | *b | Equal Clearances on Left and Right Sides |
|
|
Windshield Outside Moulding | - | - |
- NOTICE:
-
Allow the primer to dry for 3 minutes or more.
- Standard Dimension:
Area Dimension a 6.5 mm (0.256 in.)
56117E
8.INSTALL WINDOW GLASS ADHESIVE DAM
Using a brush or sponge, apply the glass primer to the window glass adhesive dam installation surface of the windshield glass.
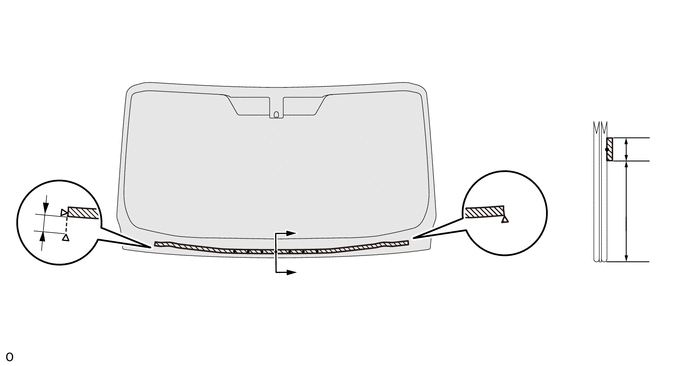
| *a | Backside | *b | Ceramic Notch |
|
|
Glass Primer | - | - |
- NOTICE:
-
Do not apply too much primer.
- Standard Dimension:
Area Dimension a 23.5 mm (0.925 in.) b 11 mm (0.433 in.) c 13 mm (0.512 in.)
Remove the peeling paper from a new window glass adhesive dam.
- HINT:
-
After removing the peeling paper, keep the exposed adhesive free from foreign matter.
Install the window glass adhesive dam to the windshield glass as shown in the illustration.
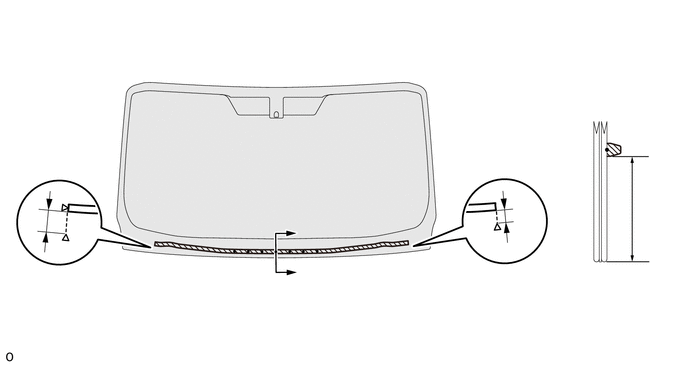
| *a | Backside | *b | Ceramic Notch |
|
|
Window Glass Adhesive Dam | - | - |
- Standard Dimension:
Area Dimension a 26.5 mm (1.04 in.) b 16 mm (0.630 in.) c 3.0 mm (0.118 in.)
- NOTICE:
-
Allow the primer to dry for 3 minutes or more.
56119C
9.INSTALL WINDSHIELD GLASS SEAL
Using a brush or sponge, apply the glass primer to the windshield glass seal installation surface of the windshield glass.
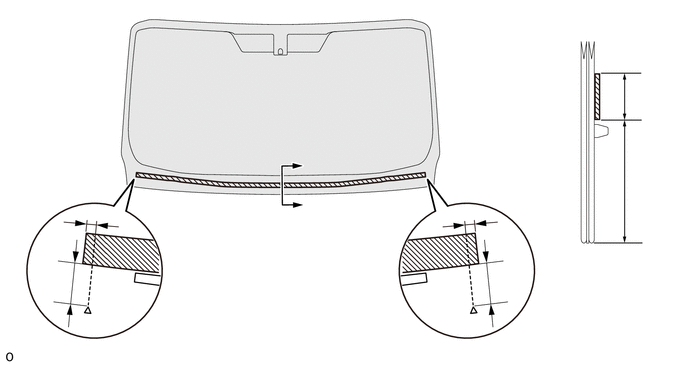
| *1 | Window Glass Adhesive Dam | - | - |
| *a | Backside | *b | Ceramic Notch |
|
|
Glass Primer | - | - |
- NOTICE:
-
Do not apply too much primer.
- Standard Dimension:
Area Dimension a 32.6 mm (1.28 in.) b 5.0 mm (0.197 in.) c 35.3 mm (1.39 in.) d 21 mm (0.827 in.)
Remove the peeling paper from a new windshield glass seal.
- HINT:
-
After removing the peeling paper, keep the exposed adhesive free from foreign matter.
Install the windshield glass seal to the windshield glass as shown in the illustration.
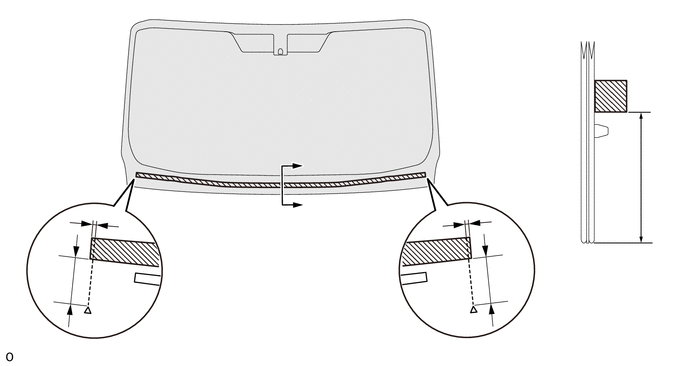
| *1 | Window Glass Adhesive Dam | - | - |
| *a | Backside | *b | Ceramic Notch |
|
|
Windshield Glass Seal | - | - |
- NOTICE:
-
Allow the primer to dry for 3 minutes or more.
- Standard Dimension:
Area Dimension a 35.6 mm (1.40 in.) b 2.0 mm (0.0787 in.) c 38.3 mm (1.51 in.)
56153C
10.INSTALL FRONT WINDOW INNER CENTER MOULDING
- CAUTION:
-
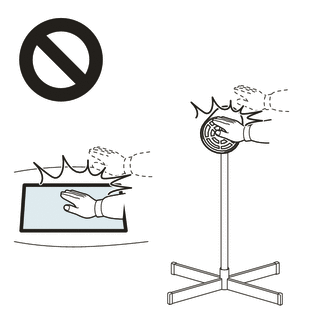 2.365,2 2.698,2 false 0.5,2.333 0.5,2.667 true 0.427,2.708 0.74,2.865 0.313,0.156 10 false *a 2.76,1.927 3.073,2.083 0.313,0.156 10 false *b
*a Heated Part *b Heat Light
- ·
Do not touch the heat light and heated parts.
·Touching the heat light may result in burns.
·Touching heated parts for a long time may result in burns.
- HINT:
-
Perform the following procedures if replacing the front window inner center moulding.
Using a heat light, heat the windshield glass and a new front window inner center moulding.
- Standard:
Item Temperature Windshield Glass 20 to 30°C (68 to 86°F) Front Window Inner Center Moulding 20 to 30°C (68 to 86°F)
Using a brush or sponge, apply the glass primer to the front window inner center moulding installation surface of the windshield glass.
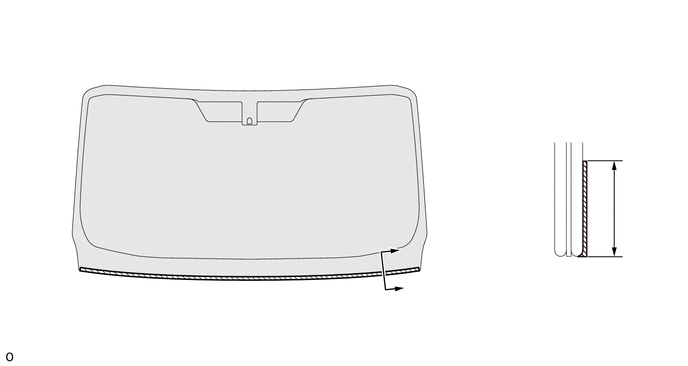
| *a | Backside | - | - |
|
|
Glass Primer | - | - |
- NOTICE:
-
Do not apply too much primer.
- Standard Dimension:
Area Dimension a 17.5 mm (0.689 in.)
Remove the peeling paper from a new front window inner center moulding.
- HINT:
-
After removing the peeling paper, keep the exposed adhesive free from foreign matter.
Install the front window inner center moulding to the windshield glass as shown in the illustration.
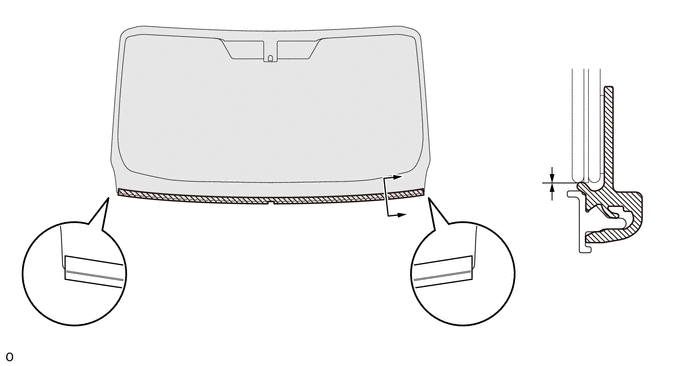
| *a | Backside | *b | R End |
| *c | Liner for the Protection | - | - |
|
|
Front Window Inner Center Moulding | - | - |
- NOTICE:
- ·
Do not remove the protective liner off the front window inner center moulding until the windshield glass is installed to the body.
·Allow the primer to dry for 3 minutes or more.
- Standard Dimension:
Area Dimension a 0 mm (0 in.)
56111A
11.INSTALL WINDSHIELD GLASS
Clean and shape the contact surface of the vehicle body.
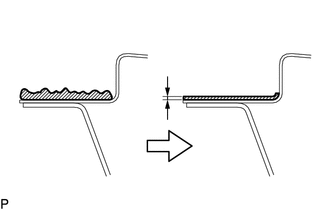
| *a | Vehicle Body |
|
|
Adhesive |
Using a knife, cut away excess adhesive on the contact surface of the vehicle body as shown in the illustration.
- Standard Dimension:
Area Dimension a 1.0 mm (0.0394 in.) to 3.0 mm (0.118 in.)
- NOTICE:
-
Be careful not to damage the vehicle body.
- HINT:
-
Leave approximately 1.0 mm (0.0394 in.) to 3.0 mm (0.118 in.) of adhesive on the vehicle body.
Clean the contact surface of the vehicle body with a piece of cloth saturated with non-residue solvent.
- HINT:
-
Even if all of the adhesive has been removed, clean the vehicle body.
Position the windshield glass.
Using suction cups, place the windshield glass in the correct position.
Check that the entire contact surface of the glass rim is perfectly even.
- NOTICE:
-
w/ Windshield Deicer:
-
Make sure that the wire harness of the windshield deicer is not caught between the body and windshield glass.
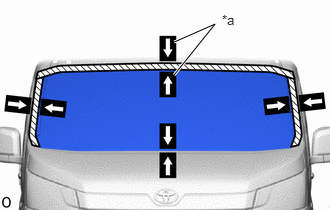
| *a | Matchmarks |
When using a new windshield glass:
Place matchmarks on the windshield glass and vehicle body at the locations indicated in the illustration.
- NOTICE:
-
Check that the No. 2 windshield glass stopper is attached to the No. 1 windshield glass stopper correctly.
- HINT:
-
When reusing a windshield glass, check the position of the matchmarks and make adjustments.
Using suction cups, remove the windshield glass.
Using a brush or sponge, apply the body primer to the exposed part of the vehicle body.
- NOTICE:
- ·
Do not apply too much primer.
·Do not apply primer to the adhesive.
·When applying the primer, take care of the seams of the panel and spot welds.
Using a brush or sponge, apply the glass primer as shown in the illustration.
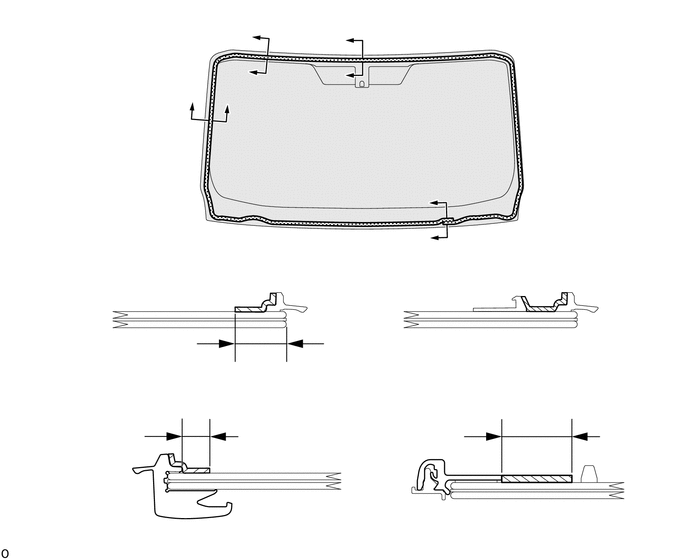
| *1 | No. 2 Windshield Glass Stopper | - | - |
| *a | Backside | *b | Moulding Edge |
|
|
Glass Primer | - | - |
- Standard Dimension:
Area Dimension a 16.5 mm (0.650 in.) b 8.6 mm (0.339 in.) c 21.5 mm (0.846 in.)
- NOTICE:
-
Do not apply too much primer.
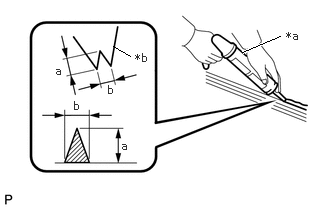
| *a | Sealer Gun |
| *b | Nozzle |
|
|
Adhesive |
Cut off the tip of the cartridge nozzle as shown in the illustration.
- Standard Dimension:
Area Dimension a 12 mm (0.472 in.) to 15 mm (0.591 in.) b 8.0 mm (0.315 in.) to 11 mm (0.433 in.)
Load the sealer gun with the cartridge.
Apply adhesive to the glass as shown in the illustration.
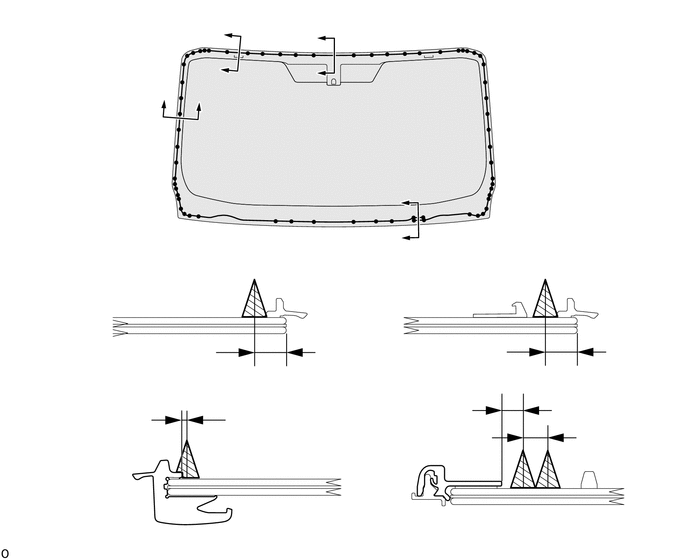
| *a | Backside | *b | Adhesive Positioning Center |
| *c | Ceramic Notch | *d | Moulding Edge |
|
|
Adhesive | - | - |
- NOTICE:
-
Allow the primer to dry for 3 minutes or more.
- Adhesive:
Toyota Genuine Windshield Glass Adhesive (High modulus type) or equivalent
- Standard Dimension:
Area Dimension a 9.5 mm (0.374 in.) b 1.6 mm (0.0630 in.) c 6.5 mm (0.256 in.) d 8.0 mm (0.315 in.)
| *a | Matchmarks |
Install the windshield glass to the vehicle body.
Using suction cups, position the windshield glass so that the matchmarks are aligned.
- NOTICE:
- ·
Check that the No. 1 windshield stopper and the No. 2 windshield stopper are attached to the vehicle body correctly.
·Check that the vehicle body and glass have a small gap between them.
Press it in gently along the rim.
- HINT:
-
Press the glass with force of 98 N (10 kgf, 22.0 lbf) or more.
Using a gasket scraper, remove any excess or protruding adhesive.
- NOTICE:
-
Apply adhesive up to the edge of the windshield glass.
Hold the windshield glass using protective tape until the applied adhesive becomes hard.
- NOTICE:
-
Do not drive the vehicle for the time described in the table below.
- Minimum Time:
Temperature Minimum Time Prior to Driving Vehicle 35°C (95°F) 1 hour and 30 minutes 20°C (68°F) 5 hours 5°C (41°F) 24 hours
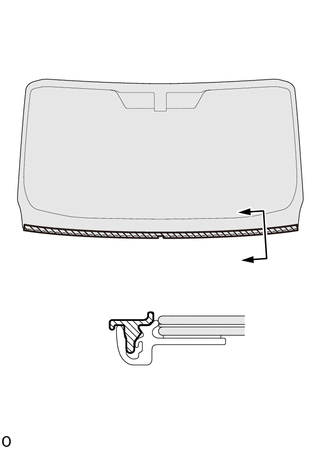
|
|
Liner for the Protection |
When replacing the front window inner center moulding:
Remove the 2 protective liners of the front window inner center moulding.
- NOTICE:
-
Do not damage or deform the front window inner center moulding.
w/ Windshield Deicer:
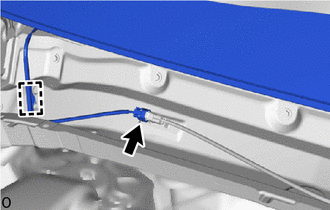
Attach the wire harness clamp and connect the windshield deicer connector.
12.INSTALL ROOF HEADLINING ASSEMBLY
for Semi-trim, for Standard Roof:
for Semi-trim, for High Roof:
for Full-trim, for Standard Roof:
for Full-trim, for High Roof:
63413C
13.INSTALL FRONT INNER ROOF RACK BOARD (for High Roof)
63439D
14.INSTALL NO. 2 INNER ROOF RACK COVER (for High Roof)
63438F
15.INSTALL NO. 1 INNER ROOF RACK COVER (for High Roof)
89941
16.INSTALL RAIN SENSOR (w/ Rain Sensor)
86768
17.INSTALL ROOF ANTENNA COVER (w/ Digital Audio Broadcasting Antenna)
86401
18.INSTALL FORWARD RECOGNITION WITH HEATER HOOD SUB-ASSEMBLY (w/ Pre-collision System)
8646C
19.INSTALL FORWARD RECOGNITION CAMERA (w/ Pre-collision System)
86464A
20.INSTALL FORWARD RECOGNITION LATCH (w/ Pre-collision System)
87810
21.INSTALL INNER REAR VIEW MIRROR ASSEMBLY (w/ EC Mirror)
87810
22.INSTALL INNER REAR VIEW MIRROR ASSEMBLY (w/o EC Mirror)
87810
23.INSTALL INNER REAR VIEW MIRROR ASSEMBLY (for Digital Inner Mirror)
86466D
24.INSTALL NO. 1 FORWARD RECOGNITION COVER (w/ Pre-collision System)
25.INSTALL MAP LIGHT ASSEMBLY
26.INSTALL ASSIST GRIP ASSEMBLY (w/ Assist Grip)
74348
27.INSTALL VISOR HOLDER
74320
28.INSTALL VISOR ASSEMBLY LH
74310
29.INSTALL VISOR ASSEMBLY RH
- HINT:
-
Use the same procedure described for the LH side.
62212
30.INSTALL FRONT PILLAR GARNISH LH
62211
31.INSTALL FRONT PILLAR GARNISH RH
- HINT:
-
Use the same procedure described for the LH side.
74680
32.INSTALL PILLAR ASSIST GRIP ASSEMBLY
- HINT:
-
Use the same procedure for the other side.
62312B
33.INSTALL FRONT DOOR OPENING TRIM WEATHERSTRIP LH
62311B
34.INSTALL FRONT DOOR OPENING TRIM WEATHERSTRIP RH
- HINT:
-
Use the same procedure described for the LH side.
55708
35.INSTALL COWL TOP VENTILATOR LOUVER SUB-ASSEMBLY
53808G
36.INSTALL FENDER APRON MUDGUARD SEAL SUB-ASSEMBLY LH
53807G
37.INSTALL FENDER APRON MUDGUARD SEAL SUB-ASSEMBLY RH
- HINT:
-
Use the same procedure described for the LH side.
53867H
38.INSTALL FRONT FENDER TO COWL SIDE SEAL LH
53866J
39.INSTALL FRONT FENDER TO COWL SIDE SEAL RH
- HINT:
-
Use the same procedure described for the LH side.
40.INSTALL WINDSHIELD WIPER ARM AND BLADE ASSEMBLY LH
41.INSTALL WINDSHIELD WIPER ARM AND BLADE ASSEMBLY RH
85192
42.INSTALL WINDSHIELD WIPER ARM COVER
43. CHECK FOR LEAK AND REPAIR
Conduct a leak test after the adhesive has completely hardened.
Seal any leaks with auto glass sealer.
Remove the protective tape and matchmark.
8646C
44.ADJUST FORWARD RECOGNITION CAMERA (w/ Pre-collision System)