M20F-FXS, M20G-FXS ENGINE CONTROL SFI SYSTEM P107A2A Fuel Rail Pressure Sensor (Low) Signal Stuck in Range P107A64 Fuel Rail Pressure Sensor (Low) Signal Plausibility Failure
DESCRIPTION
Refer to DTC P107A11.
| DTC No. | Detection Item | DTC Detection Condition | Trouble Area | MIL | Note |
|---|---|---|---|---|---|
| P107A2A | Fuel Rail Pressure Sensor (Low) Signal Stuck in Range | When the target fuel pressure for the low pressure side changes, the change in the fuel pressure sensor (for low pressure side) value is abnormal (2 trip detection logic). | ·
Leak of fuel ·
Fuel pump control ECU ·
Fuel pressure sensor (for low pressure side) ·
Fuel pump (for low pressure side) ·
Fuel main valve assembly ·
ECM |
Comes on | SAE Code: P107B |
| P107A64 | Fuel Rail Pressure Sensor (Low) Signal Plausibility Failure | When the fuel pump on the low pressure side is operated at maximum speed when the engine is stopped at vehicle speed of 45 km/h (28 mph) or more, the low pressure side fuel pressure is higher or lower than threshold (2 trip detection logic). | ·
Leak of fuel ·
Fuel pump control ECU ·
Fuel pressure sensor (for low pressure side) ·
Fuel pump (for low pressure side) ·
Fuel main valve assembly ·
ECM |
Comes on | SAE Code: P107B |
MONITOR DESCRIPTION
- Fuel Pressure Sensor Stuck Monitor
-
If the fuel pressure sensor (for low pressure side) value does not follow the change in the target low pressure side fuel pressure, it is judged as a malfunction. If this malfunction is detected in 2 consecutive driving cycles, the ECM will illuminate the MIL and store DTC P107A2A.
- Fuel Pressure Sensor Correlation Monitor
-
If the fuel pressure sensor (for low pressure side) value is less than or higher than the threshold value when the fuel pump on the low pressure side is operated at maximum speed when the engine is stopped at vehicle speed of 45 km/h (28 mph) or more, it is judged as a malfunction has occurred. If this malfunction is detected for 2 consecutive driving cycles, the ECM will illuminate the MIL and store DTC P107A64.
MONITOR STRATEGY
| Required Sensors/Components (Main) | Fuel pressure sensor (for low pressure side) |
| Required Sensors/Components (Related) | Atmospheric pressure sensor |
| Frequency of Operation | Continuous: Stuck monitor
Once per driving cycle: Correlation monitor |
CONFIRMATION DRIVING PATTERN
- HINT:
- ·
After repair has been completed, clear the DTC and then check that the vehicle has returned to normal by performing the following All Readiness check procedure.
·When clearing the permanent DTCs, refer to the "CLEAR PERMANENT DTC" procedure.
- P107A2A
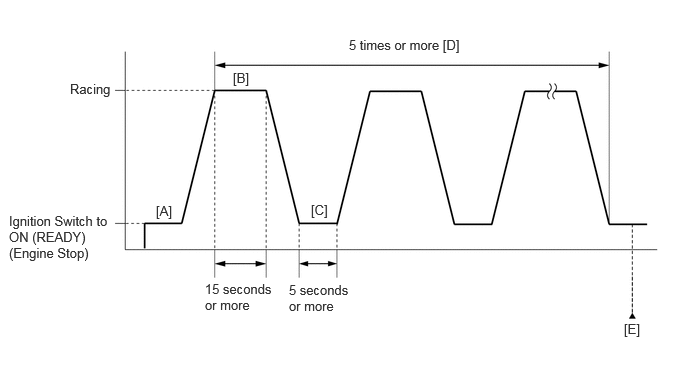 0.094,2.219 1.198,3.031 1.104,0.813 10 false Ignition Switch to ON (READY) (Engine Stop) 0.729,0.844 1.229,1.219 0.5,0.375 10 false Racing 3.635,0.385 5.063,0.688 1.427,0.302 10 false 5 times or more [D] 1.625,2.115 1.917,2.385 0.292,0.271 10 false [A] 2.427,0.729 2.719,1 0.292,0.271 10 false [B] 3.24,2.104 3.531,2.375 0.292,0.271 10 false [C] 6.5,3.344 6.792,3.615 0.292,0.271 10 false [E] 2.135,2.927 2.865,3.271 0.729,0.344 10 false 15 seconds or more 3.01,2.938 3.677,3.375 0.667,0.438 10 false 5 seconds or more
- 1.
Connect the GTS to the DLC3.
2.Turn the ignition switch to ON.
3.Turn the GTS on.
4.Clear the DTCs (even if no DTCs are stored, perform the clear DTC procedure).
5.Turn the ignition switch off and wait for at least 30 seconds.
6.Turn the ignition switch to ON.
7.Turn the GTS on.
8.Put the engine in Inspection Mode (Maintenance Mode).
9.Start the engine and warm it up until the engine coolant temperature reaches 75°C (167°F) or higher.
10.Turn the ignition switch off.
11.Turn the ignition switch to ON (READY) [A].
12.Turn the GTS on.
13.Rev the engine for 15 seconds or more with the shift lever in P [B].
14.Allow the engine to stop for 5 seconds or more [C].
- HINT:
- ·
If the engine does not stop, wait until the engine stops.
·If the engine coolant temperature is low, it may take some time for the engine to stop.
15.Repeat [B] and [C] 5 times or more [D].
16.Enter the following menus: Powertrain / Engine / Trouble Codes [E].
17.Read the pending DTCs.
- HINT:
- ·
If a pending DTC is output, the system is malfunctioning.
·If a pending DTC is not output, perform the following procedure.
18.Enter the following menus: Powertrain / Engine / Utility / All Readiness.
19.Input the DTC: P107A2A.
20.Check the DTC judgment result.
GTS Display Description NORMAL ·DTC judgment completed
·System normal
ABNORMAL ·DTC judgment completed
·System abnormal
INCOMPLETE ·DTC judgment not completed
·Perform driving pattern after confirming DTC enabling conditions
- HINT:
- ·
If the judgment result is NORMAL, the system is normal.
·If the judgment result is ABNORMAL, the system has a malfunction.
·If the judgment result is INCOMPLETE, perform steps [B] through [E] again.
·[A] to [E]: Normal judgment procedure.
The normal judgment procedure is used to complete DTC judgment and also used when clearing permanent DTCs.
·When clearing the permanent DTCs, do not disconnect the cable from the auxiliary battery terminal or attempt to clear the DTCs during this procedure, as doing so will clear the universal trip and normal judgment histories.
- P107A64
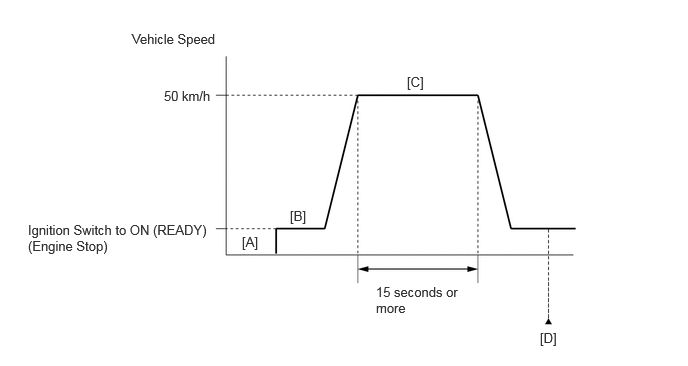 1.708,0.917 3.271,1.281 1.563,0.365 10 false 50 km/h 0.292,2.313 2.208,3.073 1.917,0.76 10 false Ignition Switch to ON (READY) (Engine Stop) 2.521,2.438 2.802,2.729 0.281,0.292 10 false [A] 3.021,2.167 3.302,2.458 0.281,0.292 10 false [B] 4.24,0.771 4.521,1.063 0.281,0.292 10 false [C] 5.625,3.438 5.906,3.729 0.281,0.292 10 false [D] 3.917,2.958 4.833,3.375 0.917,0.417 10 false 15 seconds or more 1.375,0.323 2.938,0.688 1.563,0.365 10 false Vehicle Speed
- 1.
Connect the GTS to the DLC3.
2.Turn the ignition switch to ON.
3.Turn the GTS on.
4.Clear the DTCs (even if no DTCs are stored, perform the clear DTC procedure).
5.Turn the ignition switch off and wait for at least 30 seconds.
6.Turn the ignition switch to ON.
7.Turn the GTS on.
8.Put the engine in Inspection Mode (Maintenance Mode).
9.Start the engine and warm it up until the engine coolant temperature reaches 75°C (167°F) or higher [B].
10.Turn the ignition switch off [A].
11.Turn the ignition switch to ON (READY) [B].
12.Drive the vehicle at approximately 50 km/h (31 mph) for 15 seconds or more [C].
- CAUTION:
-
When performing the confirmation driving pattern, obey all speed limits and traffic laws.
13.Enter the following menus: Powertrain / Engine / Trouble Codes [D].
14.Read the pending DTCs.
- HINT:
- ·
If a pending DTC is output, the system is malfunctioning.
·If a pending DTC is not output, perform the following procedure.
15.Enter the following menus: Powertrain / Engine / Utility / All Readiness.
16.Input the DTC: P107A64.
17.Check the DTC judgment result.
GTS Display Description NORMAL ·DTC judgment completed
·System normal
ABNORMAL ·DTC judgment completed
·System abnormal
INCOMPLETE ·DTC judgment not completed
·Perform driving pattern after confirming DTC enabling conditions
- HINT:
- ·
If the judgment result is NORMAL, the system is normal.
·If the judgment result is ABNORMAL, the system has a malfunction.
·If the judgment result is INCOMPLETE, perform steps [A] through [D] again.
·[B] to [D]: Normal judgment procedure.
The normal judgment procedure is used to complete DTC judgment and also used when clearing permanent DTCs.
·When clearing the permanent DTCs, do not disconnect the cable from the auxiliary battery terminal or attempt to clear the DTCs during this procedure, as doing so will clear the universal trip and normal judgment histories.
CAUTION / NOTICE / HINT
- NOTICE:
- ·
Vehicle Control History may be stored in the hybrid vehicle control ECU assembly if the engine is malfunctioning. Certain vehicle condition information is recorded when Vehicle Control History is stored. Reading the vehicle conditions recorded in both the freeze frame data and Vehicle Control History can be useful for troubleshooting.
(Select Powertrain in Health Check and then check the time stamp data.)
·If any "Engine Malfunction" Vehicle Control History item has been stored in the hybrid vehicle control ECU assembly, make sure to clear it. However, as all Vehicle Control History items are cleared simultaneously, if any Vehicle Control History items other than "Engine Malfunction" are stored, make sure to perform any troubleshooting for them before clearing Vehicle Control History.
- HINT:
-
Read Freeze Frame Data using the GTS. The ECM records vehicle and driving condition information as Freeze Frame Data the moment a DTC is stored. When troubleshooting, Freeze Frame Data can help determine if the vehicle was moving or stationary, if the engine was warmed up or not, if the air fuel ratio was lean or rich, and other data from the time the malfunction occurred.
PROCEDURE
Read the DTCs and record the Freeze Frame Data.
- Powertrain > Engine > Trouble Codes
- 50001 372
- Result:
Result Proceed to DTC P107A2A is output A DTC P107A64 is output B DTC P107A2A or P107A64 and P008A00 are output C DTC P107A2A or P107A64 and P008B00 are output D DTC P107A2A, P107A64, P008A00 and/or P008B00 and other DTCs are output E
- HINT:
-
If any DTCs other than P107A2A, P107A64, P008A00 and/or P008B00 are output, troubleshoot those DTCs first.
A
B
C
D
E
Put the engine in Inspection Mode (Maintenance Mode).
- Powertrain > Hybrid Control > Utility
-
Tester Display Inspection Mode - 50005 397 2103
Start the engine.
Enter the following menus.
- Powertrain > Engine > Data List
-
Tester Display Fuel Pressure (Low) / Fuel Pressure 2 - 50003 372 267
Record the Fuel Pressure (Low) / Fuel Pressure 2 value.
Turn the ignition switch off.
Discharge the fuel pressure.
- HINT:
-
DTCs may be stored during this inspection. Check for DTCs and clear them using the GTS.
Remove the EFI-MAIN NO. 2 fuse from the No. 1 engine room relay block.
Put the engine in Inspection Mode (Maintenance Mode).
- Powertrain > Hybrid Control > Utility
-
Tester Display Inspection Mode - 50005 397 2103
Start the engine.
After the engine has stopped on its own, turn the ignition switch off.
- HINT:
-
If the engine does not stop naturally, perform direct injection by racing the engine to reduce the fuel pressure [Fuel Pressure (High)] and stop the engine.
Put the engine in Inspection Mode (Maintenance Mode).
- Powertrain > Hybrid Control > Utility
-
Tester Display Inspection Mode - 50005 397 2103
Crank the engine again and make sure that the engine does not start.
Install the EFI-MAIN NO. 2 fuse.
Enter the following menus.
- Powertrain > Engine > Data List
-
Tester Display Fuel Pressure (Low) / Fuel Pressure 2 - 50003 372 267
Compare the Fuel Pressure (Low) / Fuel Pressure 2 value recorded with the engine running to the Fuel Pressure (Low) / Fuel Pressure 2 value currently shown on the GTS.
- Result:
Result Proceed to Fuel Pressure (Low) / Fuel Pressure 2 value drops A Fuel Pressure (Low) / Fuel Pressure 2 value does not fluctuate B
- HINT:
-
Perform "Inspection After Repair" after replacing the fuel pressure sensor (for low pressure side).
A
B
Clear the DTCs.
- Powertrain > Engine > Clear DTCs
- 50002 372
Turn the ignition switch off and wait for at least 30 seconds.
- Result:
Proceed to NEXT
NEXT
Drive the vehicle in accordance with the driving pattern described in Confirmation Driving Pattern.
Enter the following menus.
- Powertrain > Engine > Utility
-
Tester Display All Readiness - 50005 372 20
Input the DTC: P107A2A or P107A64.
Check the DTC judgment result.
- Result:
Result Proceed to NORMAL
(DTCs are not output)A ABNORMAL
(DTC P107A2A or P107A64 is output)B
A
B
Install the fuel pressure gauge (for low pressure line of low pressure side).
Enter the following menus.
- Powertrain > Engine > Active Test
-
Active Test Display Control the Fuel Pump Duty Ratio (Brushless) -
Data List Display Fuel Pressure (Low) / Fuel Pressure 2 - 50004 372 39 267
Compare the values in the Data List using the GTS and the fuel pressure gauge when the Active Test was performed.
- Standard:
GTS Operation Standard Low Data List value and fuel pressure gauge are within +/-50 kPa of each other High
- HINT:
-
Perform "Inspection After Repair" after replacing the fuel pressure sensor (for low pressure side).
- Result:
Proceed to OK NG
OK
NG
Read the Freeze Frame Data value from step 1.
- Powertrain > Engine > DTC(P107A2A) > Freeze Frame Data
-
Tester Display Fuel Pressure (Low) / Fuel Pressure 2 - 50040 372 267 P107A2A
- Result:
Result Proceed to Fuel Pressure (Low) / Fuel Pressure 2 value is 770 kPa or higher A Fuel Pressure (Low) / Fuel Pressure 2 value is 540 kPa or less B
A
B
Check around and beneath the vehicle for fuel leaks, fumes, etc.
- OK:
No fuel leaks present.
- Result:
Proceed to OK NG
OK
NG
Enter the following menus.
- Powertrain > Engine > Active Test
-
Tester Display Control the Fuel Pump Duty Ratio (Brushless) - 50004 372 39
Check whether the fuel pump operating sound occurs when performing the Active Test on the GTS.
- Standard:
GTS Operation Standard High Operating sounds can be heard from fuel pump (for low pressure side)
- HINT:
-
Perform "Inspection After Repair" after replacing the fuel pump (for low pressure side).
- Result:
Proceed to OK NG
OK
NG
Discharge the fuel pressure.
- HINT:
-
DTCs may be stored during this inspection. Check for DTCs and clear them using the GTS.
Remove the EFI-MAIN NO. 2 fuse from the No. 1 engine room relay block.
Put the engine in Inspection Mode (Maintenance Mode).
- Powertrain > Hybrid Control > Utility
-
Tester Display Inspection Mode - 50005 397 2103
Start the engine.
After the engine has stopped on its own, turn the ignition switch off.
- HINT:
-
If the engine does not stop naturally, perform direct injection by racing the engine to reduce the fuel pressure [Fuel Pressure (High)] and stop the engine.
Put the engine in Inspection Mode (Maintenance Mode).
- Powertrain > Hybrid Control > Utility
-
Tester Display Inspection Mode - 50005 397 2103
Crank the engine again and make sure that the engine does not start.
Install the EFI-MAIN NO. 2 fuse.
Enter the following menus.
- Powertrain > Engine > Active Test
-
Active Test Display Control the Fuel Pump Duty Ratio (Brushless) -
Data List Display Fuel Pressure (Low) / Fuel Pressure 2 - 50004 372 39 267
Read the value displayed on the GTS when the Active Test was performed.
- Standard:
GTS Operation Standard Low to High When switching from Low to High, Fuel Pressure (Low) / Fuel Pressure 2 value changes
- HINT:
-
Once the fuel pressure becomes high, the fuel pressure will not decrease, even when switched from High to Low. Therefore, make sure that the fuel pressure is low before checking that the fuel pressure changes when switching from Low to High.
- Result:
Proceed to OK NG
OK
NG
Discharge the fuel pressure.
- HINT:
-
DTCs may be stored during this inspection. Check for DTCs and clear them using the GTS.
Remove the EFI-MAIN NO. 2 fuse from the No. 1 engine room relay block.
Put the engine in Inspection Mode (Maintenance Mode).
- Powertrain > Hybrid Control > Utility
-
Tester Display Inspection Mode - 50005 397 2103
Start the engine.
After the engine has stopped on its own, turn the ignition switch off.
- HINT:
-
If the engine does not stop naturally, perform direct injection by racing the engine to reduce the fuel pressure [Fuel Pressure (High)] and stop the engine.
Put the engine in Inspection Mode (Maintenance Mode).
- Powertrain > Hybrid Control > Utility
-
Tester Display Inspection Mode - 50005 397 2103
Crank the engine again and make sure that the engine does not start.
Install the EFI-MAIN NO. 2 fuse.
Enter the following menus.
- Powertrain > Engine > Active Test
-
Active Test Display Control the Fuel Pump Duty Ratio (Brushless) -
Data List Display Fuel Pressure (Low) / Fuel Pressure 2 - 50004 372 39 267
Read the value displayed on the GTS when the Active Test was performed.
- Standard:
GTS Operation Fuel Pressure (Low) / Fuel Pressure 2 Low 50 kPa or higher High 420 kPa or higher
- HINT:
-
Once the fuel pressure becomes high, the fuel pressure will not decrease, even when switched from High to Low. Therefore, make sure that the fuel pressure is low before checking that the fuel pressure changes when switching from Low to High.
- OK:
Actual Low and High values are as shown above.
- Result:
Proceed to OK NG
OK
NG
Install the fuel pressure gauge (for low pressure line of low pressure side).
Enter the following menus.
- Powertrain > Engine > Active Test
-
Active Test Display Control the Fuel Pump Duty Ratio (Brushless) -
Data List Display Fuel Pressure (Low) / Fuel Pressure 2 - 50004 372 39 267
Compare the values in the Data List using the GTS and the fuel pressure gauge when the Active Test was performed.
- Standard:
GTS Operation Standard Low Data List value and fuel pressure gauge are within +/-50 kPa of each other High
- HINT:
-
Perform "Inspection After Repair" after replacing the fuel pressure sensor (for low pressure side).
- Result:
Proceed to OK NG
OK
NG
Clear the DTCs.
- Powertrain > Engine > Clear DTCs
- 50002 372
Turn the ignition switch off and wait for at least 30 seconds.
- Result:
Proceed to NEXT
NEXT
Drive the vehicle in accordance with the driving pattern described in Confirmation Driving Pattern.
Enter the following menus.
- Powertrain > Engine > Utility
-
Tester Display All Readiness - 50005 372 20
Input the DTC: P107A2A or P107A64.
Check the DTC judgment result.
- Result:
Result Proceed to NORMAL
(DTCs are not output)A ABNORMAL
(DTC P107A2A or P107A64 is output)B
A
B
Put the engine in Inspection Mode (Maintenance Mode).
- Powertrain > Hybrid Control > Utility
-
Tester Display Inspection Mode - 50005 397 2103
Start the engine.
Enter the following menus.
- Powertrain > Engine > Data List
-
Tester Display Fuel Pressure (Low) / Fuel Pressure 2 - 50003 372 267
Record the Fuel Pressure (Low) / Fuel Pressure 2 value.
Turn the ignition switch off.
Wait for 10 seconds.
Enter the following menus.
- Powertrain > Engine > Data List
-
Tester Display Fuel Pressure (Low) / Fuel Pressure 2 - 50003 372 267
Compare the Fuel Pressure (Low) / Fuel Pressure 2 value recorded with the engine running to the Fuel Pressure (Low) / Fuel Pressure 2 value currently shown on the GTS.
- Result:
Result Proceed to Fuel Pressure (Low) / Fuel Pressure 2 value is maintained A Fuel Pressure (Low) / Fuel Pressure 2 value drops B
- HINT:
-
Perform "Inspection After Repair" after replacing the fuel pump (for low pressure side).
A
B
Install the fuel pressure gauge (for low pressure line of low pressure side).
Enter the following menus.
- Powertrain > Engine > Active Test
-
Active Test Display Control the Fuel Pump Duty Ratio (Brushless) -
Data List Display Fuel Pressure (Low) / Fuel Pressure 2 - 50004 372 39 267
Read the values in the Data List using the GTS and the fuel pressure gauge when the Active Test was performed.
- Result:
GTS Operation Result Proceed to Low to High Data List value does not change, but fuel pressure gauge changes A Data List value and fuel pressure gauge do not change B
- HINT:
-
Perform "Inspection After Repair" after replacing the fuel pressure sensor (for low pressure side).
A
B
Put the engine in Inspection Mode (Maintenance Mode).
- Powertrain > Hybrid Control > Utility
-
Tester Display Inspection Mode - 50005 397 2103
Start the engine.
Enter the following menus.
- Powertrain > Engine > Data List
-
Tester Display Fuel Pressure (Low) / Fuel Pressure 2 - 50003 372 267
Record the Fuel Pressure (Low) / Fuel Pressure 2 value.
Turn the ignition switch off.
Discharge the fuel pressure.
- HINT:
-
DTCs may be stored during this inspection. Check for DTCs and clear them using the GTS.
Remove the EFI-MAIN NO. 2 fuse from the No. 1 engine room relay block.
Put the engine in Inspection Mode (Maintenance Mode).
- Powertrain > Hybrid Control > Utility
-
Tester Display Inspection Mode - 50005 397 2103
Start the engine.
After the engine has stopped on its own, turn the ignition switch off.
- HINT:
-
If the engine does not stop naturally, perform direct injection by racing the engine to reduce the fuel pressure [Fuel Pressure (High)] and stop the engine.
Put the engine in Inspection Mode (Maintenance Mode).
- Powertrain > Hybrid Control > Utility
-
Tester Display Inspection Mode - 50005 397 2103
Crank the engine again and make sure that the engine does not start.
Install the EFI-MAIN NO. 2 fuse.
Enter the following menus.
- Powertrain > Engine > Data List
-
Tester Display Fuel Pressure (Low) / Fuel Pressure 2 - 50003 372 267
Compare the Fuel Pressure (Low) / Fuel Pressure 2 value recorded with the engine running to the Fuel Pressure (Low) / Fuel Pressure 2 value currently shown on the GTS.
- Result:
Result Proceed to Fuel Pressure (Low) / Fuel Pressure 2 value drops A Fuel Pressure (Low) / Fuel Pressure 2 value is maintained B
- HINT:
-
Perform "Inspection After Repair" after replacing the fuel pressure sensor (for low pressure side).
A
B
Install the fuel pressure gauge (for low pressure line of low pressure side).
Enter the following menus.
- Powertrain > Engine > Active Test
-
Active Test Display Control the Fuel Pump Duty Ratio (Brushless) -
Data List Display Fuel Pressure (Low) / Fuel Pressure 2 - 50004 372 39 267
Compare the values in the Data List using the GTS and the fuel pressure gauge when the Active Test was performed.
- Standard:
GTS Operation Standard Low Data List value and fuel pressure gauge are within +/-50 kPa of each other High
- HINT:
-
Perform "Inspection After Repair" after replacing the fuel pressure sensor (for low pressure side).
- Result:
Proceed to OK NG
OK
NG
Clear the DTCs.
- Powertrain > Engine > Clear DTCs
- 50002 372
Turn the ignition switch off and wait for at least 30 seconds.
- Result:
Proceed to NEXT
NEXT
Drive the vehicle in accordance with the driving pattern described in Confirmation Driving Pattern.
Enter the following menus.
- Powertrain > Engine > Utility
-
Tester Display All Readiness - 50005 372 20
Input the DTC: P107A2A or P107A64.
Check the DTC judgment result.
- Result:
Result Proceed to NORMAL
(DTCs are not output)A ABNORMAL
(DTC P107A2A or P107A64 is output)B
A
B