DOOR / HATCH BACK DOOR REASSEMBLY
PROCEDURE

 68948
1.INSTALL BACK DOOR DAMPER STAY LOWER BRACKET LH
68948
1.INSTALL BACK DOOR DAMPER STAY LOWER BRACKET LH
68947
2.INSTALL BACK DOOR DAMPER STAY LOWER BRACKET RH
- HINT:
-
Use the same procedure as for the LH side.
68946
3.INSTALL BACK DOOR DAMPER STAY UPPER BRACKET LH
w/o Power Back Door:
w/ Power Back Door:
68945
4.INSTALL BACK DOOR DAMPER STAY UPPER BRACKET RH
- HINT:
-
Use the same procedure as for the LH side.
68960B
5.INSTALL BACK DOOR STAY ASSEMBLY LH (w/o Power Back Door)
68970
6.INSTALL BACK DOOR STAY ASSEMBLY RH (w/o Power Back Door)
- HINT:
-
Use the same procedure as for the LH side.
68920
7.INSTALL POWER BACK DOOR UNIT SET ASSEMBLY LH (w/ Power Back Door)
68910A
8.INSTALL POWER BACK DOOR UNIT SET ASSEMBLY RH (w/ Power Back Door)
- HINT:
-
Use the same procedure as for the LH side.
67005B
9.INSTALL BACK DOOR PANEL CUSHION
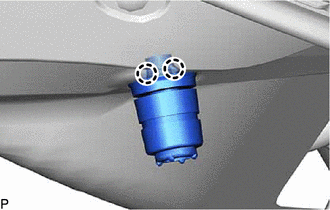
Engage the 2 claws to install the back door panel cushion.
- HINT:
-
Use the same procedure for the RH side and LH side.
67837N
10.INSTALL BACK DOOR DUST PROOF SEAL
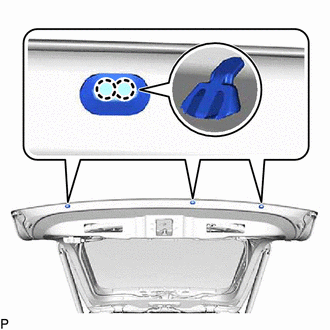
Engage the 2 claws to install the back door dust proof seal.
- HINT:
-
Use the same procedure for all back door dust proof seals.
86790D
11.INSTALL REAR TELEVISION CAMERA ASSEMBLY
812D0
12.INSTALL LICENSE PLATE LIGHT ASSEMBLY WITH BACK DOOR OPENER SWITCH
13.INSTALL BACK DOOR OUTSIDE GARNISH SUB-ASSEMBLY WITH LIGHT
85143R
14.INSTALL REAR WIPER MOTOR GROMMET
85110R
15.INSTALL REAR WIPER MOTOR ASSEMBLY
16.INSTALL REAR WIPER ARM AND BLADE ASSEMBLY
85292A
17.INSTALL REAR WIPER ARM HEAD CAP
18.INSTALL REAR SPOILER ASSEMBLY
19.INSTALL HOLE PLUG
67282F
20.INSTALL BACK DOOR LOWER STOPPER LH
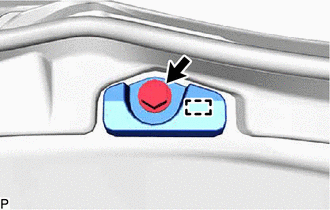
Disengage the guide.
Install the back door lower stopper LH with the bolt.
- Torque:
- 6.0 N*m (61 kgf*cm, 53 in.*lbf)
67281G
21.INSTALL BACK DOOR LOWER STOPPER RH
- HINT:
-
Use the same procedure as for the LH side.
69350P
22.INSTALL BACK DOOR LOCK ASSEMBLY WITH COURTESY LIGHT SWITCH (w/o Power Back Door)
69350P
23.INSTALL BACK DOOR LOCK ASSEMBLY WITH COURTESY LIGHT SWITCH (w/ Power Back Door)
67372A
24.INSTALL BACK DOOR WEIGHT
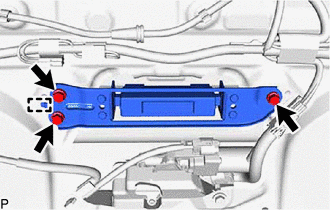
Disengage the guide.
Install the back door weight with the 3 bolts.
- Torque:
- 8.0 N*m (82 kgf*cm, 71 in.*lbf)
89222A
25.INSTALL MULTIPLEX NETWORK DOOR ECU (w/ Power Back Door)
867C0B
26.INSTALL REAR INNER MIRROR CAMERA ASSEMBLY (w/ Digital Inner Mirror)
84280D
27.INSTALL POWER BACK DOOR SENSOR ASSEMBLY LH (w/ Power Back Door)
84270G
28.INSTALL POWER BACK DOOR SENSOR ASSEMBLY RH (w/ Power Back Door)
- HINT:
-
Use the same procedure as for the LH side.
67766
29.INSTALL NO. 2 BACK DOOR SERVICE HOLE COVER

Engage the 2 guides and 2 claws to install the No. 2 back door service hole cover.
67750
30.INSTALL BACK DOOR TRIM BOARD ASSEMBLY
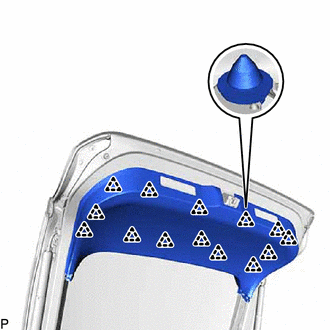
Engage the 14 clips to install the back door trim board assembly.
74811D
31.INSTALL DOOR PULL HANDLE LH (w/o Power Back Door)
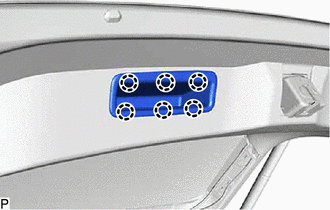
Engage the 6 claws to install the door pull handle LH.
74811D
32.INSTALL DOOR PULL HANDLE RH (w/o Power Back Door)
- HINT:
-
Use the same procedure as for the LH side.
74811D
33.INSTALL DOOR PULL HANDLE (w/ Power Back Door)
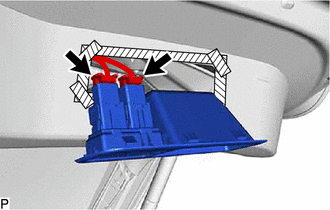
Connect the 2 connectors.
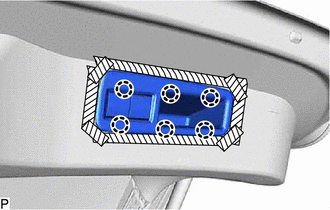
Engage the 6 claws to install the door pull handle.
Remove the protective tape.
64785A
34.INSTALL BACK DOOR TRIM BASE (w/ Power Back Door)
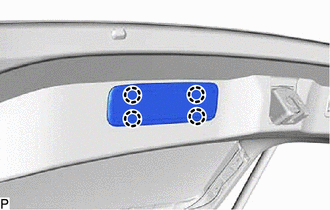
Engage the 4 claws to install the back door trim base.
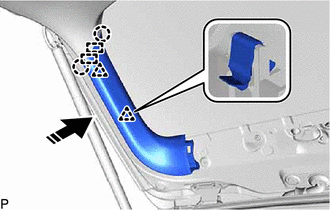
67938A
35.INSTALL BACK DOOR SIDE GARNISH LH

|
Install in this Direction |
Engage the 2 guides, 2 claws and 2 clips to install the back door side garnish LH as shown in the illustration.
67937B
36.INSTALL BACK DOOR SIDE GARNISH RH
- HINT:
-
Use the same procedure as for the LH side.
67939B
37.INSTALL BACK DOOR CENTER GARNISH
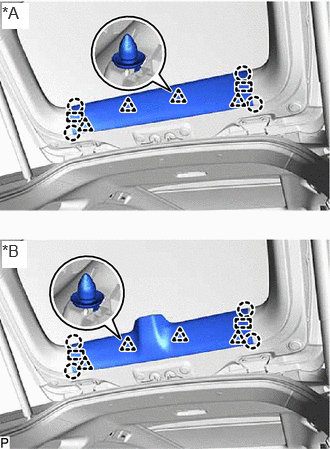
| *A | w/o Digital Inner Mirror |
| *B | w/ Digital Inner Mirror |
Engage the 2 guides, 4 clips and 4 claws to install the back door center garnish.
38.INITIALIZE POWER BACK DOOR SYSTEM
39.INSPECT POWER BACK DOOR SYSTEM
40.PERFORM CALIBRATION (w/ Parking Assist Monitor System)
41.PERFORM CALIBRATION (w/ Panoramic View Monitor System)
42.ADJUST BACK DOOR
- HINT:
-
When the back door damper stay lower bracket is removed, it is necessary to perform back door position adjustment.