AUDIO / VIDEO AUDIO AND VISUAL SYSTEM Radio Wave Reception Failure
CAUTION / NOTICE / HINT
- NOTICE:
-
Depending on the parts that are replaced during vehicle inspection or maintenance, performing initialization, registration or calibration may be needed.
PROCEDURE
Check the radio automatic station search function by activating it.
- OK:
Automatic station search function stops on a station.
- Result:
Proceed to OK NG
OK
NG
Check if any optional components that may decrease reception capacity, such as sunshade film or a telephone antenna, are installed.
- OK:
Optional components are not installed.
- NOTICE:
-
Do not remove optional components without the permission of the customer.
- Result:
Proceed to OK NG
OK
NG
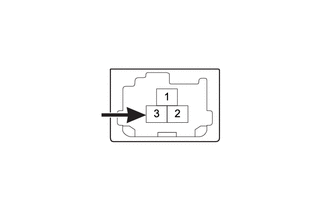
Preparation for check
Disconnect the RA radio and display receiver assembly connector.
Check for noise
Turn the ignition switch to ON with the radio and display receiver assembly connector connected.
Turn the radio and display receiver assembly on and tune into FM mode.
Place a screwdriver, thin wire or other metal object on the radio and display receiver assembly antenna jack and check that noise can be heard from the speakers.
- OK:
Noise can be heard from the speakers.
- Result:
Proceed to OK NG
OK
NG
Disconnect the RA radio and display receiver assembly connector.
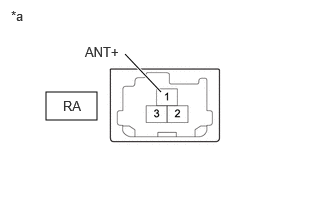
| *a | Component without harness connected
(Radio and Display Receiver Assembly) |
Measure the voltage according to the value(s) in the table below.
- Standard Voltage:
Tester Connection Switch Condition Specified Condition RA-1 (ANT+) - Body ground Ignition switch ACC
Radio switch on7 to 16 V
- Result:
Proceed to OK NG
OK
NG
Replace the antenna cord sub-assembly with a new or known good one and check if radio broadcasts can be received normally.
- OK:
Radio broadcasts can be received normally.
- Result:
Proceed to OK NG
OK
NG
Replace the No. 2 antenna cord sub-assembly with a new or known good one and check if radio broadcasts can be received normally.
- OK:
Radio broadcasts can be received normally.
- Result:
Proceed to OK NG
OK
NG
Replace the No. 4 antenna cord sub-assembly with a new or known good one and check if radio broadcasts can be received normally.
- OK:
Radio broadcasts can be received normally.
- Result:
Proceed to OK NG
OK
NG
Replace the roof antenna assembly with a new or known good one and check if radio broadcasts can be received normally.
- OK:
Radio broadcasts can be received normally.
- Result:
Proceed to OK NG
OK
NG