PARK ASSIST / MONITORING ULTRASONIC SENSOR(for Rear) INSTALLATION
PROCEDURE

 89305
1.INSTALL ULTRASONIC SENSOR CUSHION SET
89305
1.INSTALL ULTRASONIC SENSOR CUSHION SET
- HINT:
-
Only perform this procedure when removing and installing the ultrasonic sensor cushion set.
Install the ultrasonic sensor cushion set as shown in the illustration.
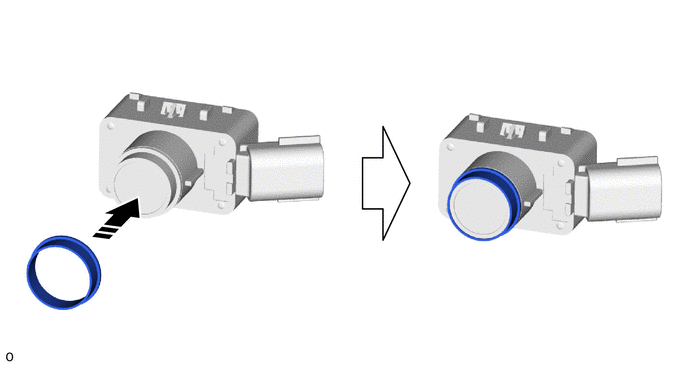

|
Install in this Direction | - | - |
89C48A
2.INSTALL REAR CORNER ULTRASONIC SENSOR RETAINER
- HINT:
- ·
Perform this procedure only when replacement of the rear corner ultrasonic sensor retainer is necessary.
·If a rear corner ultrasonic sensor retainer has been removed, replace it with a new one.
Clean the surface of the rear bumper assembly.
Remove any remaining double-sided tape from the rear bumper assembly.
Wipe off any adhesive residue with cleaner.
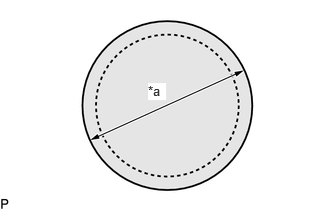
| *a | 26 mm (1.02 in.) |
Cover the sensor installation hole with a 26 mm (1.02 in.) circular piece of tape.
Using a brush or felt, apply primer or equivalent to the rear corner ultrasonic sensor retainer installation area.
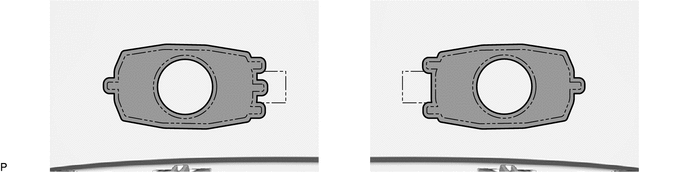
| *A | for RH Side | *B | for LH Side |

|
Primer | - | - |
- NOTICE:
- ·
Use a clean brush or felt.
·Do not touch the rear bumper assembly until the primer has dried.
Confirm that the primer has completely dried by touching the rear bumper assembly. Then remove the tape.
Peel off the release paper from a new rear corner ultrasonic sensor retainer.
Check that the identification codes on the rear bumper assembly and the rear corner ultrasonic sensor retainer are identical.
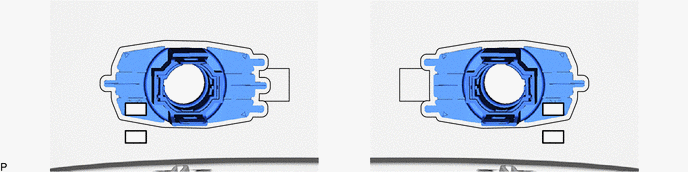
| *A | for RH Side | *B | for LH Side |
| *a | Identification Code | - | - |
Align the rear corner ultrasonic sensor retainer with the mark on the rear bumper assembly and install it as shown in the illustration.
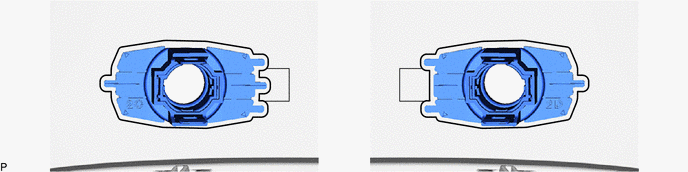
| *A | for RH Side | *B | for LH Side |
| *a | Scribed Line | - | - |
- NOTICE:
- ·
Ensure that the rear corner ultrasonic sensor retainer is within the scribed line.
·The double-sided tape of a rear corner ultrasonic sensor retainer will deteriorate if it is detached. Make sure to replace the rear corner ultrasonic sensor retainer with a new one when reattachment is necessary.
- HINT:
-
Press with a force of 30 N (3.0 kgf) for 3 seconds to securely install the rear corner ultrasonic sensor retainer to the rear bumper assembly. Confirm there is no clearance between the rear corner ultrasonic sensor retainer and rear bumper assembly.
89C48B
3.INSTALL REAR CENTER ULTRASONIC SENSOR RETAINER
- HINT:
- ·
Perform this procedure only when replacement of the rear center ultrasonic sensor retainer is necessary.
·If a rear center ultrasonic sensor retainer has been removed, replace it with a new one. Install the rear center ultrasonic sensor with a new rear center ultrasonic sensor retainer as a set to the rear bumper assembly.
·The illustration is for the LH side.
Clean the surface of the rear bumper assembly.
Remove any remaining double-sided tape from the rear bumper assembly.
Wipe off any adhesive residue with cleaner.
| *a | 26 mm (1.02 in.) |
Cover the sensor installation hole with a 26 mm (1.02 in.) circular piece of tape.
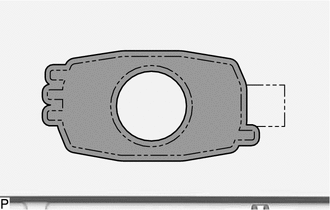
|
|
Primer |
Using a brush or felt, apply primer or equivalent to the rear center ultrasonic sensor retainer installation area.
- NOTICE:
- ·
Use a clean brush or felt.
·Do not touch the rear bumper assembly until the primer has dried.
Confirm that the primer has completely dried by touching the rear bumper assembly. Then remove the tape.
Peel off the release paper from a new rear center ultrasonic sensor retainer.
Check that the identification codes on the rear bumper assembly and the rear center ultrasonic sensor retainer are identical.
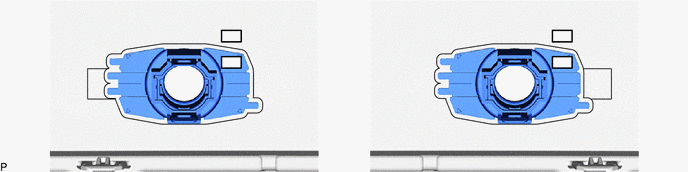
| *A | for RH Side | *B | for LH Side |
| *a | Identification Code | - | - |
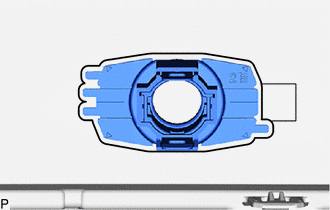
| *a | Scribed Line |
Align the rear center ultrasonic sensor retainer with rear center ultrasonic sensor with the mark on the rear bumper assembly and install it as shown in the illustration.
- NOTICE:
- ·
Ensure that the rear center ultrasonic sensor retainer is within the scribed line.
·The double-sided tape of a rear center ultrasonic sensor retainer will deteriorate if it is detached. Make sure to replace the rear center ultrasonic sensor retainer with a new one when reattachment is necessary.
- HINT:
-
Press with a force of 30 N (3.0 kgf) for 3 seconds to securely install the rear center ultrasonic sensor retainer to the rear bumper assembly. Confirm there is no clearance between the rear center ultrasonic sensor retainer and rear bumper assembly.
89342
4.INSTALL REAR CORNER ULTRASONIC SENSOR
- HINT:
-
The illustration is for the LH side. The orientation for the RH side is the opposite of the LH side.
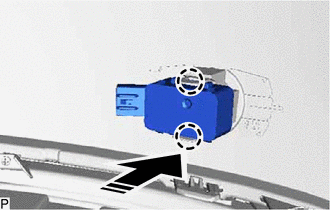
|
|
Install in this Direction |
Engage the 2 claws to install the rear corner ultrasonic sensor as shown in the illustration.
Connect the connector.
89342A
5.INSTALL REAR CENTER ULTRASONIC SENSOR
- HINT:
-
The illustration is for the LH side. The orientation for the RH side is the opposite of the LH side.
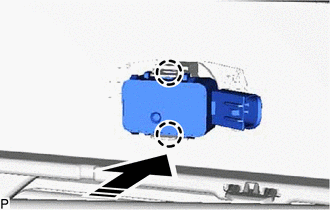
|
|
Install in this Direction |
Engage the 2 claws to install the rear center ultrasonic sensor as shown in the illustration.
Connect the connector.
6.INSTALL REAR BUMPER ASSEMBLY