WINDOW / GLASS ROOF WINDOW FIX GLASS INSTALLATION
CAUTION / NOTICE / HINT
- NOTICE:
- ·
Make sure to use Toyota Genuine Windshield Glass Adhesive (No High Modulus Type) or an equivalent no high modulus adhesive to install the roof window glass.
·Make sure to use Toyota Genuine Windshield Glass Adhesive (High Modulus Type) or an equivalent high modulus adhesive to retouch it.
·To prevent water ingress or a malfunction, do not touch or damage the seal material application surface around the wire harness (flat wire harness).
PROCEDURE

 63201M
1.CLEAN NO. 1 ROOF WINDOW GLASS SUB-ASSEMBLY
63201M
1.CLEAN NO. 1 ROOF WINDOW GLASS SUB-ASSEMBLY
When reusing the No. 1 roof window glass sub-assembly:
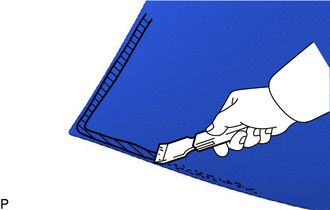
Using a scraper, remove any remaining double-sided tape and adhesive residue from the No. 1 roof window glass sub-assembly.
- NOTICE:
-
Be careful not to damage the No. 1 roof window glass sub-assembly.
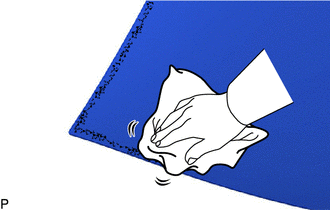
Clean the No. 1 roof window glass sub-assembly with a non-residue solvent.
- NOTICE:
-
Make sure to clean the No. 1 roof window glass sub-assembly even if it is a new part.
63227M
2.INSTALL ROOF WINDOW LOWER CLIP
Using a brush or sponge, coat the installation area of a new roof window lower clip with glass primer.
- NOTICE:
- ·
Do not apply too much glass primer.
·Allow the glass primer to dry for 3 minutes or more.
·Throw away any leftover glass primer.
- HINT:
-
If an area other than specified is coated by accident, wipe off the glass primer with a clean piece of cloth before it dries.
Peel off the release paper from the roof window lower clip.
Install a new roof window lower clip to the No. 1 roof window glass sub-assembly as shown in the illustration.
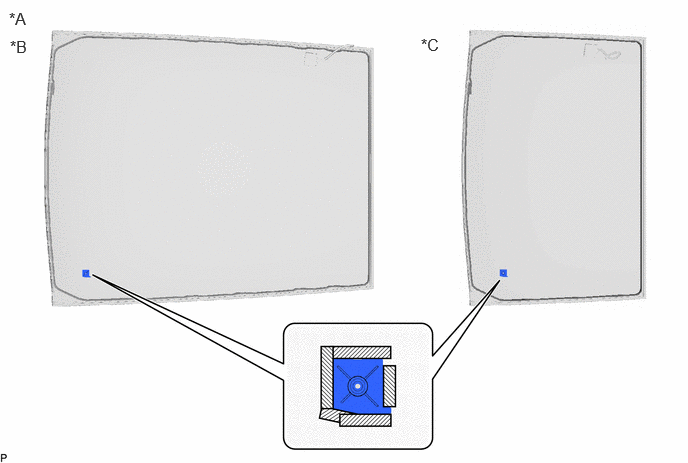
| *A | Back Side | *B | for Long Type Panoramic Fixed Moon Roof |
| *C | for Short Type Panoramic Fixed Moon Roof | - | - |

|
Adhesive Tape | - | - |
63228N
3.INSTALL ROOF WINDOW SIDE CLIP
- HINT:
-
Use the same procedure as for the roof window lower clip.
63215G
4.INSTALL FRONT MOON ROOF MOULDING
Clean the installation area of the front moon roof moulding on the No. 1 roof window glass sub-assembly with a non-residue solvent.
Apply new double-sided tape to the installation area of the front moon roof moulding on the No. 1 roof window glass sub-assembly.
for Long Type Panoramic Fixed Moon Roof:
Without touching the contact surface of the double-sided tape, remove the release paper and install a new front moon roof moulding to the No. 1 roof window glass sub-assembly at the position shown in the illustration.
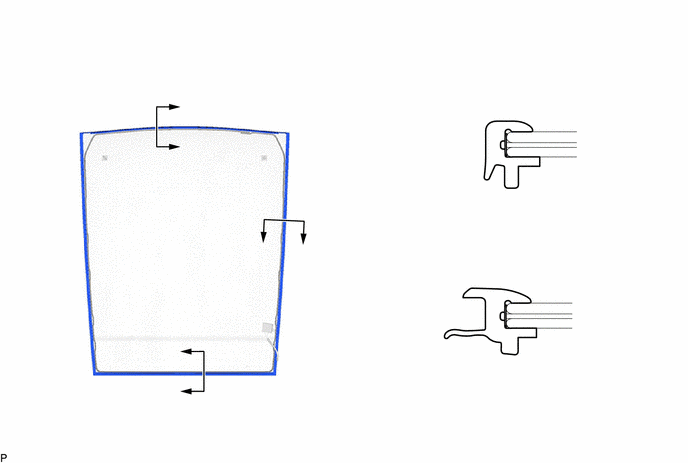
| *A | Back Side | - | - |
| *a | Double-sided Tape | - | - |
for Short Type Panoramic Fixed Moon Roof:
Without touching the contact surface of the double-sided tape, remove the release paper and install a new front moon roof moulding to the No. 1 roof window glass sub-assembly at the position shown in the illustration.
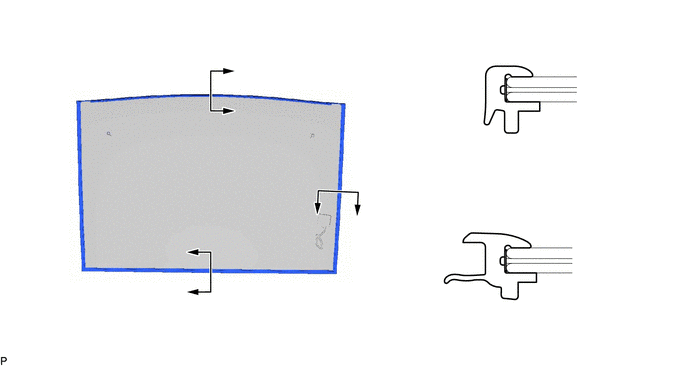
| *A | Back Side | - | - |
| *a | Double-sided Tape | - | - |
63201M
5.INSTALL NO. 1 ROOF WINDOW GLASS SUB-ASSEMBLY
Clean and shape the contact surface of the vehicle body.
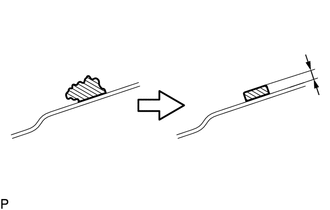
| *a | Vehicle Body |
|
|
Adhesive |
If the adhesive remaining on the vehicle is considerably uneven, smooth it using a knife.
| Area | Dimension |
|---|---|
| a | 1.0 mm (0.0394 in.) or more |
- NOTICE:
-
Make sure to leave a small amount of adhesive on the vehicle body to protect the vehicle from damage and for reference when applying adhesive again.
- HINT:
-
Leave approximately 1.0 mm (0.0394 in.) of adhesive on the vehicle body.
Clean the contact surface of the vehicle body with a piece of cloth saturated with non-residue solvent.
Using suction cups, place the No. 1 roof window glass sub-assembly in the correct position.
Check that the whole contact surface of the No. 1 roof window glass sub-assembly rim is perfectly even.
Remove the No. 1 roof window glass sub-assembly.
Using a brush, coat the installation surface on the vehicle body with body primer.
- NOTICE:
- ·
Do not coat the adhesive with body primer.
·Do not apply too much body primer.
·Allow the body primer to dry for 3 minutes or more.
·Throw away any leftover body primer.
- HINT:
-
If an area other than specified is coated by accident, wipe off the body primer with a clean piece of cloth before it dries.
for Long Type Panoramic Fixed Moon Roof:
Using a brush or sponge, coat the adhesive application area with glass primer.
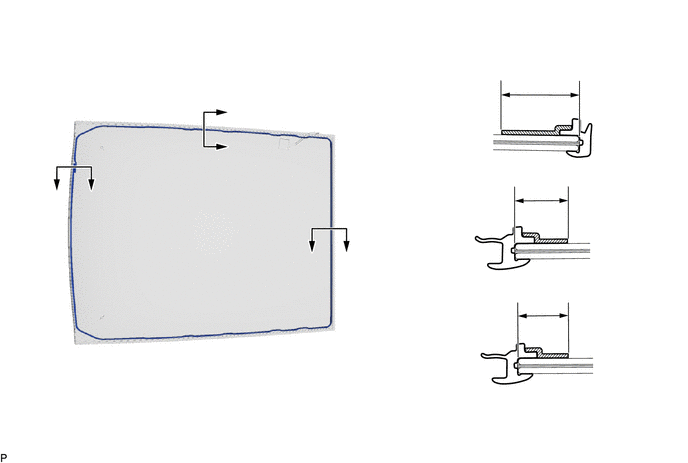
| *A | Back Side | - | - |
|
|
Glass Primer | - | - |
| Area | Dimension | Area | Dimension |
|---|---|---|---|
| a | 24.9 mm (0.980 in.) or more | b | 15.5 mm (0.610 in.) or more |
| c | 15.5 mm (0.610 in.) or more | - | - |
- NOTICE:
- ·
Do not coat the adhesive with glass primer.
·Do not apply too much glass primer.
·Allow the glass primer to dry for 3 minutes or more.
·Throw away any leftover glass primer.
- HINT:
- ·
Apply glass primer onto the ceramic notches.
·If an area other than specified is coated by accident, wipe off the glass primer with a clean piece of cloth before it dries.
for Short Type Panoramic Fixed Moon Roof:
Using a brush or sponge, coat the adhesive application area with glass primer.
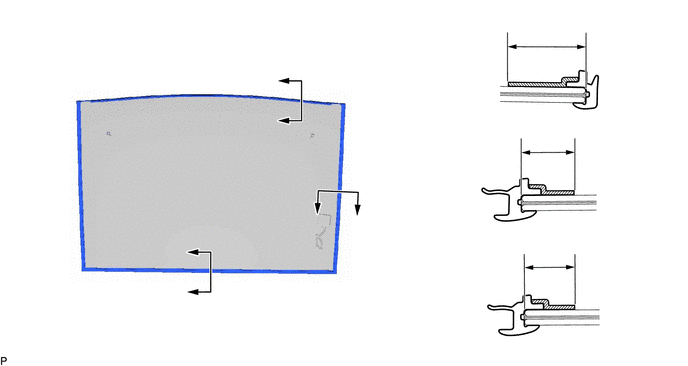
| *A | Back Side | - | - |
|
|
Glass Primer | - | - |
| Area | Dimension | Area | Dimension |
|---|---|---|---|
| a | 24.9 mm (0.980 in.) or more | b | 15.5 mm (0.610 in.) or more |
| c | 15.5 mm (0.610 in.) or more | - | - |
- NOTICE:
- ·
Do not coat the adhesive with glass primer.
·Do not apply too much glass primer.
·Allow the glass primer to dry for 3 minutes or more.
·Throw away any leftover glass primer.
- HINT:
- ·
Apply glass primer onto the ceramic notches.
·If an area other than specified is coated by accident, wipe off the glass primer with a clean piece of cloth before it dries.
Apply adhesive to the No. 1 roof window glass sub-assembly.
- Adhesive:
Toyota Genuine Windshield Glass Adhesive or Equivalent
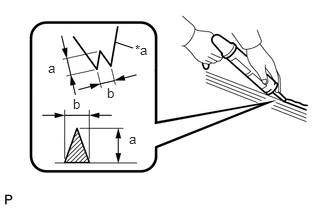
| *a | Nozzle |
Cut off the tip of the cartridge nozzle as shown in the illustration.
- Standard Dimension:
Area Dimension a 12.0 to 15.0 mm (0.472 to 0.591 in.) b 8.0 to 11.0 mm (0.315 to 0.433 in.)
Load the sealer gun with the cartridge.
for Long Type Panoramic Fixed Moon Roof:
Apply adhesive to the No. 1 roof window glass sub-assembly as shown in the illustration.
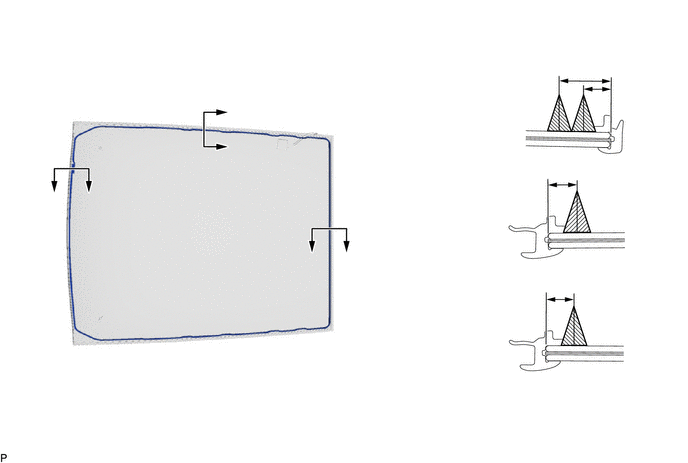
| *A | Back Side | - | - |
|
|
Glass Primer | - | - |
| Area | Dimension | Area | Dimension |
|---|---|---|---|
| a | 17.9 mm (0.705 in.) | b | 8.7 mm (0.343 in.) |
| c | 8.5 mm (0.335 in.) | d | 8.5 mm (0.335 in.) |
for Short Type Panoramic Fixed Moon Roof:
Apply adhesive to the No. 1 roof window glass sub-assembly as shown in the illustration.
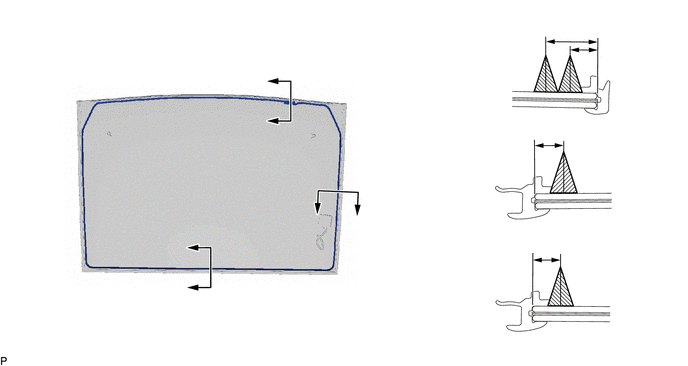
| *A | Back Side | - | - |
|
|
Glass Primer | - | - |
| Area | Dimension | Area | Dimension |
|---|---|---|---|
| a | 17.9 mm (0.705 in.) | b | 8.7 mm (0.343 in.) |
| c | 8.5 mm (0.335 in.) | d | 8.5 mm (0.335 in.) |
Install the No. 1 roof window glass sub-assembly.
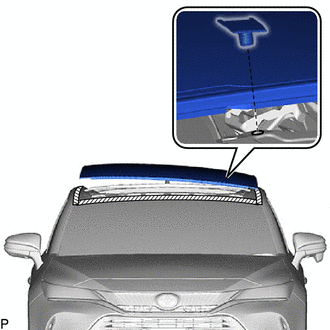
| *a | Insertion Hole of Roof Window Clip |
Using suction cups, align the end of roof window lower clip and roof window side clip with the insertion hole of the roof window clip as shown in the illustration and engage the roof window lower clip and roof window side clip to install the No. 1 roof window glass sub-assembly.
- NOTICE:
-
Make sure to install the No. 1 roof window glass sub-assembly only after the body primer on the vehicle body has dried.
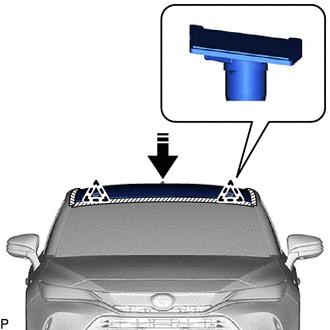

|
Install in this Direction |
Lightly push the No. 1 roof window glass sub-assembly from the outside of the vehicle so that it is in full contact with the vehicle body.
Using a scraper, remove any excess or protruding adhesive.
- NOTICE:
-
Remove any excess or protruding adhesive before it becomes hard.
| Temperature | Minimum Time Prior to Driving Vehicle |
|---|---|
| 35°C (95°F) | 7 hours |
| 20°C (68°F) | 12 hours |
| 5°C (41°F) | 54 hours |
Connect the connector.
6.INSPECT FOR LEAK
After the adhesive has hardened, apply water from the outside of the vehicle. Check that no water leaks into the cabin.
If water leaks into the cabin, allow the water to dry and add adhesive.
Remove the protective tape.
75554A
7.INSTALL REAR ROOF DRIP SIDE FINISH MOULDING LH (for Long Type Panoramic Fixed Moon Roof)
75553A
8.INSTALL REAR ROOF DRIP SIDE FINISH MOULDING RH (for Long Type Panoramic Fixed Moon Roof)
- HINT:
-
Use the same procedure as for the LH side.
75554A
9.INSTALL REAR ROOF DRIP SIDE FINISH MOULDING LH (for Short Type Panoramic Fixed Moon Roof)
75553A
10.INSTALL REAR ROOF DRIP SIDE FINISH MOULDING RH (for Short Type Panoramic Fixed Moon Roof)
- HINT:
-
Use the same procedure as for the LH side.
11.INSTALL SLIDING ROOF HOUSING ASSEMBLY (for Long Type Panoramic Fixed Moon Roof)
12.INSTALL SLIDING ROOF HOUSING ASSEMBLY (for Short Type Panoramic Fixed Moon Roof)