AXLE AND DIFFERENTIAL REAR AXLE CARRIER(for AWD) REMOVAL
CAUTION / NOTICE / HINT
The necessary procedures (adjustment, calibration, initialization, or registration) that must be performed after parts are removed and installed, or replaced during rear axle carrier removal/installation are shown below.
| Replaced Part or Performed Procedure | Necessary Procedure | Effect/Inoperative Function when Necessary Procedure not Performed | Link |
|---|---|---|---|
| Rear wheel alignment adjustment | 1.
Perform "Reset Memory" 2.
Perform "Calibration" |
·
DTCs are stored ·
ABS warning light illuminates ·
Brake warning light / yellow (minor malfunction) illuminates ·
Slip indicator light illuminates ·
Electronically controlled brake system disabled or malfunctions |
( 202304,999999,_54,_083077,_0401811,RM1000000029TH7,) 202304,999999,_54,_083077,_0401811,RM1000000029TH7,)
|
| Suspension, tires, etc. | Parking assist ECU initialization | Panoramic view monitor system | (202304,999999,_56,_083082,_0586733,RM1000000029R9F,)
|
- HINT:
- for HV Model:
-
When the cable is disconnected / reconnected to the auxiliary battery terminal, systems temporarily stop operating. However, each system has a function that completes learning the first time the system is used.
- ·
Learning completes when vehicle is driven
Effect/Inoperative Function When Necessary Procedures are not Performed Necessary Procedures Link Lane tracing assist system Drive the vehicle straight ahead at 35 km/h (22 mph) or more for 5 second or more. ( 201910,999999,_58,_083101,_0401880,RM100000001JE9I,)
Pre-collision system
·Learning completes when vehicle is operated normally
Effect/Inoperative Function When Necessary Procedures are not Performed Necessary Procedures Link Power back door function Fully close the back door by hand.
- HINT:
-
Initialization is not necessary if the above procedures are performed while the back door is closed.
( 202304,999999,_59,_083093,_0584672,RM1000000029PGT,)
Power door lock control system If the back door is locked and therefore cannot be opened, it is necessary to unlock the back door using the door control switch, electrical key transmitter sub-assembly switch. ( 202409,999999,_58,_083092,_0403003,RM100000002NS90,)
Air conditioning system After the ignition switch is turned to ON, the servo motor standard position is recognized -
·Use the same procedure for the RH and LH sides.
·The following procedure is for the LH side.
| Replaced Part or Performed Procedure | Necessary Procedure | Effect/Inoperative Function when Necessary Procedure not Performed | Link |
|---|---|---|---|
| Rear wheel alignment adjustment | 1.
Perform "Reset Memory" 2.
Perform acceleration sensor zero point calibration and store system information memorization |
·
VSC is disabled or malfunctions ·
DTCs are output ·
Slip indicator light illuminates ·
ABS warning light illuminates |
(202304,999999,_54,_083077,_0402316,RM100000002AG8P,)
|
| Suspension, tires, etc. | Parking assist ECU initialization | Panoramic view monitor system | (202304,999999,_56,_083082,_0586733,RM1000000029R9F,)
|
- HINT:
- for Gasoline Model:
- ·
Use the same procedure for the RH and LH sides.
·The following procedure is for the LH side.
PROCEDURE

 1. PRECAUTION (for HV Model)
- NOTICE:
-
After the ignition switch is turned off, there may be a waiting time before disconnecting the negative (-) auxiliary battery terminal.
2.RELEASE PARKING BRAKE
3.DISABLE BRAKE CONTROL (for HV Model)
4.REMOVE REAR WHEEL
890C0A
5.DISCONNECT NO. 2 PARKING BRAKE WIRE ASSEMBLY
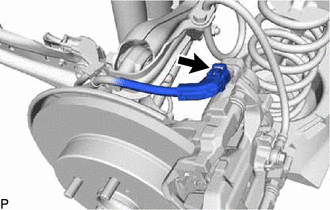
Disconnect the No. 2 parking brake wire assembly connector from the parking brake actuator assembly.
- NOTICE:
- ·
Remove any dirt or foreign matter on and around the No. 2 parking brake wire assembly connector before performing this step.
·Do not allow water, oil or dirt to enter the No. 2 parking brake wire assembly connector.
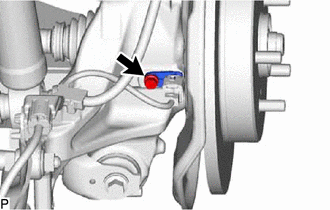
Remove the bolt and disconnect the rear skid control sensor LH from the rear axle carrier sub-assembly.
- NOTICE:
- ·
Keep the tip of the rear skid control sensor LH and installation hole free of foreign matter.
·Do not rotate or apply excessive force to the rear skid control sensor LH when removing it from the rear axle carrier sub-assembly. Rotating or applying excessive force may result in damage to the skid control sensor.
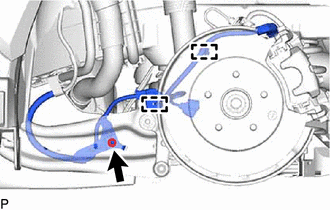
Remove the nut, disengage the 2 clamps and separate the No. 2 parking brake wire assembly from the rear flexible hose bracket and rear trailing arm assembly.
47319F
6.DISCONNECT REAR FLEXIBLE HOSE
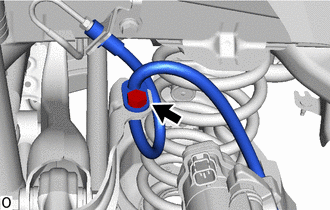
Remove the bolt and disconnect the rear flexible hose from the rear flexible hose bracket.
42312B
7.REMOVE REAR AXLE SHAFT NUT LH
8.DISCONNECT REAR DISC BRAKE CALIPER ASSEMBLY LH
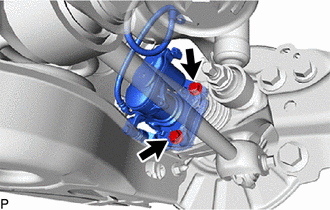
Remove the 2 bolts and disconnect the rear disc brake caliper assembly from the rear axle carrier sub-assembly.
- NOTICE:
-
Use wire or an equivalent tool to keep the rear disc brake caliper assembly from hanging by the rear flexible hose.
42431
9.REMOVE REAR DISC
42450B
10.REMOVE REAR AXLE HUB AND BEARING ASSEMBLY LH
47354B
11.REMOVE NO. 4 FLEXIBLE HOSE BRACKET
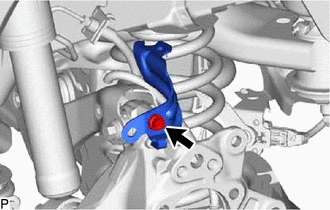
Remove the bolt and No. 4 flexible hose bracket from the rear axle carrier sub-assembly.
48840A
12.REMOVE REAR STABILIZER LINK ASSEMBLY LH
48231B
13.REMOVE REAR COIL SPRING LH
48258C
14.REMOVE REAR LOWER COIL SPRING INSULATOR LH
48720A
15.REMOVE REAR NO. 1 SUSPENSION ARM ASSEMBLY LH
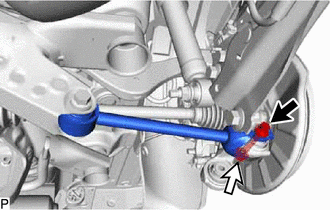
Remove the bolt, nut and rear No. 1 suspension arm assembly LH from the rear axle carrier sub-assembly and rear suspension member sub-assembly.
- NOTICE:
-
Because the nut has its own stopper, do not turn the nut. Loosen the bolt with the nut secured.
16.REMOVE REAR AXLE CARRIER SUB-ASSEMBLY
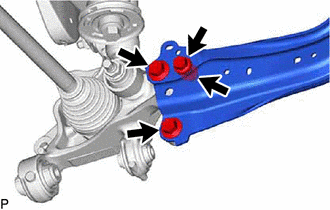
Loosen the 3 bolts and nut of the rear trailing arm assembly.
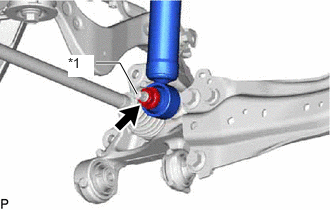
| *1 | Rear Axle Carrier Pin |
Loosen the nut of the rear shock absorber assembly.
- NOTICE:
-
Hold the rear axle carrier pin while rotating the nut.
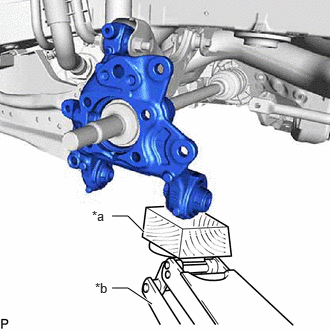
| *a | Wooden Block |
| *b | Jack |
Using a jack and wooden block, support the rear axle carrier sub-assembly.
- NOTICE:
- ·
When jacking up the rear axle carrier sub-assembly, be sure to jack it up slowly.
·Make sure to perform this operation with the vehicle kept as low as possible.
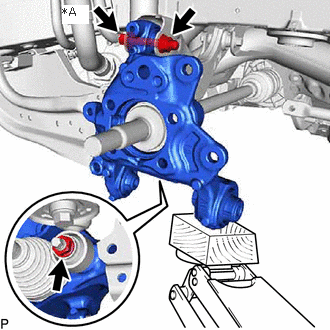
Loosen the bolt (A).
- NOTICE:
-
Because the nut has its own stopper, do not turn the nut. Loosen the bolt with the nut secured.
Remove the 3 bolts, nut and disconnect the rear trailing arm assembly from the rear axle carrier sub-assembly.
Remove the nut and disconnect the rear shock absorber assembly from the rear axle carrier sub-assembly.
- NOTICE:
-
Hold the rear axle carrier pin while rotating the nut.
Remove the bolt (A), nut and rear axle carrier sub-assembly from the rear upper control arm assembly.
- NOTICE:
-
Because the nut has its own stopper, do not turn the nut. Loosen the bolt with the nut secured.