NR Series ENGINE CONTROL CAMSHAFT OIL CONTROL SOLENOID INSTALLATION
PROCEDURE

 15370
1.INSTALL CAMSHAFT TIMING OIL CONTROL SOLENOID ASSEMBLY (for Intake Side)
15370
1.INSTALL CAMSHAFT TIMING OIL CONTROL SOLENOID ASSEMBLY (for Intake Side)
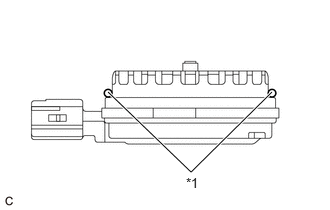
| *1 | O-ring |
Apply engine oil to a new O-ring and install it to the camshaft timing oil control solenoid assembly as shown in the illustration.
- NOTICE:
-
Do not damage the O-ring.
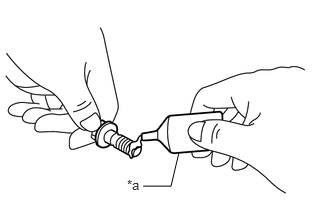
| *a | Adhesive |
Apply adhesive to 2 or 3 threads of 2 new bolts.
- Adhesive:
Toyota Genuine Adhesive 1324, Three Bond 1324 or equivalent
Install the camshaft timing oil control solenoid assembly to the timing chain cover assembly with the 2 bolts.
- Torque:
- 10 N*m (102 kgf*cm, 7 ft.*lbf)
- NOTICE:
- ·
If the camshaft timing oil control solenoid assembly has been struck or dropped, replace it.
·Make sure that the O-ring is not cracked or moved out of place when installing the camshaft timing oil control solenoid assembly.
Connect the camshaft timing oil control solenoid assembly connector.
12305
2.INSTALL ENGINE MOUNTING INSULATOR SUB-ASSEMBLY RH (When Using the Engine Support Bridge)
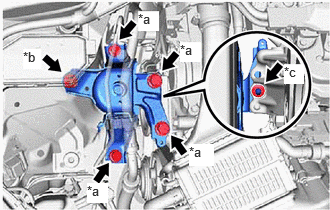
| *a | Bolt |
| *b | Nut (A) |
| *c | Nut (B) |
Install the engine mounting insulator sub-assembly RH to the vehicle body and engine mounting bracket RH with the 4 bolts and 2 nuts.
- Torque:
- Bolt : 72 N*m (734 kgf*cm, 53 ft.*lbf)
- Nut (A) : 72 N*m (734 kgf*cm, 53 ft.*lbf)
- Nut (B) : 41 N*m (418 kgf*cm, 30 ft.*lbf)
Install the No. 2 cooler refrigerant hose bracket to the vehicle body with the nut.
- Torque:
- 9.8 N*m (100 kgf*cm, 87 in.*lbf)
Engage the clamp and install the No. 1 cooler refrigerant hose bracket to the engine mounting insulator sub-assembly RH with the bolt.
- Torque:
- 9.8 N*m (100 kgf*cm, 87 in.*lbf)
Engage the pin and install the reserve sealed tank with the bolt.
- Torque:
- 5.0 N*m (51 kgf*cm, 44 in.*lbf)
Connect the air conditioner pressure sensor connector.
3.REMOVE ENGINE SUPPORT BRIDGE (When Using the Engine Support Bridge)
4.REMOVE ENGINE HANGERS (When Using the Engine Support Bridge)
82286A
5.CONNECT NO. 2 EARTH WIRE (When Using the Engine Support Bridge)
6.INSTALL WIRE HARNESS CLAMP BRACKET (When Using the Engine Support Bridge)
74404A
7.INSTALL BATTERY CLAMP SUB-ASSEMBLY (When Using the Engine Support Bridge)
8.CONNECT ENGINE WIRE (When Using the Engine Support Bridge)
9.INSTALL BATTERY (When Using the Engine Support Bridge)
89661
10.INSTALL ECM (When Using the Engine Support Bridge)
17701
11.INSTALL AIR CLEANER CASE SUB-ASSEMBLY (When Using the Engine Support Bridge)
17705
12.INSTALL AIR CLEANER CAP WITH AIR CLEANER HOSE (When Using the Engine Support Bridge)
17751
13.INSTALL INLET NO. 1 AIR CLEANER (When Using the Engine Support Bridge)
53289A
14.INSTALL RADIATOR SUPPORT OPENING COVER (When Using the Engine Support Bridge)
55701J
15.INSTALL OUTER COWL TOP PANEL SUB-ASSEMBLY (When Using the Engine Support Bridge)
55737B
16.INSTALL NO. 1 HEATER AIR DUCT SPLASH SHIELD SEAL (When Using the Engine Support Bridge)
w/ No. 1 Heater Air Duct Splash Shield Seal
17.INSTALL WINDSHIELD WIPER MOTOR AND LINK ASSEMBLY (When Using the Engine Support Bridge)
51443C
18.INSTALL REAR ENGINE UNDER COVER RH (When Using the Engine Support Bridge)
51410
19.INSTALL NO. 1 ENGINE UNDER COVER ASSEMBLY (When Using the Engine Support Bridge)
20.CONNECT CABLE TO NEGATIVE BATTERY TERMINAL (When Using the Engine Support Bridge)
21.INSTALL ENGINE ASSEMBLY WITH TRANSAXLE (When Not Using the Engine Support Bridge)
15370
22.INSTALL CAMSHAFT TIMING OIL CONTROL SOLENOID ASSEMBLY (for Exhaust Side)
| *1 | O-ring |
Apply engine oil to a new O-ring and install it to the camshaft timing oil control solenoid assembly as shown in the illustration.
- NOTICE:
-
Do not damage the O-ring.
| *a | Adhesive |
Apply adhesive to 2 or 3 threads of 2 new bolts.
- Adhesive:
Toyota Genuine Adhesive 1324, Three Bond 1324 or equivalent
Install the camshaft timing oil control solenoid assembly to the timing chain cover assembly with the 2 bolts.
- Torque:
- 10 N*m (102 kgf*cm, 7 ft.*lbf)
- NOTICE:
- ·
If the camshaft timing oil control solenoid assembly has been struck or dropped, replace it.
·Make sure that the O-ring is not cracked or moved out of place when installing the camshaft timing oil control solenoid assembly.
Connect the camshaft timing oil control solenoid assembly connector.
Engage the clamp to install the wire harness clamp bracket to the engine wire.
Install the engine wire to the cylinder head cover sub-assembly with the bolt.
- Torque:
- 8.0 N*m (82 kgf*cm, 71 in.*lbf)
23.INSPECT FOR ENGINE OIL LEAK
24. INITIALIZATION AFTER RECONNECTING BATTERY TERMINAL
- HINT:
-
When disconnecting and reconnecting the battery, there is an automatic learning function that completes learning when the respective system is used.