AUDIO / VIDEO RADIO ANTENNA CORD INSTALLATION
PROCEDURE

 86101J
1.INSTALL NO. 2 ANTENNA CORD SUB-ASSEMBLY
86101J
1.INSTALL NO. 2 ANTENNA CORD SUB-ASSEMBLY
for Normal Roof:
Align the marking tape (A) on the No. 2 antenna cord sub-assembly with the protrusion on the front of the roof headlining assembly and wrap tape around the No. 2 antenna cord sub-assembly and protrusion of the roof headlining assembly.
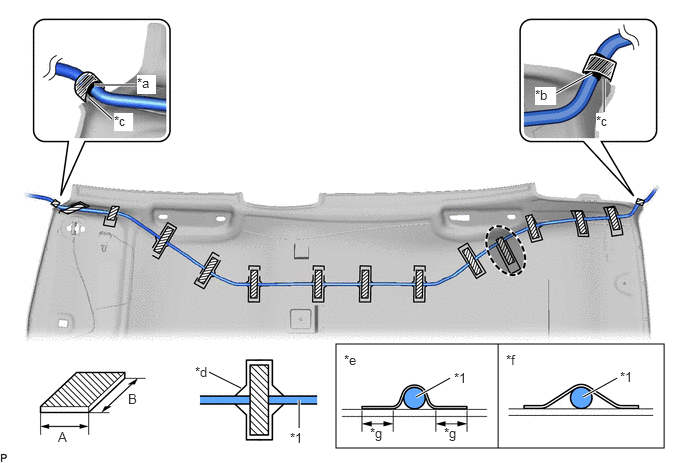
| *1 | No. 2 Antenna Cord Sub-assembly | - | - |
| *a | Marking Tape (A) | *b | Marking Tape (B) |
| *c | Protrusion | *d | Marking |
| *e | Correct | *f | Incorrect |
| *g | 10 mm (0.394 in.) or more | - | - |

|
Adhesive Tape | 
|
Adjustment Area |
- Adhesive Tape Size:
Area Dimension Area Dimension A 20 mm (0.787 in.) B 80 mm (3.15 in.) or more
Align the marking tape (B) on the No. 2 antenna cord sub-assembly with the protrusion on the rear of the roof headlining assembly and wrap tape around the No. 2 antenna cord sub-assembly and protrusion of the roof headlining assembly.
Install the No. 2 antenna cord sub-assembly with adhesive tape.
- NOTICE:
- ·
Apply the tape securely in place.
·Do not touch the adhesive surface when applying the tape to prevent adhesion failure.
- HINT:
-
Secure the extra length of the No. 2 antenna cord sub-assembly in the adjustment area.
for Moon Roof:
Align the marking tape (A) on the No. 2 antenna cord sub-assembly with the protrusion on the front of the roof headlining assembly and wrap tape around the No. 2 antenna cord sub-assembly and protrusion of the roof headlining assembly.
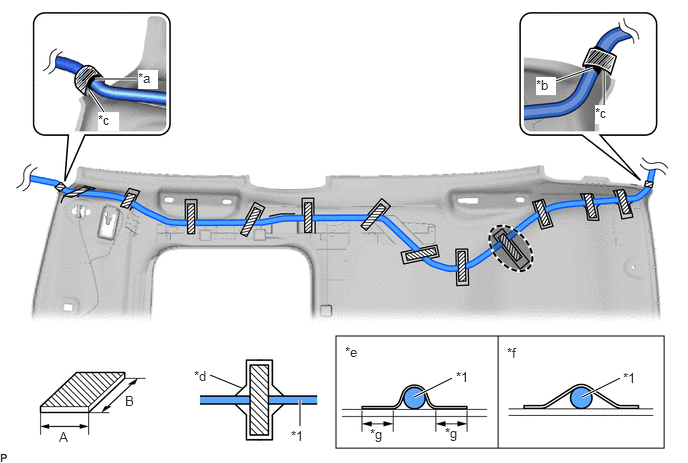
| *1 | No. 2 Antenna Cord Sub-assembly | - | - |
| *a | Marking Tape (A) | *b | Marking Tape (B) |
| *c | Protrusion | *d | Marking |
| *e | Correct | *f | Incorrect |
| *g | 10 mm (0.394 in.) or more | - | - |
|
|
Adhesive Tape |
|
Adjustment Area |
- Adhesive Tape Size:
Area Dimension Area Dimension A 20 mm (0.787 in.) B 80 mm (3.15 in.) or more
Align the marking tape (B) on the No. 2 antenna cord sub-assembly with the protrusion on the rear of the roof headlining assembly and wrap tape around the No. 2 antenna cord sub-assembly and protrusion of the roof headlining assembly.
Install the No. 2 antenna cord sub-assembly with adhesive tape.
- NOTICE:
- ·
Apply the tape securely in place.
·Do not touch the adhesive surface when applying the tape to prevent adhesion failure.
- HINT:
-
Secure the extra length of the No. 2 antenna cord sub-assembly in the adjustment area.
63342
2.INSTALL NO. 2 ROOF SILENCER PAD (for Normal Roof)
63341
3.INSTALL NO. 1 ROOF SILENCER PAD (for Normal Roof)
4.INSTALL ROOF HEADLINING ASSEMBLY
86101
5.INSTALL ANTENNA CORD SUB-ASSEMBLY
Engage the 9 clamps to install the antenna cord sub-assembly.
Engage the 2 claws and connect the connector.
55085
6.INSTALL NO. 2 HEATER TO REGISTER DUCT SUB-ASSEMBLY
7.INSTALL INSTRUMENT PANEL SAFETY PAD SUB-ASSEMBLY