8ZR-FXE INTAKE / EXHAUST EXHAUST MANIFOLD INSTALLATION
PROCEDURE

 17168
1.INSTALL NO. 2 EXHAUST MANIFOLD HEAT INSULATOR
17168
1.INSTALL NO. 2 EXHAUST MANIFOLD HEAT INSULATOR
Install the No. 2 exhaust manifold heat insulator to the exhaust manifold with the 3 bolts.
- Torque:
- 12 N*m (122 kgf*cm, 9 ft.*lbf)
17141
2.INSTALL EXHAUST MANIFOLD (TWC: Front Catalyst)
Install a new exhaust manifold to head gasket and EGR cooler gasket to the cylinder head sub-assembly.
Temporarily install the exhaust manifold to the cylinder head sub-assembly with 7 new nuts.
Temporarily install the manifold stay to the exhaust manifold and cylinder block sub-assembly with the 3 bolts.
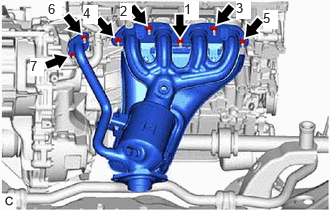
Using a 12 mm deep socket wrench, tighten the 7 nuts in the order shown in the illustration.
- Torque:
- 26 N*m (265 kgf*cm, 19 ft.*lbf)
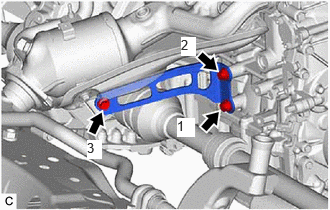
Tighten the 3 bolts in the order shown in the illustration.
- Torque:
- 43 N*m (438 kgf*cm, 32 ft.*lbf)
17167
3.INSTALL NO. 1 EXHAUST MANIFOLD HEAT INSULATOR
Install the No. 1 exhaust manifold heat insulator to the exhaust manifold with the 3 bolts.
- Torque:
- 12 N*m (122 kgf*cm, 9 ft.*lbf)
4.INSTALL NO. 1 VACUUM TRANSMITTING PIPE SUB-ASSEMBLY
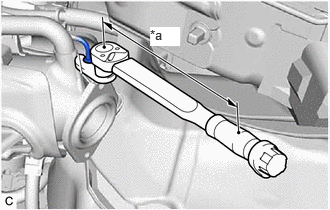
| *a | Torque Wrench Fulcrum Length |
Using a 14 mm union nut wrench, install a new No. 1 vacuum transmitting pipe sub-assembly to the exhaust manifold.
- Torque:
- Specified tightening torque : 30 N*m (306 kgf*cm, 22 ft.*lbf)
- HINT:
- ·
Calculate the torque wrench reading when changing the fulcrum length of the torque wrench.
·When using a 14 mm union nut wrench (fulcrum length of 25 mm (0.984 in.)) + torque wrench (fulcrum length of 180 mm (7.09 in.)): 26.3 N*m (268 kgf*cm, 19 ft.*lbf).
Install the nut.
- Torque:
- 10 N*m (102 kgf*cm, 7 ft.*lbf)
89481B
5.INSTALL DIFFERENTIAL PRESSURE SENSOR
33820B
6.CONNECT TRANSMISSION CONTROL CABLE ASSEMBLY
Connect the transmission control cable assembly to the engine assembly with the bolt.
- Torque:
- 12 N*m (122 kgf*cm, 9 ft.*lbf)
58151
7.INSTALL FRONT NO. 1 FLOOR HEAT INSULATOR
17410
8.INSTALL FRONT EXHAUST PIPE ASSEMBLY
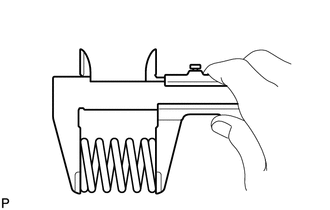
Using a vernier caliper, measure the free length of the compression springs.
| Minimum Free Length (Front) | 41.5 mm (1.63 in.) |
| Minimum Free Length (Rear) | 38.5 mm (1.52 in.) |
If the free length is less than the minimum, replace the compression spring.
Temporarily install 2 new gaskets to the exhaust manifold and front exhaust pipe assembly.
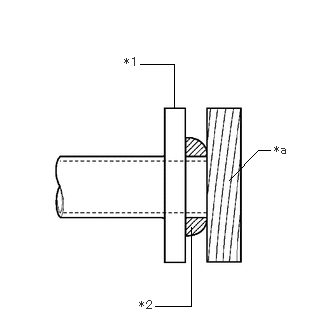
| *1 | Exhaust Manifold or Front Exhaust Pipe Assembly |
| *2 | Gasket |
| *a | Wooden Block |
Using a plastic hammer and wooden block, tap in each gasket until its surface is flush with the exhaust manifold and front exhaust pipe assembly.
- NOTICE:
- ·
Be sure to install the gasket in the correct direction.
·Do not reuse the gaskets.
·Do not damage the gaskets.
·Do not push in the gaskets by using the exhaust pipes when connecting them.
Connect the front exhaust pipe assembly to the 2 exhaust pipe supports.
Install the front exhaust pipe assembly to the exhaust manifold with the 2 compression springs and 2 bolts.
- Torque:
- 43 N*m (438 kgf*cm, 32 ft.*lbf)
- HINT:
-
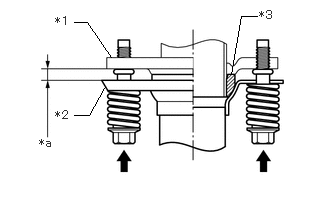 2.406,0.771 2.51,0.167 2.51,0.167 2.677,0.167 false 0.771,0.229 0.906,0.229 0.906,0.229 1.156,0.594 false 0.771,1.198 0.927,1.198 0.927,1.198 1.094,0.896 false 0.406,1.417 0.615,1.573 0.208,0.156 10 *a 0.573,0.146 0.823,0.302 0.25,0.156 10 *1 0.573,1.125 0.813,1.313 0.24,0.188 10 *2 2.698,0.083 2.927,0.26 0.229,0.177 10 *3
*1 Exhaust Manifold *2 Front Exhaust Pipe Assembly *3 Gasket *a Space between Flanges: 8.5 mm (0.335 in.)
-
After installation, check that the space between the flanges of the exhaust manifold and front exhaust pipe assembly is consistent front-to-rear and left-to-right.
Install the front exhaust pipe assembly to the tail exhaust pipe assembly with the 2 compression springs and 2 bolts.
- Torque:
- 43 N*m (438 kgf*cm, 32 ft.*lbf)
- HINT:
-
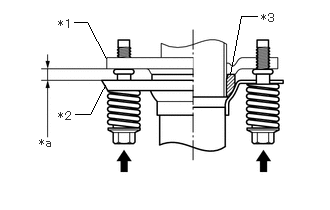 2.396,0.771 2.51,0.167 2.51,0.167 2.677,0.167 false 0.771,0.229 0.906,0.229 0.906,0.229 1.104,0.604 false 0.781,1.188 0.938,1.188 0.938,1.188 1.094,0.885 false 0.406,1.417 0.573,1.573 0.167,0.156 10 *a 0.604,0.177 0.802,0.375 0.198,0.198 10 *1 0.604,1.135 0.813,1.333 0.208,0.198 10 *2 2.719,0.115 2.885,0.271 0.167,0.156 10 *3
*1 Front Exhaust Pipe Assembly *2 Tail Exhaust Pipe Assembly *3 Gasket *a Space between Flanges: 6.5 mm (0.256 in.)
-
After installation, check that the space between the flanges of the front exhaust pipe assembly and tail exhaust pipe assembly is consistent front-to-rear and left-to-right.
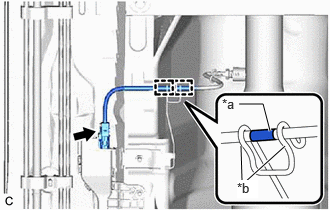
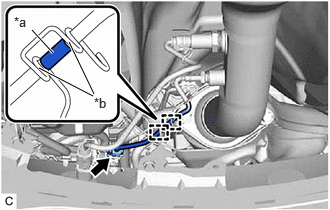
| *a | Tube |
| *b | Wire Harness Clamp |
Connect the No. 2 exhaust gas temperature sensor connector.
Engage the wire harness clamp so that the tube is positioned as shown in the illustration.
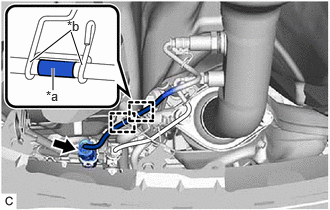
| *a | Tube |
| *b | Wire Harness Clamp |
Connect the No. 1 exhaust gas temperature sensor connector.
Engage the wire harness clamp so that the tube is positioned as shown in the illustration.
| *a | Tube |
| *b | Wire Harness Clamp |
Connect the heated oxygen sensor connector.
Engage the wire harness clamp so that the tube is positioned as shown in the illustration.
57533B
9.INSTALL FRONT FLOOR CENTER BRACE
Install the 3 front floor center braces to the vehicle body with the 12 bolts.
- Torque:
- 29 N*m (296 kgf*cm, 21 ft.*lbf)
58166A
10.INSTALL FRONT FLOOR COVER LH
Engage the 6 clamps to install the front floor cover LH to the vehicle body with the 2 bolts and 3 clips.
- Torque:
- 7.5 N*m (76 kgf*cm, 66 in.*lbf)
58165C
11.INSTALL FRONT FLOOR COVER RH
- HINT:
-
Perform the same procedure as for the front floor cover LH.
89467B
12.INSTALL AIR FUEL RATIO SENSOR
13.INSPECT FOR EXHAUST GAS LEAK
51410
14.INSTALL NO. 1 ENGINE UNDER COVER ASSEMBLY
15. RESET TOTAL SHORT TRIP ESTIMATE
- HINT:
-
This function is used for initializing the value of "Total Short Trip Estimate Bank 1" which was stored to the ECM when replacing the TWC (front catalyst).