WINDOW / GLASS BACK DOOR GLASS(except Wagon) INSTALLATION
CAUTION / NOTICE / HINT
- NOTICE:
-
Make sure to use Toyota Genuine Windshield Glass Adhesive (High Modulus Type) or equivalent.
- HINT:
-
Emergency hammer caution label (Type B) is only inner side.
PROCEDURE

 68131
1.CLEAN BACK DOOR GLASS
68131
1.CLEAN BACK DOOR GLASS
When reusing the back door glass:
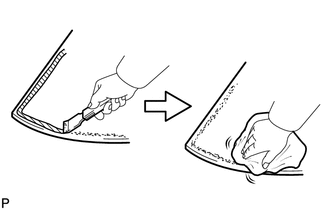
Using a gasket scraper, remove any remaining, clip, spacer, moulding, adhesive dam, double-sided tape and adhesive residue from the back door glass.
- NOTICE:
-
Be careful not to damage the back door glass.
Clean the outer circumference of the back door glass with a non-residue solvent.
- NOTICE:
- ·
Do not touch the back door glass surface after cleaning it.
·Even if using a new back door glass, clean the back door glass with a non-residue solvent.
64819
2.INSTALL NO. 2 BACK WINDOW GLASS SPACER
Using a brush or sponge, apply the body primer to the No. 2 back window glass spacer installation surface of the back door panel.
- NOTICE:
-
Do not apply too much primer.
Remove the peeling paper from 2 new No. 2 back window glass spacers.
- HINT:
-
After removing the peeling paper, keep the exposed adhesive free from foreign matter.
Install the No. 2 back window glass spacer to the back door panel.
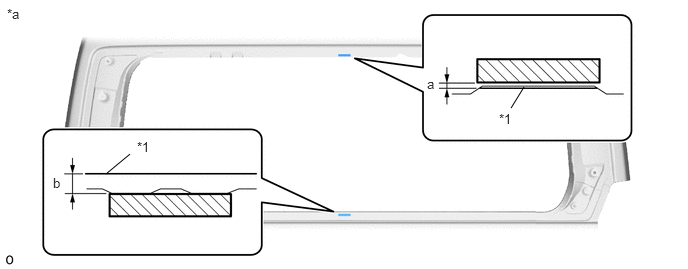
| *1 | Back Door Panel | - | - |
| *a | Backside | - | - |

|
No. 2 Back Window Glass Spacer | - | - |
- NOTICE:
-
Allow the primer to dry for 3 minutes or more.
- Standard Dimension:
Area Dimension *A: for Standard Roof
*B: for High Roof
a*A 2.4 mm (0.0945 in.) a*B 2.8 mm (0.110 in.) b 6.5 mm (0.256 in.)
64828
3.INSTALL BACK WINDOW GLASS CLIP LH
Using a brush or sponge, apply the glass primer to the back window glass clip LH installation surface of the back door glass.
- NOTICE:
-
Do not apply too much primer.
Remove the peeling paper from a new back window glass clip LH.
- HINT:
-
After removing the peeling paper, keep the exposed adhesive free from foreign matter.
Install the back window glass clip LH to the back door glass as shown in the illustration.
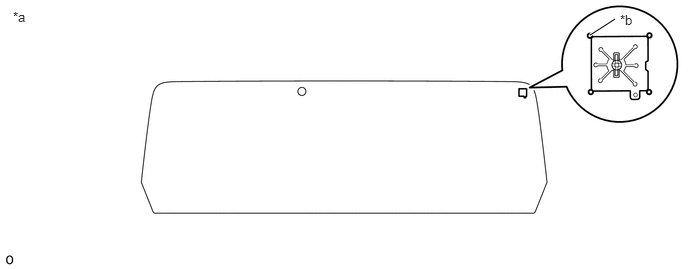
| *a | Backside | *b | Ceramic Notch |
- NOTICE:
-
Allow the primer to dry for 3 minutes or more.
64827A
4.INSTALL BACK WINDOW GLASS CLIP RH
Using a brush or sponge, apply the glass primer to the back window glass clip RH installation surface of the back door glass.
- NOTICE:
-
Do not apply too much primer.
Remove the peeling paper from a new back window glass clip RH.
- HINT:
-
After removing the peeling paper, keep the exposed adhesive free from foreign matter.
Install the back window glass clip RH to the back door glass as shown in the illustration.
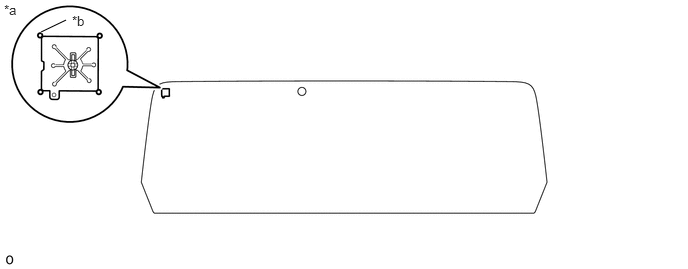
| *a | Backside | *b | Ceramic Notch |
- NOTICE:
-
Allow the primer to dry for 3 minutes or more.
64819C
5.INSTALL NO. 2 BACK DOOR GLASS SPACER
Using a brush or sponge, apply the glass primer to the No. 2 back door glass spacer installation surface of the back door glass.
- NOTICE:
-
Do not apply too much primer.
Remove the peeling paper from a new No. 2 back door glass spacer.
- HINT:
-
After removing the peeling paper, keep the exposed adhesive free from foreign matter.
Install the No. 2 back door glass spacer to the back door glass as shown in the illustration.
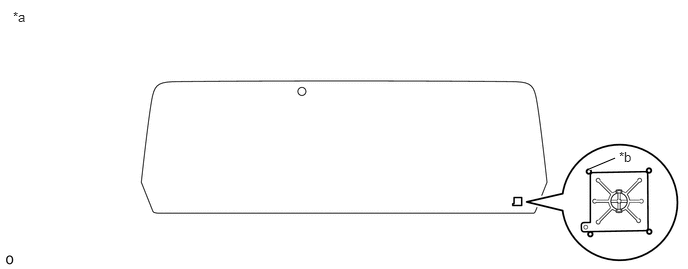
| *a | Backside | *b | Ceramic Notch |
- NOTICE:
-
Allow the primer to dry for 3 minutes or more.
64818B
6.INSTALL NO. 1 BACK DOOR GLASS SPACER
Using a brush or sponge, apply the glass primer to the No. 1 back door glass spacer installation surface of the back door glass.
- NOTICE:
-
Do not apply too much primer.
Remove the peeling paper from a new No. 1 back door glass spacer.
- HINT:
-
After removing the peeling paper, keep the exposed adhesive free from foreign matter.
Install the No. 1 back door glass spacer to the back door glass as shown in the illustration.
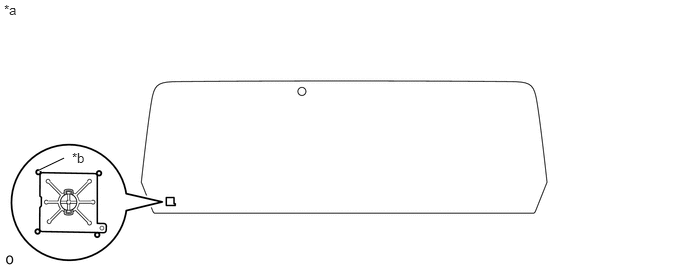
| *a | Backside | *b | Ceramic Notch |
- NOTICE:
-
Allow the primer to dry for 3 minutes or more.
64819B
7.INSTALL NO. 2 BACK WINDOW GLASS SPACER
Using a brush or sponge, apply the glass primer to the No. 2 back window glass spacer installation surface of the back door glass.
- NOTICE:
-
Do not apply too much primer.
Remove the peeling paper from 2 new No. 2 back window glass spacers.
- HINT:
-
After removing the peeling paper, keep the exposed adhesive free from foreign matter.
Install the No. 2 back window glass spacer to the back door glass as shown in the illustration.
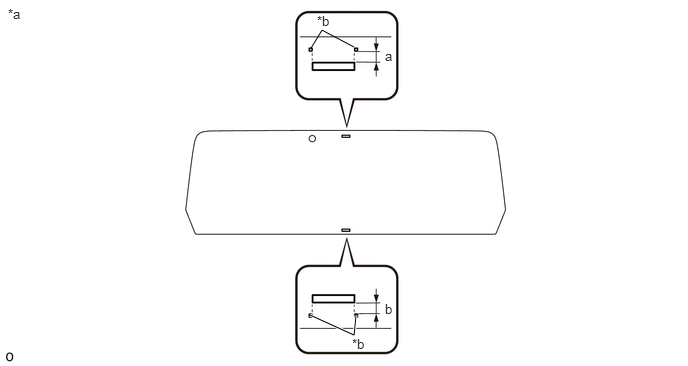
| *a | Backside | *b | Ceramic Notch |
- NOTICE:
-
Allow the primer to dry for 3 minutes or more.
- Standard Dimension:
Area Dimension a 11.7 mm (0.461 in.) b 4.2 mm (0.165 in.)
75573C
8.INSTALL BACK WINDOW OUTSIDE MOULDING
Using a brush or sponge, apply the glass primer to the back window outside moulding installation surface of the back door glass.
- NOTICE:
-
Do not apply too much primer.
Remove the peeling paper from 2 new back window outside mouldings.
- HINT:
-
After removing the peeling paper, keep the exposed adhesive free from foreign matter.
Install the back window outside moulding to the back door glass as shown in the illustration.
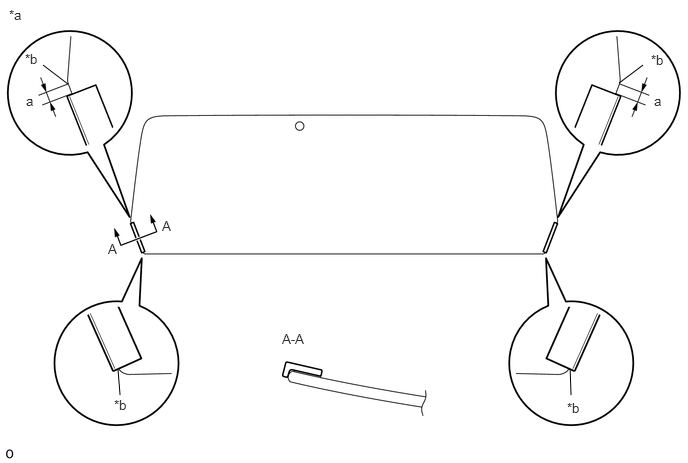
| *a | Backside | *b | R End |
- NOTICE:
-
Allow the primer to dry for 3 minutes or more.
- Standard Dimension:
Area Dimension a 5.3 mm (0.209 in.)
68294A
9.INSTALL BACK DOOR GLASS ADHESIVE DAM
Using a brush or sponge, apply the glass primer to the back door glass adhesive dam installation surface of the back door glass.
- NOTICE:
-
Do not apply too much primer.
Remove the peeling paper from 4 new back door glass adhesive dams.
- HINT:
-
After removing the peeling paper, keep the exposed adhesive free from foreign matter.
Install the back door glass adhesive dam to the back door glass as shown in the illustration.
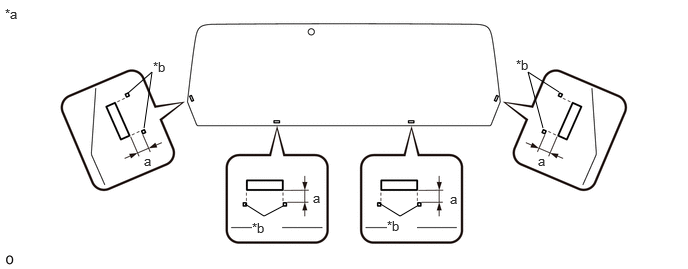
| *a | Backside | *b | Ceramic Notch |
- NOTICE:
-
Allow the primer to dry for 3 minutes or more.
- Standard Dimension:
Area Dimension a 7.2 mm (0.284 in.)
74537E
10.INSTALL EMERGENCY BACK DOOR CAUTION LABEL (w/ Back Window Glass Hammer Assembly)
- HINT:
- ·
Perform the following procedures if replacing any emergency hammer caution labe.
·Emergency hammer caution label (Type B) is only inner side.
for Type A:
Apply the emergency back door caution label to the inner sides of the back window glass as shown in the illustration.
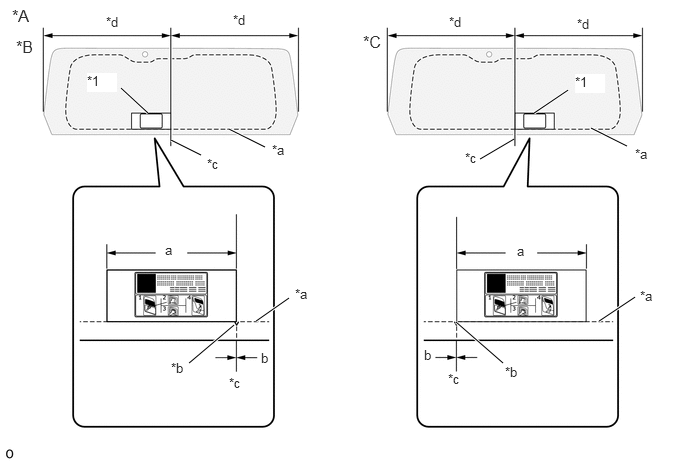
| *A | Inner Side | *B | for LHD |
| *C | for RHD | - | - |
| *1 | Emergency Back Door Caution Label | - | - |
| *a | Ceramic Line | *b | Ceramic Notch |
| *c | Back Door Glass Center | *d | Bilateral Symmetry |
- Standard Dimension:
Area Dimension a 270 mm (10.6 in.) b 0 + 5 mm (0 + 0.197 in.)
0 - 5 mm (0 - 0.197 in.)
Apply the emergency back door caution label to the outer sides of the back window glass as shown in the illustration.
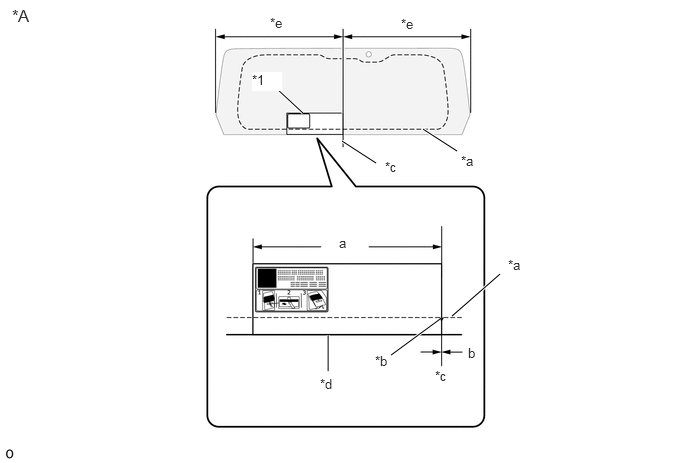
| *A | Outer Side | - | - |
| *1 | Emergency Back Door Caution Label | - | - |
| *a | Ceramic Line | *b | Ceramic Notch |
| *c | Back Door Glass Center | *d | Back Door Glass Edge Side |
| *e | Bilateral Symmetry | - | - |
- Standard Dimension:
Area Dimension a 385 mm (15.2 in.) b 0 + 5 mm (0 + 0.197 in.)
0 - 5 mm (0 - 0.197 in.)
for Type B:
Apply the emergency back door caution label to the inner sides of the back window glass as shown in the illustration.
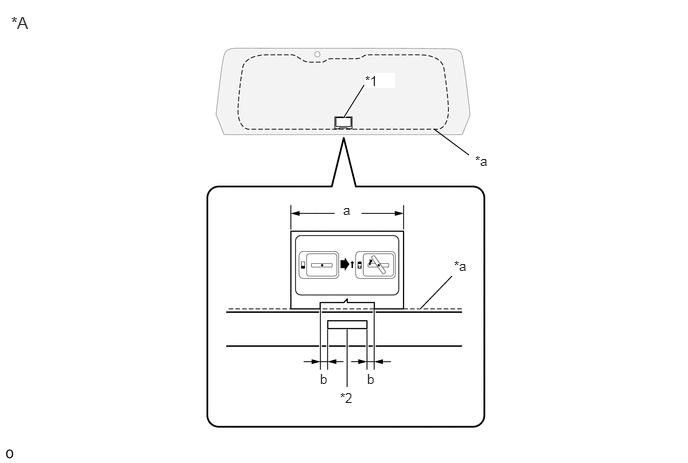
| *A | Inner Side | - | - |
| *1 | Emergency Back Door Caution Label | *2 | No. 2 Back Window Glass Spacer |
| *a | Ceramic Line | - | - |
- Standard Dimension:
Area Dimension a 105 mm (4.13 in.) b 5.0 mm (0.197 in.) to 10 mm (0.394 in.)
68131
11.INSTALL BACK DOOR GLASS
Clean and shape the contact surface of the vehicle body.
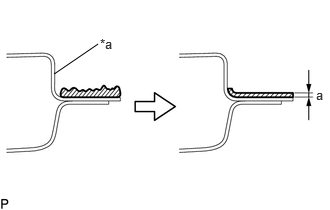
| *a | Vehicle Body |
|
|
Adhesive |
Using a knife, cut away excess adhesive on the contact surface of the vehicle body as shown in the illustration.
- Standard Dimension:
Area Dimension a 1.0 mm (0.0394 in.) to 3.0 mm (0.118 in.)
- NOTICE:
-
Be careful not to damage the vehicle body.
- HINT:
-
Leave approximately 1.0 mm (0.0394 in.) to 3.0 mm (0.118 in.) of adhesive on the vehicle body.
Clean the contact surface of the vehicle body with a piece of cloth saturated with non-residue solvent.
- HINT:
-
Even if all of the adhesive has been removed, clean the vehicle body.
Position the back door glass.
Using suction cups, place the back door glass in the correct position.
Check that the entire contact surface of the glass rim is perfectly even.
- NOTICE:
-
w/ Window Defogger System:
-
Make sure that the wire harness of the window defogger is not caught between the body and back door glass.
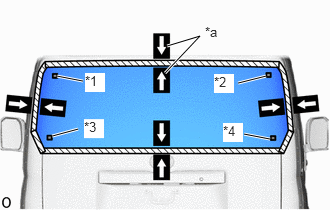
| *1 | Back Window Glass Clip LH |
| *2 | Back Window Glass Clip RH |
| *3 | No. 2 Back Door Glass Spacer |
| *4 | No. 1 Back Door Glass Spacer |
| *a | Matchmarks |
When using a new back door glass:
Place matchmarks on the back door glass and vehicle body at the locations indicated in the illustration.
- NOTICE:
-
Check that the back window glass clip LH, back window glass clip RH, No. 1 back door glass spacer and No. 2 back door glass spacer are attached to the back door panel correctly.
- HINT:
-
When reusing a back door glass, check the position of the matchmarks and make adjustments.
Using suction cups, remove the back door glass.
Using a brush or sponge, apply the body primer to the exposed part of the vehicle body.
- NOTICE:
- ·
Do not apply too much primer.
·Do not apply primer to the adhesive.
·When applying the primer, take care of the seams of the panel and spot welds.
Using a brush or sponge, apply the glass primer as shown in the illustration.
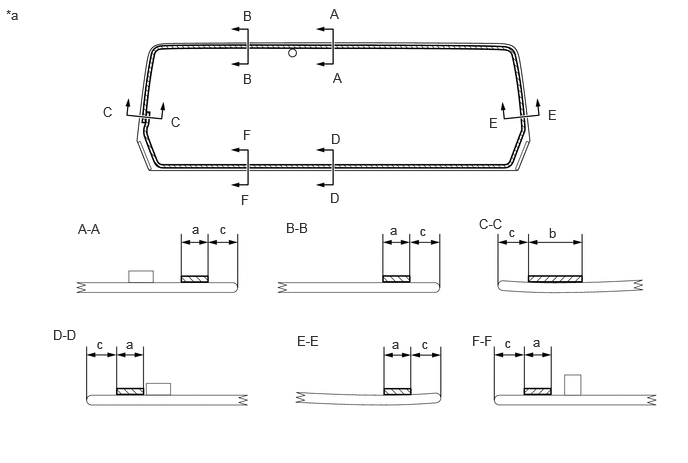
| *a | Backside | - | - |
|
|
Glass Primer | - | - |
- NOTICE:
-
Do not apply too much primer.
- Standard Dimension:
Area Dimension a 14 mm (0.551 in.) b 22 mm (0.866 in.) c 6.0 mm (0.236 in.)
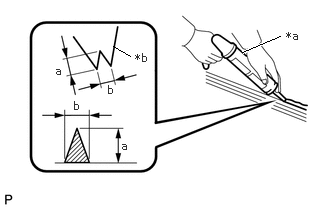
| *a | Sealer Gun |
| *b | Nozzle |
|
|
Adhesive |
Cut off the tip of the cartridge nozzle as shown in the illustration.
- Standard Dimension:
Area Dimension a 12 mm (0.472 in.) to 15 mm (0.591 in.) b 8.0 mm (0.315 in.) to 11 mm (0.433 in.)
Load the sealer gun with the cartridge.
Apply adhesive to the glass as shown in the illustration.
- Adhesive:
Toyota Genuine Windshield Glass Adhesive (High modulus type) or equivalent
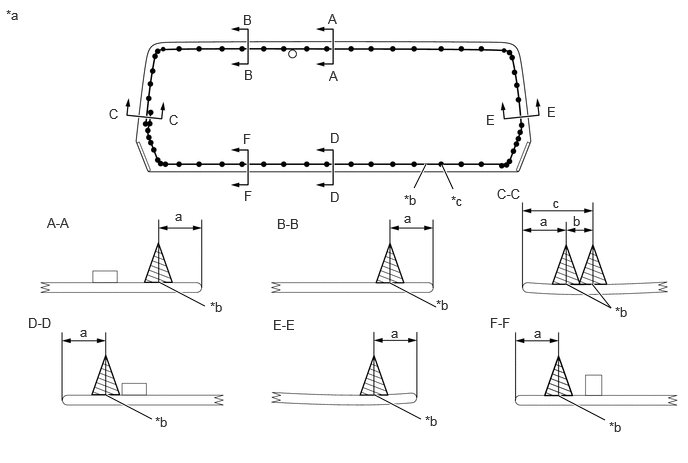
| *a | Backside | *b | Adhesive Positioning Center |
| *c | Ceramic Notch | - | - |
|
|
Adhesive | - | - |
- NOTICE:
-
Allow the primer to dry for 3 minutes or more.
- Standard Dimension:
Area Dimension a 13 mm (0.512 in.) b 8.0 mm (0.315 in.) c 21 mm (0.827 in.)
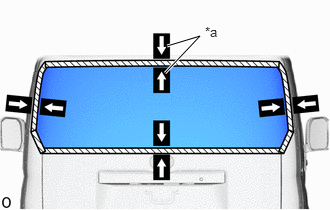
| *a | Matchmarks |
Install the back door glass to the vehicle body.
Using suction cups, position the back door glass so that the matchmarks are aligned.
- NOTICE:
- ·
Check that the back window glass clip LH, back window glass clip RH, No. 1 back door glass spacer and No. 2 back door glass spacer are attached to the back door panel correctly.
·Check that the vehicle body and glass have a small gap between them.
Press it in gently along the rim.
- HINT:
-
Press the glass with force of 98 N (10 kgf, 22.0 lbf) or more.
Using a gasket scraper, remove any excess or protruding adhesive.
- NOTICE:
-
Apply adhesive up to the edge of the back door glass.
Hold the back door glass using protective tape until the applied adhesive becomes hard.
- NOTICE:
-
Do not drive the vehicle for the time described in the table below.
- Minimum Time:
Temperature Minimum Time Prior to Driving Vehicle 35°C (95°F) 1 hour and 30 minutes 20°C (68°F) 5 hours 5°C (41°F) 24 hours
w/ Rear Window Defogger:
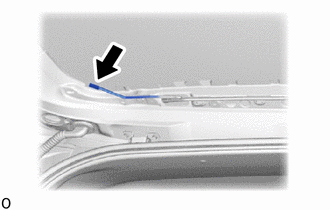
Connect the connector.
82186
12.INSTALL NO. 1 REAR WINDOW WIRE (w/ Rear Window Defogger)
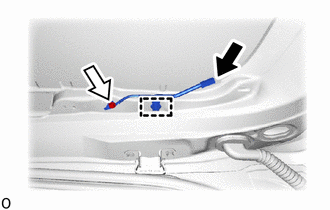

|
Wire Harness Connector |

|
Bolt |
Attach the clamp and install the No. 1 rear window wire.
Install the bolt.
- Torque:
- 10 N*m (102 kgf*cm, 7 ft.*lbf)
Connect the wire harness connector.
85143R
13.INSTALL REAR WIPER MOTOR GROMMET (w/ Rear Wiper)
85110R
14.INSTALL REAR WIPER MOTOR ASSEMBLY (w/ Rear Wiper)
15.INSTALL REAR WIPER ARM AND BLADE ASSEMBLY (w/ Rear Wiper)
69783B
16.INSTALL BACK DOOR INSIDE HANDLE BEZEL (w/ Handle, w/ Illumination)
69783B
17.INSTALL BACK DOOR INSIDE HANDLE BEZEL (w/ Handle, w/o Illumination)
69291
18.INSTALL BACK DOOR INSIDE HANDLE ASSEMBLY (w/ Handle)
69298
19.INSTALL BACK DOOR INSIDE HANDLE COVER (w/ Handle, w/ Cover)
81570
20.INSTALL CENTER STOP LIGHT ASSEMBLY
87950
21.INSTALL OUTER UNDER REAR VIEW MIRROR ASSEMBLY (w/ Outer Under Rear View Mirror)
22. CHECK FOR LEAK AND REPAIR
Conduct a leak test after the adhesive has completely hardened.
Seal any leaks with auto glass sealer.
Remove the protective tape and matchmark.