DOOR LOCK FRONT DOOR LOCK INSTALLATION
CAUTION / NOTICE / HINT
- HINT:
- ·
Use the same procedure for RHD and LHD vehicles.
·The procedure below is for LHD vehicles.
·Use the same procedure for the RH and LH sides.
·The procedure below is for the LH side.
PROCEDURE

 69760B
1.INSTALL FRONT DOOR INSIDE LOCKING CABLE ASSEMBLY LH
69760B
1.INSTALL FRONT DOOR INSIDE LOCKING CABLE ASSEMBLY LH
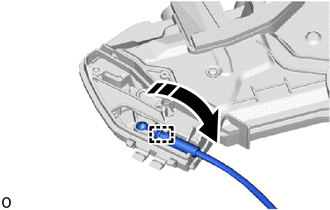

|
Install in this Direction |
Attach the clamp and install the front door inside locking cable assembly LH as shown in the illustration.
69720D
2.INSTALL FRONT DOOR LOCK REMOTE CONTROL CABLE ASSEMBLY LH
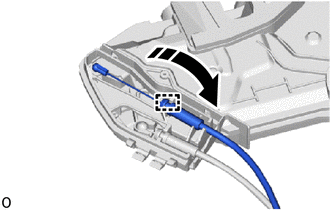
|
|
Install in this Direction |
Attach the clamp and install the front door lock remote control cable assembly LH as shown in the illustration.
69036A
3.INSTALL FRONT DOOR LOCK COVER SUB-ASSEMBLY LH
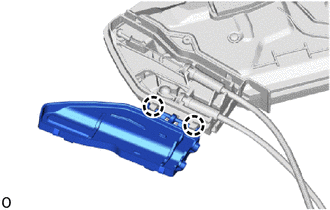
Attach the claw.
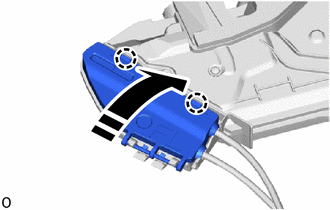
|
|
Install in this Direction |
Attach the claw and install the front door lock cover sub-assembly LH as shown in the illustration.
69318C
4.INSTALL DOOR LOCK WIRING HARNESS SEAL
- NOTICE:
- ·
When reusing the removed front door lock with motor assembly LH, be sure to replace the door lock wiring harness seal on the connector with a new one.
·Keep the door lock wiring harness seal of the connector free from grease and dust, etc.
·Reusing the door lock wiring harness seal or using a damaged door lock wiring harness seal may cause water to enter the connecting part. This may result in a malfunction of the front door lock with motor assembly LH.
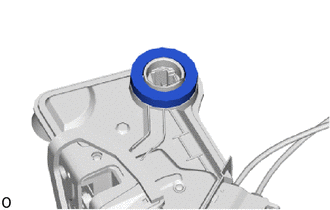
When reusing front door lock with motor assembly LH:
Install a new door lock wiring harness seal to the front door lock with motor assembly LH.
69040A
5.INSTALL FRONT DOOR LOCK WITH MOTOR ASSEMBLY LH
Apply MP grease to the sliding parts of the front door lock with motor assembly LH.
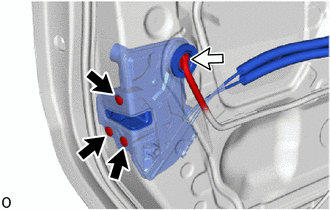

|
"TORX" Screw |

|
Connector |
Using a T30 "TORX" socket wrench, install the front door lock with motor assembly LH with the 3 "TORX" screws.
- Torque:
- 5.5 N*m (56 kgf*cm, 49 in.*lbf)
Disconnect the connector.
69312
6.INSTALL FRONT DOOR LOCK OPEN ROD LH
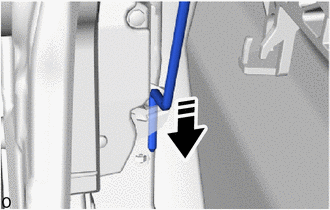
|
|
Install in this Direction |
Install the front door lock open rod LH on the front door lock with motor assembly LH as shown in the illustration.
- HINT:
-
Check that the front door lock open rod LH is securely attached to the front door lock with motor assembly LH.
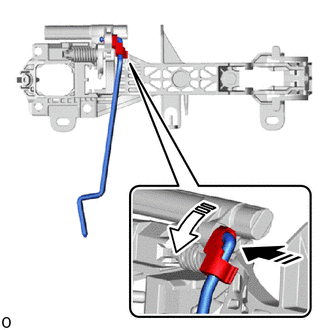
|
|
Install in this Direction (1) |

|
Install in this Direction (2) |
Insert the front door lock open rod LH into the front door outside handle frame sub-assembly LH in the direction (1) indicated by the arrow shown in the illustration.
Attach the snap in the direction (2) indicated by the arrow shown in the illustration.
7.INSTALL FRONT DOOR LOCK CYLINDER ASSEMBLY LH (w/ Lock Cylinder)
69220
8.INSTALL FRONT DOOR OUTSIDE HANDLE ASSEMBLY LH (w/ Lock Cylinder)
67404F
9.INSTALL FRONT DOOR REAR LOWER FRAME SUB-ASSEMBLY LH
69820
10.INSTALL FRONT DOOR WINDOW REGULATOR ASSEMBLY LH
67834
11.INSTALL FRONT DOOR NO. 2 SERVICE HOLE COVER LH
68151D
12.CONNECT FRONT DOOR GLASS RUN LH
68102
13.INSTALL FRONT DOOR GLASS SUB-ASSEMBLY LH
67402F
14.INSTALL FRONT DOOR FRONT LOWER FRAME SUB-ASSEMBLY LH
68151D
15.INSTALL FRONT DOOR GLASS RUN LH
67838F
16.INSTALL FRONT DOOR NO. 4 SERVICE HOLE COVER LH (w/ Curtain Shield Airbag)
67836C
17.INSTALL FRONT DOOR NO. 3 SERVICE HOLE COVER LH (w/ Curtain Shield Airbag)
67832
18.INSTALL FRONT DOOR SERVICE HOLE COVER LH
67626A
19.INSTALL NO. 2 DOOR TRIM BRACKET
86160
20.INSTALL FRONT NO. 1 SPEAKER ASSEMBLY
68193C
21.INSTALL FRONT DOOR FRONT BELT SEAL LH
68195B
22.INSTALL FRONT DOOR REAR BELT SEAL LH
68172A
23.INSTALL FRONT DOOR INNER GLASS WEATHERSTRIP LH
67602
24.INSTALL FRONT DOOR TRIM BOARD SUB-ASSEMBLY LH
25.INSTALL MULTIPLEX NETWORK MASTER SWITCH ASSEMBLY WITH FRONT DOOR ARMREST BASE PANEL (for Driver Side)
26.INSTALL POWER WINDOW REGULATOR SWITCH ASSEMBLY WITH FRONT DOOR ARMREST BASE PANEL (for Front Passenger Side)
69278B
27.INSTALL FRONT DOOR INSIDE HANDLE BEZEL LH
28.CONNECT CABLE TO NEGATIVE BATTERY TERMINAL
29. INITIALIZATION AFTER RECONNECTING BATTERY TERMINAL
- HINT:
-
When disconnecting and reconnecting the battery, there is an automatic learning function that completes learning when the respective system is used.
30. INITIALIZE POWER WINDOW CONTROL SYSTEM
31. CHECK POWER WINDOW CONTROL SYSTEM
32. CHECK POWER DOOR LOCK CONTROL SYSTEM