STOP AND START STOP AND START SYSTEM Starter Signal Circuit
DESCRIPTION
By using the starter delay circuit, the engine stop and start ECU can activate the STARTER NO.2 relay (for starter motor operation) after activating the STARTER relay (for starter pinion operation) to operate the starter assembly.
WIRING DIAGRAM
for Automatic Transmission:
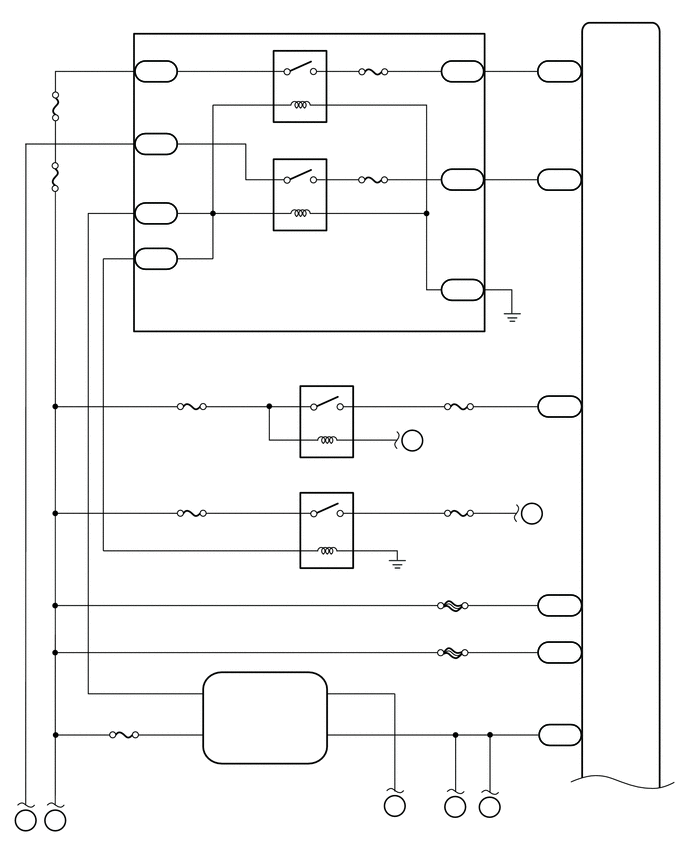
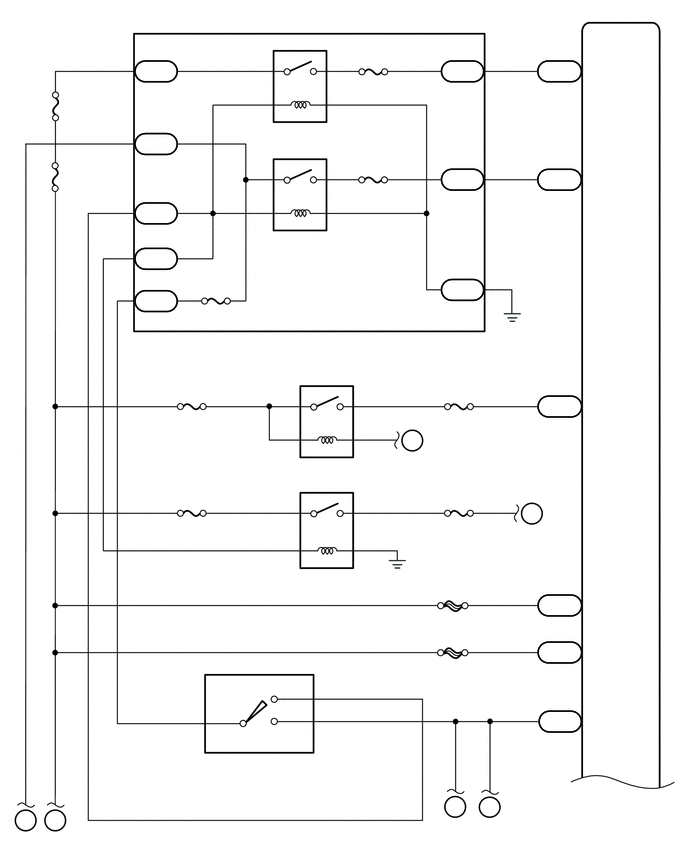
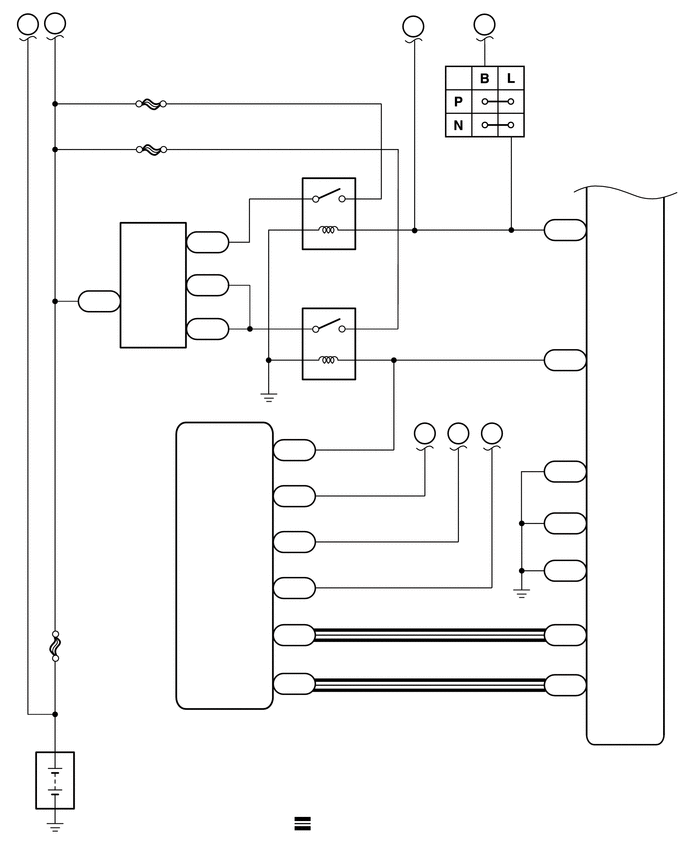
for Manual Transmission:
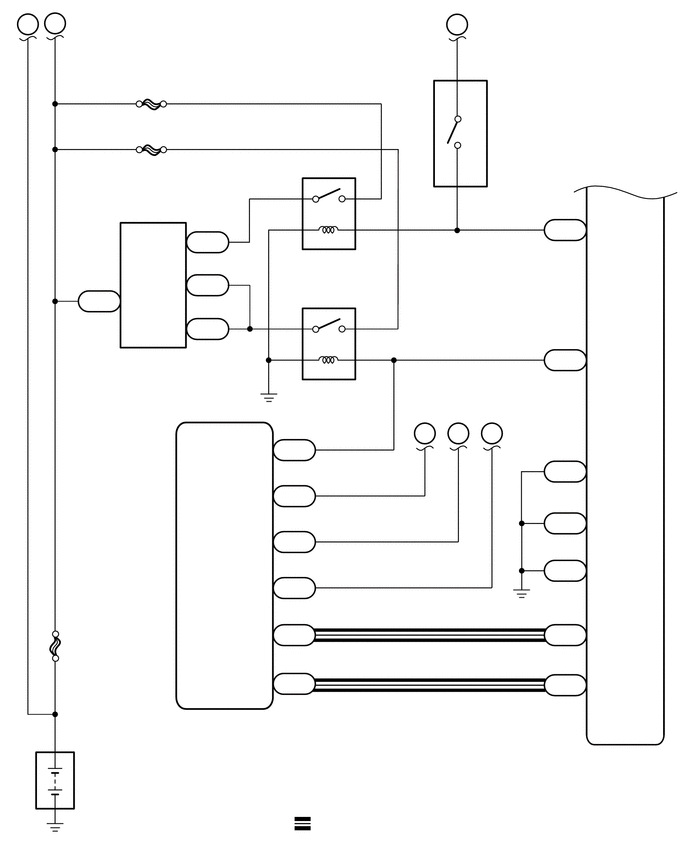
CAUTION / NOTICE / HINT
- NOTICE:
- ·
Before replacing the engine stop and start ECU, read the number of starter operations and write it into a new engine stop and start ECU.
·After replacing the engine stop and start ECU or air conditioning amplifier assembly, reset and perform learning of the air conditioning information in the engine stop and start ECU.
·After replacing the engine stop and start ECU or airbag sensor assembly, clear and calibrate the deceleration sensor zero point in the engine stop and start ECU.
·for Automatic Transmission:
When the engine stop and start ECU or electromagnetic oil pump is replaced, check the electromagnetic oil pump.
·After replacing the starter assembly, perform initialization of the number of starter operations stored in the engine stop and start ECU.
·When the starter assembly is replaced, "STARTER relay" and "STARTER NO. 2 relay" must be also replaced.
·After turning ignition switch off, waiting time may be required before disconnecting the cable from the negative (-) battery terminal. Therefore, make sure to read the disconnecting the cable from the negative (-) battery terminal notices before proceeding with work.
·Inspect the fuses for circuits related to this system before performing the following procedure.
PROCEDURE
Turn the ignition switch START and check that the engine cranks.
- Result:
Result Proceed to Engine cranks A Engine does not crank (for Automatic Transmission) B Engine does not crank (for Manual Transmission) C
A
B
C
Check that the engine hood is closed.
Connect the GTS to the DLC3.
Turn the ignition switch to ON.
Turn the GTS on.
Enter the following menus: Powertrain / Stop and Start / Active Test / Starter(Hood Close).
- Powertrain > Stop and Start > Active Test
-
Tester Display Starter(Hood Close) - 50004 392 42017
Check whether the engine cranks while the Active Test "Starter(Hood Close)" is being performed.
- NOTICE:
-
The Active Test "Starter(Hood Close)" is stopped automatically 3 seconds after the starter assembly begins operating.
- Standard:
Engine cranks
- Result:
Proceed to OK NG
OK
NG
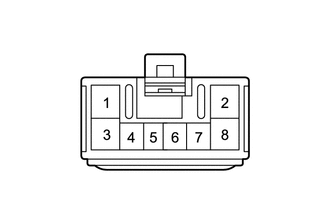
| *a | Front view of wire harness connector
(to Engine Stop and Start ECU) |
Disconnect the engine stop and start ECU connector.
Measure the voltage according to the value(s) in the table below.
- Standard Voltage:
Tester Connection Condition Specified Condition N31-1 (BIN2) - Body ground Always 9.5 to 14 V N31-3 (BIN1) - Body ground Always 9.5 to 14 V
- Result:
Proceed to OK NG
OK
NG
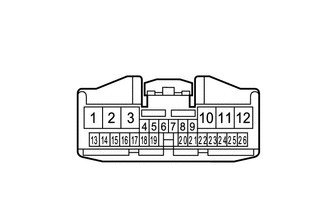
| *a | Front view of wire harness connector
(to Engine Stop and Start ECU) |
Disconnect the engine stop and start ECU connector.
Turn the ignition switch to ON.
Measure the voltage according to the value(s) in the table below.
- Standard Voltage:
Tester Connection Condition Specified Condition N33-21 (IG1) - Body ground Ignition switch ON 9.5 to 14 V
- Result:
Proceed to OK NG
OK
NG
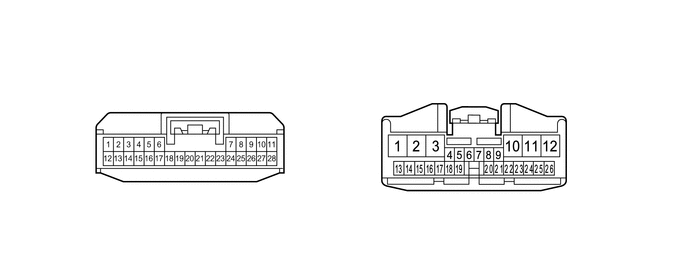
| *a | Front view of wire harness connector
(to Engine Stop and Start ECU) |
- | - |
Disconnect the engine stop and start ECU connectors.
Turn the ignition switch to ON.
Measure the voltage according to the value(s) in the table below.
- Standard Voltage:
Tester Connection Condition Specified Condition N32-1 (+B) - Body ground Ignition switch ON 9.5 to 14 V N33-18 (IG2) - Body ground Ignition switch ON 9.5 to 14 V
- Result:
Proceed to OK NG
OK
NG
Disconnect the engine stop and start ECU connectors.
Measure the resistance according to the value(s) in the table below.
- Standard Resistance:
Tester Connection Condition Specified Condition N31-2 (GND2) - Body ground Always Below 1 Ω N31-8 (GND1) - Body ground Always Below 1 Ω N32-6 (DGND) - Body ground Always Below 1 Ω
- Result:
Proceed to OK NG
OK
NG
Check that the engine hood is closed.
Connect the GTS to the DLC3.
Turn the ignition switch to ON.
Turn the GTS on.
Enter the following menus: Powertrain / Stop and Start / Active Test / Starter(Hood Close).
- Powertrain > Stop and Start > Active Test
-
Tester Display Starter(Hood Close) - 50004 392 42017
Check whether the engine cranks while the Active Test "Starter(Hood Close)" is being performed.
- NOTICE:
-
The Active Test "Starter(Hood Close)" is stopped automatically 3 seconds after the starter assembly begins operating.
- Standard:
Engine cranks
- Result:
Result Proceed to Engine cranks A Engine does not crank B
A
B
Connect the GTS to the DLC3.
Turn the ignition switch to ON.
Turn the GTS on.
Enter the following menus: Powertrain / Stop and Start / Data List / Neutral Switch.
- Powertrain > Stop and Start > Data List
-
Tester Display Neutral Switch - 50003 392 202
In accordance with the display on the GTS, read the Data List.
- OK:
GTS Display Condition Normal Condition Neutral Switch Shift lever in P or N ON Shift lever not in P or N OFF
- Result:
Result Proceed to NG A OK (w/ Entry and Start System) B OK (w/o Entry and Start System) C
A
B
C
Inspect the park/neutral position switch assembly.
- Result:
Result Proceed to OK (w/ Entry and Start System) A OK (w/o Entry and Start System) B NG C
A
B
C
Disconnect the certification ECU (smart key ECU assembly) connector.
Remove the STARTER relay from the No. 1 engine room relay block and No. 1 junction block assembly.
Disconnect the engine stop and start ECU connector.
Disconnect the ECM connector.
Measure the resistance according to the value(s) in the table below.
- Standard Resistance:
Tester Connection Condition Specified Condition N156-9 (STAR) - 2 (STARTER relay) Shift lever in P or N Below 1 Ω Shift lever not in P or N 10 kΩ or higher
- Result:
Proceed to OK NG
OK
NG
Disconnect the ignition or starter switch assembly connector.
Remove the STARTER relay from the No. 1 engine room relay block and No. 1 junction block assembly.
Disconnect the engine stop and start ECU connector.
Disconnect the ECM connector.
Measure the resistance according to the value(s) in the table below.
- Standard Resistance:
Tester Connection Condition Specified Condition N28-4 (ST2) - 2 (STARTER relay) Shift lever in P or N Below 1 Ω Shift lever not in P or N 10 kΩ or higher
- Result:
Proceed to OK NG
OK
NG
Disconnect the certification ECU (smart key ECU assembly) connector.
Disconnect the park/neutral position switch assembly connector.
Disconnect the engine stop and start ECU connector.
Disconnect the ECM connector.
Measure the resistance according to the value(s) in the table below.
- Standard Resistance:
Tester Connection Condition Specified Condition N156-9 (STAR) - E92-4 (B) Always Below 1 Ω N156-9 (STAR) or E92-4 (B) - Body ground and other terminals Always 10 kΩ or higher
- Result:
Proceed to OK NG
OK
NG
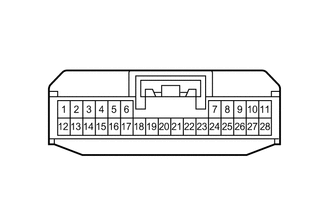
| *a | Front view of wire harness connector
(to Engine Stop and Start ECU) |
Disconnect the engine stop and start ECU connector.
Measure the voltage according to the value(s) in the table below.
- Standard Voltage:
Tester Connection Condition Specified Condition N32-17 (CLL) - Body ground Engine start 9.5 to 14 V
- Result:
Proceed to OK NG
OK
NG
Inspect the ignition or starter switch assembly.
- Result:
Proceed to OK NG
OK
NG
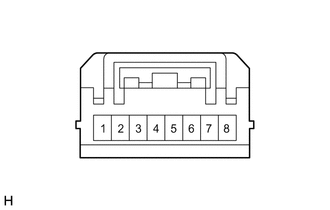
| *a | Front view of wire harness connector
(to Ignition or Starter Switch Assembly) |
Disconnect the ignition or starter switch assembly connector.
Measure the voltage according to the value(s) in the table below.
- Standard Voltage:
Tester Connection Condition Specified Condition N28-1 (AM2) - Body ground Always 9.5 to 14 V
- Result:
Proceed to OK NG
OK
NG
Disconnect the ignition or starter switch assembly connector.
Disconnect the park/neutral position switch assembly connector.
Disconnect the engine stop and start ECU connector.
Disconnect the ECM connector.
Measure the resistance according to the value(s) in the table below.
- Standard Resistance:
Tester Connection Condition Specified Condition N28-4 (ST2) - E92-4 (B) Always Below 1 Ω N28-4 (ST2) or E92-4 (B) - Body ground and other terminals Always 10 kΩ or higher
- Result:
Proceed to OK NG
OK
NG
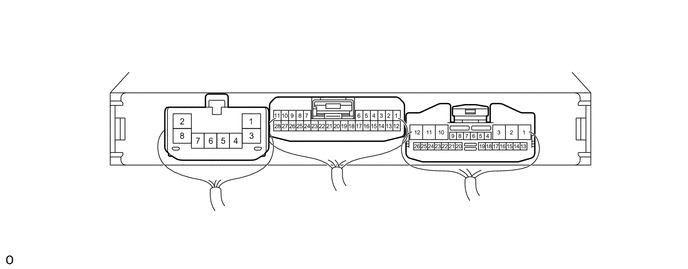
| *a | Component with harness connected
(Engine Stop and Start ECU) |
- | - |
Connect an oscilloscope to the STA, STA2 and DGND terminals of the engine stop and start ECU connector.
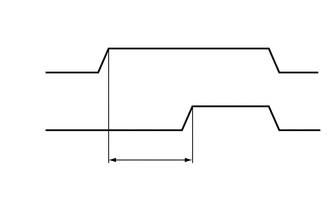
Check the waveform immediately after turning the ignition switch START.
| Item | Condition |
|---|---|
| Tester Connection | N32-21 (STA) - N32-6 (DGND)
N32-23 (STA2) - N32-6 (DGND) |
| Condition | Engine started by ignition switch operation |
- Result:
Result Proceed to Delay between STARTER relay turning on and STARTER NO.2 relay turning on: between 0.03 and 0.06 seconds A Delay between STARTER relay turning on and STARTER NO.2 relay turning on: not between 0.03 and 0.06 seconds B STARTER relay turns on and STARTER NO.2 relay does not turn on C STARTER relay and STARTER NO.2 relay do not turn on D
- NOTICE:
- ·
for Automatic Transmission:
After replacing the engine stop and start ECU, make sure that the flywheel sub-assembly and starter pinion gear are not excessively worn. A malfunction in the delay circuit may cause the flywheel sub-assembly or starter pinion gear to be worn or damaged.
·for Manual Transmission:
After replacing the engine stop and start ECU, make sure that the flywheel with damper assembly and starter pinion gear are not excessively worn. A malfunction in the delay circuit may cause the flywheel with damper assembly or starter pinion gear to be worn or damaged.
A
B
C
D
Inspect the STARTER relay.
Inspect the STARTER NO.2 relay.
- Result:
Proceed to OK NG
OK
NG
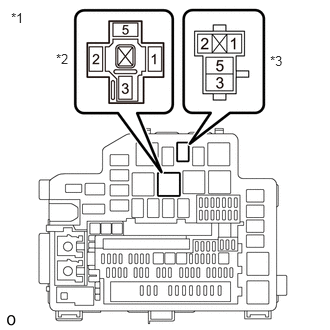
| *1 | No. 1 Engine Room Relay Block and No. 1 Junction Block Assembly |
| *2 | STARTER Relay |
| *3 | STARTER NO.2 Relay |
Remove the STARTER relay and STARTER NO.2 relay from the No. 1 engine room relay block and No. 1 junction block assembly.
Measure the voltage according to the value(s) in the table below.
- Standard Voltage:
Tester Connection Condition Specified Condition 5 (STARTER relay) - Body ground Always 9.5 to 14 V 5 (STARTER NO.2 relay) - Body ground Always 9.5 to 14 V
- Result:
Proceed to OK NG
OK
NG
Remove the STARTER relay and STARTER NO.2 relay from the No. 1 engine room relay block and No. 1 junction block assembly.
Disconnect the starter assembly connector.
Measure the resistance according to the value(s) in the table below.
- Standard Resistance:
Tester Connection Condition Specified Condition 3 (STARTER relay) - E44-1 (SL1) Always Below 1 Ω 3 (STARTER NO.2 relay) - E44-2 (SL2) Always Below 1 Ω 3 (STARTER NO.2 relay) - E23-1 (ST) Always Below 1 Ω
- Result:
Proceed to OK NG
OK
NG
Remove the STARTER relay and STARTER NO.2 relay from the No. 1 engine room relay block and No. 1 junction block assembly.
Measure the resistance according to the value(s) in the table below.
- Standard Resistance:
Tester Connection Condition Specified Condition 1 (STARTER relay) - Body ground Always Below 1 Ω 1 (STARTER NO.2 relay) - Body ground Always Below 1 Ω
- Result:
Proceed to OK NG
OK
NG
Disconnect the engine stop and start ECU connector.
w/ Entry and Start System:
Disconnect the certification ECU (smart key ECU assembly) connector.
Remove the STARTER relay from the No. 1 engine room relay block and No. 1 junction block assembly.
for Automatic Transmission:
Disconnect the park/neutral position switch assembly connector.
for Manual Transmission:
Disconnect the clutch start switch assembly (for lower) connector.
Measure the resistance according to the value(s) in the table below.
- Standard Resistance:
Tester Connection Condition Specified Condition N32-21 (STA) - 2 (STARTER relay) Always Below 1 Ω N32-21 (STA) or 2 (STARTER relay) - Body ground and other terminals Always 10 kΩ or higher
- Result:
Proceed to OK NG
OK
NG
Disconnect the engine stop and start ECU connector.
Remove the STARTER NO.2 relay from the No. 1 engine room relay block and No. 1 junction block assembly.
Disconnect the ECM connector.
Measure the resistance according to the value(s) in the table below.
- Standard Resistance:
Tester Connection Condition Specified Condition N32-23 (STA2) - 2 (STARTER NO.2 relay) Always Below 1 Ω N32-23 (STA2) or 2 (STARTER NO.2 relay) - Body ground and other terminals Always 10 kΩ or higher
- Result:
Proceed to OK NG
OK
NG
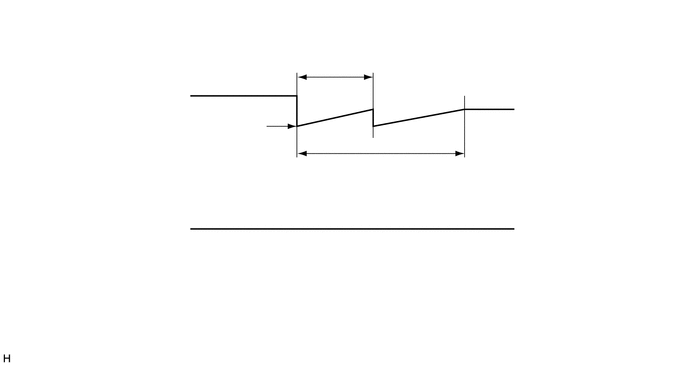
Connect the positive (+) lead of an oscilloscope to the positive (+) battery terminal and the negative (-) lead to the negative (-) battery terminal.
While cranking the engine, count the number of times the waveform drops.
- Standard:
Waveform drops 2 times
- Result:
Number of Times Waveform Dropped Proceed to 0 times A 2 times B
A
B
Inspect the starter assembly.
- Result:
Proceed to OK NG
OK
NG
Connect the GTS to the DLC3.
Turn the ignition switch to ON.
Turn the GTS on.
Enter the following menus: Powertrain / Stop and Start / Active Test / Starter(Hood Close).
- Powertrain > Stop and Start > Active Test
-
Tester Display Starter(Hood Close) - 50004 392 42017
Check whether the engine cranks while the Active Test "Starter(Hood Close)" is being performed.
- NOTICE:
-
The Active Test "Starter(Hood Close)" is stopped automatically 3 seconds after the starter assembly begins operating.
- Standard:
Engine cranks
- Result:
Result Proceed to Engine cranks A Engine does not crank B
A
B
Connect the GTS to the DLC3.
Turn the ignition switch to ON.
Turn the GTS on.
Enter the following menus: Powertrain / Stop and Start / Data List / Clutch Lower Switch
In accordance with the display on the GTS, read the Data List.
- Powertrain > Stop and Start > Data List
-
Tester Display Clutch Lower Switch - 50003 392 594
- OK:
Tester Display Condition Normal Condition Clutch Lower Switch Clutch pedal depressed ON Clutch pedal released OFF
- Result:
Proceed to OK NG
OK
NG
Inspect the ignition or starter switch assembly.
- Result:
Proceed to OK NG
OK
NG
| *a | Front view of wire harness connector:
(to Ignition or Starter Switch Assembly) |
Disconnect the ignition or starter switch assembly connector.
Measure the voltage according to the value(s) in the table below.
- Standard Voltage:
Tester Connection Condition Specified Condition N28-1 (AM2) - Body ground Always 9.5 to 14 V
- Result:
Proceed to OK NG
OK
NG
Disconnect the ignition or starter switch assembly connector.
Disconnect the clutch start switch assembly (for lower) connector.
Measure the resistance according to the value(s) in the table below.
- Standard Resistance:
Tester Connection Condition Specified Condition N28-4 (ST2) - M7-1 (B) Always Below 1 Ω N28-4 (ST2) - Body ground Always 10 kΩ or higher M7-1 - Body ground Always 10 kΩ or higher
- Result:
Proceed to OK NG
OK
NG
Inspect the clutch start switch assembly (for lower).
- Result:
Proceed to OK NG
OK
NG
Click hereDrivetrain>CLUTCH>CLUTCH PEDAL SWITCH>REMOVAL201906,999999,_52,_078837,_0382380,RM100000001IPJ6,
Disconnect the ignition or starter switch assembly connector.
Disconnect the engine stop and start ECU connectors.
Remove the STARTER relay from the No. 1 engine room relay block and No. 1 junction block assembly.
Measure the resistance according to the value(s) in the table below.
- Standard Resistance:
Tester Connection Condition Specified Condition N28-4 (ST2) - 2 (STARTER relay) Clutch pedal depressed Below 1 Ω Clutch pedal released 10 kΩ or higher
- Result:
Proceed to OK NG
OK
NG