WINDOW / GLASS ROOF WINDOW FIX GLASS INSTALLATION
CAUTION / NOTICE / HINT
- NOTICE:
-
Make sure to use Toyota Genuine Windshield Glass Adhesive (High Modulus Type) or equivalent.
PROCEDURE

 63201C
1.CLEAN TILT ROOF GLASS SUB-ASSEMBLY
63201C
1.CLEAN TILT ROOF GLASS SUB-ASSEMBLY
Clean the outer circumference of a new tilt roof glass sub-assembly with a non-residue solvent.
- NOTICE:
-
Do not touch the tilt roof glass sub-assembly surface after cleaning it.
74526D
2.INSTALL NO. 2 EMERGENCY HAMMER CAUTION LABEL
Apply the No. 2 emergency hammer caution label to the inner and outer sides of the moon roof glass sub-assembly as shown in the illustration.
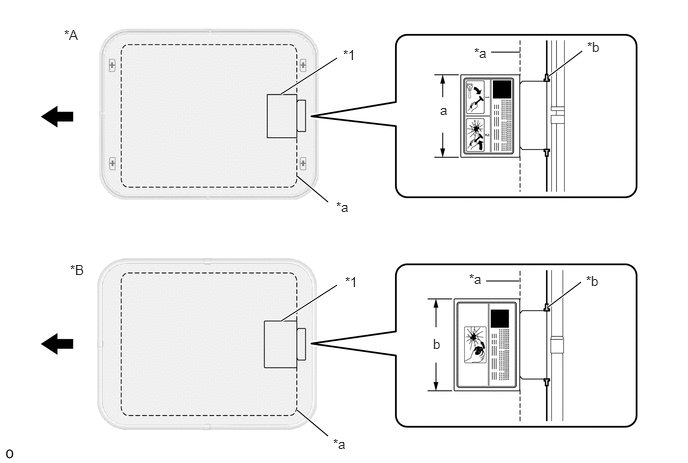
| *A | Inner Side | *B | Outer Side |
| *1 | No. 2 Emergency Hammer Caution Label | - | - |
| *a | Ceramic Line | *b | Ceramic Notch |

|
Front Side | - | - |
- Standard Dimension:
Area Dimension a 160 mm (0.525 ft.) b 180 mm (0.590 ft.)
63201C
3.INSTALL TILT ROOF GLASS SUB-ASSEMBLY
Clean and shape the contact surface of the vehicle body.
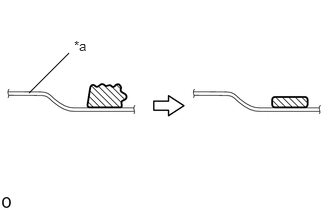
| *a | Vehicle Body |

|
Adhesive |
Using a knife, cut away excess adhesive on the contact surface of the vehicle body as shown in the illustration.
- Standard Dimension:
Area Dimension a 1.0 mm (0.0394 in.) to 3.0 mm (0.118 in.)
- NOTICE:
-
Be careful not to damage the vehicle body.
- HINT:
-
Leave approximately 1.0 mm (0.0394 in.) to 3.0 mm (0.118 in.) of adhesive on the vehicle body.
Clean the contact surface of the vehicle body with a piece of cloth saturated with non-residue solvent.
Position the tilt roof glass sub-assembly.
Install suction cups to the tilt roof glass sub-assembly.
Using a brush or sponge, apply the body primer to the exposed part of the vehicle body.
- NOTICE:
- ·
Do not apply too much primer.
·Do not apply primer to the adhesive.
·When applying the primer, take care of the seams of the panel and spot welds.
Using a brush or sponge, apply the glass primer as shown in the illustration.
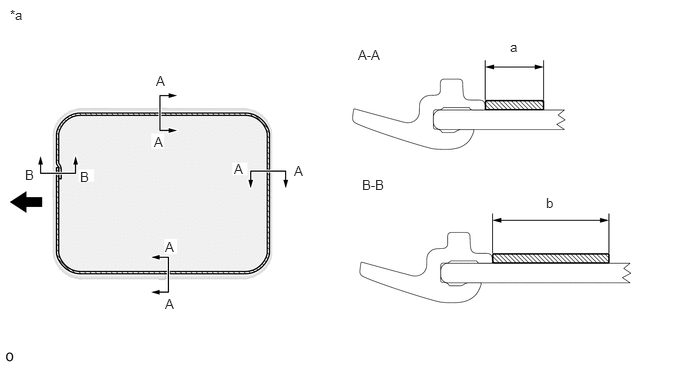
| *a | Backside | - | - |
|
|
Front Side |
|
Glass Primer |
- NOTICE:
-
Do not apply too much primer.
- Standard Dimension:
Area Dimension a 13.5 mm (0.531 in.) b 21.5 mm (0.846 in.)
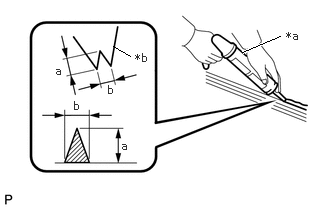
| *a | Sealer Gun |
| *b | Nozzle |
|
|
Adhesive |
Cut off the tip of the cartridge nozzle as shown in the illustration.
- Standard Dimension:
Area Dimension a 12 mm (0.472 in.) to 15 mm (0.591 in.) b 8.0 mm (0.315 in.) to 11 mm (0.433 in.)
Load the sealer gun with the cartridge.
Apply adhesive to the glass as shown in the illustration.
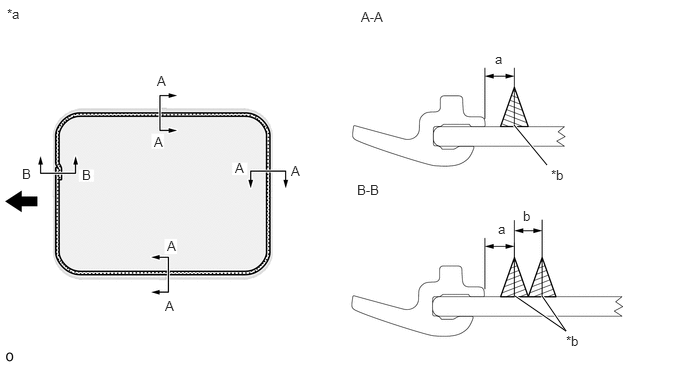
| *a | Backside | *b | Adhesive Positioning Center |
|
|
Front Side |
|
Adhesive |
- Adhesive:
Toyota Genuine Windshield Glass Adhesive (High modulus type) or equivalent
- Standard Dimension:
Area Dimension a 6.5 mm (0.256 in.) b 8.0 mm (0.315 in.)
Install the tilt roof glass sub-assembly to the vehicle body.
Using suction cups, attach the clip to install the tilt roof glass sub-assembly to the vehicle body in the order shown in the illustration.
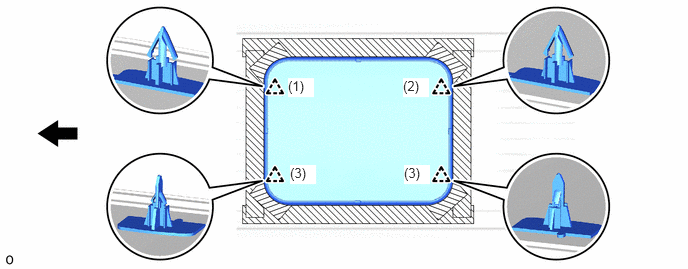
|
|
Front Side | - | - |
- NOTICE:
- ·
Allow the primer to dry for 3 minutes or more.
·Check that the clip is attached to the vehicle body correctly.
Press it in gently along the rim.
- HINT:
-
Press the glass with force of 98 N (10 kgf, 22.0 lbf) or more.
Using a gasket scraper, remove any excess or protruding adhesive.
Hold the tilt roof glass sub-assembly using protective tape until the applied adhesive becomes hard.
- NOTICE:
-
Do not drive the vehicle for the time described in the table below.
- Minimum Time:
Temperature Minimum Time Prior to Driving Vehicle 35°C (95°F) 1 hour and 30 minutes 20°C (68°F) 5 hours 5°C (41°F) 24 hours
63349A
4.INSTALL REAR ROOF HEADLINING GARNISH
5. CHECK FOR LEAK AND REPAIR
Conduct a leak test after the adhesive has completely hardened.
Seal any leaks with auto glass sealer.
Remove the protective tape and matchmark.
6.CONNECT CABLE TO NEGATIVE BATTERY TERMINAL (w/ Airbag System)
7. INITIALIZATION AFTER RECONNECTING BATTERY TERMINAL (w/ Airbag System)
- HINT:
-
When disconnecting and reconnecting the battery, there is an automatic learning function that completes learning when the respective system is used.