STEERING COLUMN STEERING WHEEL REMOVAL
CAUTION / NOTICE / HINT
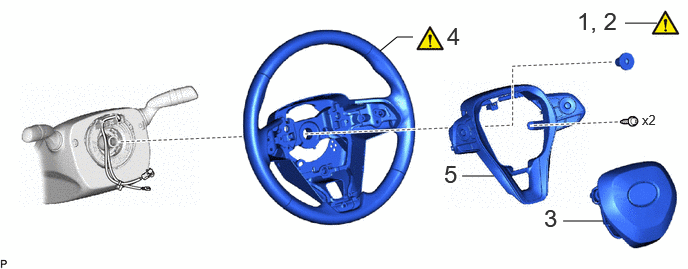
| Procedure | Part Name Code | 
|

|

|
|
|---|---|---|---|---|---|
| 1 | PRECAUTION | - | ( 202307,999999,_55,_112306,_0501032,RM100000002C3MT_02_0041,) 202307,999999,_55,_112306,_0501032,RM100000002C3MT_02_0041,)
|
||
| 2 | ALIGN FRONT WHEELS FACING STRAIGHT AHEAD | - | (202307,999999,_55,_112306,_0501032,RM100000002C3MT_02_0001,)
|
- | - |
| 3 | HORN BUTTON ASSEMBLY | 45130 | - | - | - |
| 4 | STEERING WHEEL ASSEMBLY | 45100 | (202307,999999,_55,_112306,_0501032,RM100000002C3MT_02_0006,)
|
- | - |
| 5 | STEERING PAD SWITCH ASSEMBLY | 84250A | - | - | - |
CAUTION / NOTICE / HINT
- NOTICE:
- ·
Do not remove/install the spiral cable with sensor sub-assembly with the auxiliary battery connected and the ignition switch ON.
·Do not rotate the spiral cable with sensor sub-assembly without the steering wheel assembly installed, with the auxiliary battery connected and the ignition switch ON.
·Ensure that the steering wheel assembly is installed and aligned straight when inspecting the steering sensor.
- HINT:
-
When the cable is disconnected / reconnected to the auxiliary battery terminal, systems temporarily stop operating. However, each system has a function that completes learning the first time the system is used.
- ·
Learning completes when vehicle is driven
Effect/Inoperative Function When Necessary Procedures are not Performed Necessary Procedures Link *1: for Gasoline Model
Front camera system Drive the vehicle straight ahead at 15 km/h (10 mph) or more for 1 second or more. ( 202307,999999,_95,_112293,_0586709,RM100000002BSVY,)
Stop and start system*1 Drive the vehicle until stop and start control is permitted (approximately 5 to 60 minutes). ( 202307,999999,_51,_115233,_0510781,RM100000002CS0B,)
·Learning completes when vehicle is operated normally
Effect/Inoperative Function When Necessary Procedures are not Performed Necessary Procedures Link Power door lock control system
·Back door opener
Perform door unlock operation with door control switch or electrical key transmitter sub-assembly switch. ( 202201,999999,_58,_115226,_0510939,RM1000000020BSY,)
Power back door system Fully close the back door by hand.
- HINT:
-
Initialization is not necessary if the above procedures are performed while the back door is closed.
( 202201,999999,_59,_113746,_0504731,RM100000001ZJKP,)
Air conditioning system After the ignition switch is turned to ON, the servo motor standard position is recognized. -
PROCEDURE

 1. PRECAUTION
2.ALIGN FRONT WHEELS FACING STRAIGHT AHEAD
45130
3.REMOVE HORN BUTTON ASSEMBLY
45100
4.REMOVE STEERING WHEEL ASSEMBLY

| *a | Matchmark | *b | Hold |

|
Turn | - | - |
Disconnect the connector from the spiral cable with sensor sub-assembly.
Using a 10 mm hexagon socket wrench, remove the steering wheel assembly set bolt.
Put matchmarks on the steering wheel assembly and steering main shaft.
Temporarily install the steering wheel assembly set bolt.
- NOTICE:
-
Do not overtighten the steering wheel assembly set bolt.
Using SST, separate the steering wheel assembly.
- SST
- 09950-50013 (09951-05010, 09952-05010, 09953-05020, 09954-05031, 09957-04010)
09950-60011 (09951-00330)
- NOTICE:
-
Apply a small amount of grease to the threads and tip of SST (09953-05020) before use.
Remove the steering wheel assembly set bolt and steering wheel assembly.
84250A
5.REMOVE STEERING PAD SWITCH ASSEMBLY