HYBRID / BATTERY CONTROL HYBRID CONTROL SYSTEM P19E100 DC/DC Converter System Performance
DESCRIPTION
The DC/DC converter converts the voltage from the HV battery to supply power to the vehicle lights, audio system and various ECUs, etc.
At the same time, it performs charging of the auxiliary battery, controlling the output voltage to maintain a specific voltage at the auxiliary battery terminal.
Via CAN communication, the hybrid vehicle control ECU sends stop commands to the DC/DC converter, and receives DC/DC converter Normal/Malfunction status signals.
When an auxiliary charging system malfunction causes DC/DC converter output to stop, and either the auxiliary battery voltage is 11 V or more for 5 seconds or more, or the auxiliary battery voltage is 11 V or less for 0.05 seconds or more, this DTC is stored.
This DTC may also be stored if a malfunction of the inverter cooling system (blockage, inverter water pump malfunction, etc.) or a high-voltage insulation malfunction occurs.
| DTC No. | Detection Item | DTC Detection Condition | Trouble Area | MIL | Warning Indicate | Note |
|---|---|---|---|---|---|---|
| P19E100 | DC/DC Converter System Performance | Any of the following conditions are met:
·
DC/DC converter stop signal is ON, and auxiliary battery voltage is 11 V or more for 5 seconds or more* ·
DC/DC converter stop signal is ON, and auxiliary battery voltage is 11 V or less for 0.05 seconds or more* (1 trip detection logic) |
·
Hybrid vehicle control ECU ·
Inverter with converter assembly ·
Hybrid vehicle transaxle assembly ·
Inverter cooling system ·
Cooling fan system ·
Wire harness or connector ·
DC/DC fuse ·
PCU NO. 2 fuse |
Does not come on | Master Warning:
Comes on |
SAE Code:
P19E1 |
- HINT:
-
*: If the DC/DC converter is malfunctioning, its operation and charging will be stopped and the auxiliary battery voltage will drop.
WIRING DIAGRAM
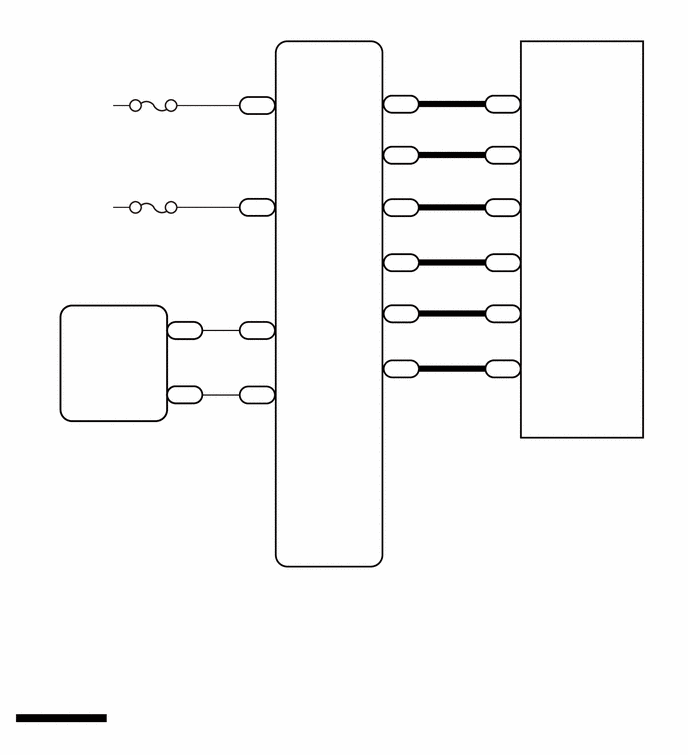
CAUTION / NOTICE / HINT
- CAUTION:
-
Refer to the precautions before inspecting high voltage circuit.
- NOTICE:
- ·
After the ignition switch is turned off, there may be a waiting time before disconnecting the auxiliary negative (-) battery terminal.
·When disconnecting and reconnecting the auxiliary battery.
- HINT:
-
When disconnecting and reconnecting the auxiliary battery, there is an automatic learning function that completes learning when the respective system is used.
- HINT:
- ·
After repair, clear the DTCs, turn the ignition switch off and wait for 30 seconds or more and perform the following procedure to confirm that the auxiliary battery low voltage indicated by this DTC has been repaired.
(a)Wait for 2 minutes with the shift lever in P, the ignition switch ON (READY) and the following conditions met, then confirm that Data List item "BATT Voltage (Hybrid control system)" is between 13.0 and 15.0 V.
(If charging is not performed and the electrical load increases, +B voltage may not be steady and will gradually drop.)
(1)Headlight switch is in the HI position.
(2)A/C blower fan switch is in the HI position.
(3)Window defogger switch is turned on.
·By performing the following procedure, the DC/DC converter function can be checked.
(a)Connect the AC/DC 400 A probe to the positive (+) auxiliary battery cable.
(1)Turn the ignition switch to ON (READY) and leave the vehicle as is until the electric current flowing to the auxiliary battery becomes 10 A or less.
(2)Turn the ignition switch to ON (READY) and turn the headlight switch and A/C blower fan switch to the HI position and the window defogger on.
(3)Confirm that the current drawn from the auxiliary battery is 0 A or lower and the auxiliary battery voltage is between 13.0 and 15.0 V.
- ·
This DTC may be also stored when a part other than the DC/DC converter is malfunctioning or depending on user operation.
- ·
If this vehicle is used to jump start another vehicle with a discharged battery, a fuse may blow due to overcurrent or the DC/DC converter self-protection may be activated. Also, if this vehicle is jump started by a vehicle with a 24 V battery, the same malfunction may occur and this DTC may be stored. (The suspended DC/DC converter control will return to normal by clearing the DTCs and turning the ignition switch off.)
- ·
Check whether high electrical load equipment such as a high-capacitance audio device or electric kettle is used in the vehicle. (A fuse of the auxiliary battery may be blown due to overcurrent.)
- ·
If the DC/DC converter is malfunctioning, the auxiliary battery cannot be charged. Therefore, once the ignition switch is turned off, it may be impossible to turn it to ON (READY) again if the auxiliary battery is completely discharged. In this case, charge the auxiliary battery. Be careful as charging is not performed during the inspection.
- ·
If the ignition switch turns off immediately after it is turned to ON (READY), the auxiliary battery voltage may be low. Charge the auxiliary battery.
- ·
P19E100 may be output as a result of the malfunction indicated by the DTCs in table below.
(a)The chart above is listed in inspection order of priority.
(b)Check DTCs that are output at the same time by following the listed order. (The main cause of the malfunction can be determined without performing unnecessary inspections.)
Table 1 Malfunction Content System Relevant DTC Insulation Malfunction Hybrid control system P1C7C49 Hybrid/EV Battery Voltage System Isolation (A/C Area) Internal Electronic Failure P1C7D49 Hybrid/EV Battery Voltage System Isolation (Hybrid/EV Battery Area) Internal Electronic Failure P1C7E49 Hybrid/EV Battery Voltage System Isolation (Transaxle Area) Internal Electronic Failure P1C7F49 Hybrid/EV Battery Voltage System Isolation (Direct Current Area) Internal Electronic Failure P1C8049 Hybrid/EV Battery Voltage System Isolation (Rear Motor Area) Internal Electronic Failure High Voltage Circuit Malfunction Hybrid control system P0AA649 Hybrid/EV Battery Voltage System Isolation Internal Electronic Failure P0AD911 Hybrid/EV Battery Positive Contactor Circuit Short to Ground P0ADD11 Hybrid/EV Battery Negative Contactor Circuit Short to Ground P1C8449 High Voltage Power Resource Circuit Short during Ready ON P300449 High Voltage Power Resource Circuit Short during Pre-Charge
Table 2 Malfunction Content System Relevant DTC System malfunction Hybrid control system U01BD87 Lost Communication with DC/DC Converter Control Module "C" P0A9300 Inverter "A" Cooling System Performance P0C7396 Motor Electronics Coolant Pump "A" Component Internal Failure P314A31 Motor Electronics Coolant Pump "A" No Signal Motor generator control system P0E5717 DC/DC Converter Voltage Sensor "A" (VL) Circuit Voltage Above Threshold
PROCEDURE
Disconnect the cable from the negative (-) auxiliary battery terminal.
Remove the DC/DC fuse from the No. 1 engine room relay block and No. 1 junction block assembly.
Measure the resistance according to the value(s) in the table below.
- Standard Resistance:
Tester Connection Condition Specified Condition DC/DC fuse Always Below 1 Ω
Install the DC/DC fuse.
Connect the cable to the negative (-) auxiliary battery terminal.
- Result:
Proceed to OK NG
OK
NG
- Result:
Proceed to OK NG
OK
NG
- CAUTION:
-
Be sure to wear insulated gloves.
Check that the service plug grip is not installed.
- NOTICE:
-
After removing the service plug grip, do not turn the ignition switch to ON (READY), unless instructed by the repair manual because this may cause a malfunction.
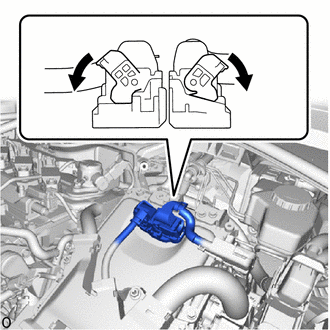
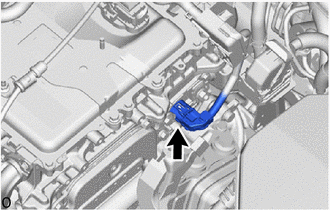
Check the connection condition of the low voltage connectors of the inverter with converter assembly and the contact pressure of each terminal. Check the terminals for deformation, and the connector for water and foreign matter.
- NOTICE:
-
Before disconnecting the connector, confirm that it is properly connected by checking that the claws of the lock levers are engaged and that the connector cannot be pulled off.
- OK:
- The connector is connected securely.
- The terminals are not deformed and are connected securely.
- No water or foreign matter in the connector.
- Result:
Result Proceed to OK A NG (The connector is not connected securely.) B NG (The terminals are not making secure contact or are deformed, or water or foreign matter exists in the connector.) C
- HINT:
-
When connecting the connector, connect it with the lock levers raised. Rotate each lock lever downward and make sure that the connector is securely connected. When a lock lever is fully lowered, a click will be heard as its claw engages. After the click is heard, pull up on the connector to confirm that it is securely connected.
A
B
C
Remove the PCU NO. 2 fuse from the No. 1 engine room relay block and No. 1 junction block assembly.
Measure the resistance according to the value(s) in the table below.
- Standard Resistance:
Tester Connection Condition Specified Condition PCU NO. 2 fuse Always Below 1 Ω
- Result:
Proceed to OK NG
OK
NG
- CAUTION:
-
Be sure to wear insulated gloves.
Check that the service plug grip is not installed.
- NOTICE:
-
After removing the service plug grip, do not turn the ignition switch to ON (READY), unless instructed by the repair manual because this may cause a malfunction.
Disconnect the inverter with converter assembly connector.
Connect the cable to the negative (-) auxiliary battery terminal.
Turn the ignition switch to ON.
Measure the voltage according to the value(s) in the table below.
- Standard Voltage:
Tester Connection Condition Specified Condition A193-3 (IGCT) - Body ground Ignition switch ON Same as auxiliary battery voltage
- NOTICE:
-
Turning the ignition switch to ON with the service plug grip removed causes other DTCs to be stored. Clear the DTCs after performing this inspection.
Turn the ignition switch off.
Disconnect the cable from the negative (-) auxiliary battery terminal.
Reconnect the inverter with converter assembly connector.
- Result:
Proceed to OK NG
OK
NG
- CAUTION:
-
Be sure to wear insulated gloves.
Check that the service plug grip is not installed.
- NOTICE:
-
After removing the service plug grip, do not turn the ignition switch to ON (READY), unless instructed by the repair manual because this may cause a malfunction.
Connect the cable to the negative (-) auxiliary battery terminal.
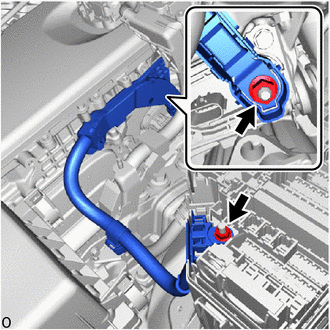
| *1 | AMD Terminal (Inverter with Converter Assembly Side) |
| *2 | AMD Terminal (No. 1 Engine Room Relay Block and No. 1 Junction Block Assembly Side) |
| *a | D1-1 (AMD) |
Measure the voltage according to the value(s) in the table below.
- Standard Voltage:
Tester Connection Condition Specified Condition D1-1 (AMD) - Body ground Ignition switch off Same as auxiliary battery voltage
Disconnect the cable from the negative (-) auxiliary battery terminal.
- Result:
Proceed to OK NG
OK
NG
- CAUTION:
-
Be sure to wear insulated gloves.
Check that the service plug grip is not installed.
- NOTICE:
-
After removing the service plug grip, do not turn the ignition switch to ON (READY), unless instructed by the repair manual because this may cause a malfunction.
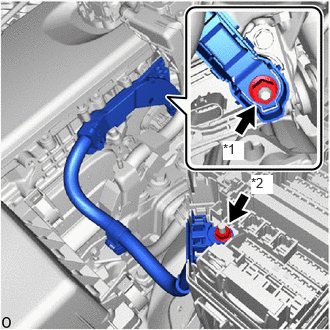
| *1 | AMD Terminal (Inverter with Converter Assembly Side) |
| *2 | AMD Terminal (No. 1 Engine Room Relay Block and No. 1 Junction Block Assembly Side) |
Check that the nuts for the AMD terminal are tightened to the specified torque, the AMD terminal is connected securely, and there are no contact problems.
- Result:
Result Proceed to There are no arc marks. The terminal is connected securely and there are no contact problems. A There are no arc marks. The terminal is not connected securely and there is a contact problem. B There are arc marks. - C
A
B
C
- OK:
The ground wire is securely installed.
- Result:
Proceed to OK NG
OK
NG
- CAUTION:
-
Be sure to wear insulated gloves.
Check that the service plug grip is not installed.
- NOTICE:
-
After removing the service plug grip, do not turn the ignition switch to ON (READY), unless instructed by the repair manual because this may cause a malfunction.
Disconnect the inverter with converter assembly connector.
Disconnect the hybrid vehicle control ECU connector.
Measure the resistance according to the value(s) in the table below.
- Standard Resistance (Check for Open):
Tester Connection Condition Specified Condition A193-5 (CNH) - I278-9 (CA4H) Ignition switch off Below 1 Ω A193-4 (CNL) - I278-22 (CA4L) Ignition switch off Below 1 Ω
- Standard Resistance (Check for Short):
Tester Connection Condition Specified Condition A193-5 (CNH) or I278-9 (CA4H) - Body ground and other terminals Ignition switch off 10 kΩ or higher A193-4 (CNL) or I278-22 (CA4L) - Body ground and other terminals Ignition switch off 10 kΩ or higher
Reconnect the hybrid vehicle control ECU connector.
Reconnect the inverter with converter assembly connector.
- Result:
Proceed to OK NG
OK
NG
Disconnect the hybrid vehicle control ECU connector.
Measure the resistance according to the value(s) in the table below.
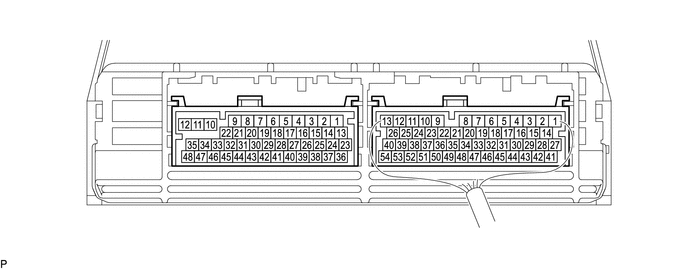
| *a | Component without harness connected
(Hybrid Vehicle Control ECU) |
- | - |
- Standard Resistance:
Tester Connection Condition Specified Condition I278-9 (CA4H) - I278-22 (CA4L) Ignition switch off 80 to 170 Ω
Reconnect the hybrid vehicle control ECU connector.
- Result:
Proceed to OK NG
OK
NG
- Result:
Proceed to NEXT
NEXT
- HINT:
-
The current at the AMD terminal cannot be measured directly because of space limitations. Measure the current flowing at the auxiliary battery instead.
Connect the AC/DC 400 A probe of the tester to the positive (+) auxiliary battery cable.
Install the service plug grip.
Connect the cable to the negative (-) auxiliary battery terminal.
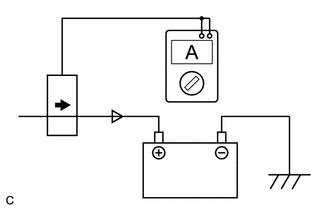
| *a | Probe Direction |
| *b | Current Flowing to Auxiliary Battery |
Turn the ignition switch to ON (READY) and leave the vehicle as it is until the electric current flowing to the auxiliary battery becomes 10 A or less.
- HINT:
-
If the ignition switch turns off immediately after it is turned to ON (READY), auxiliary battery voltage may be low. Recharge the auxiliary battery and perform this procedure again.
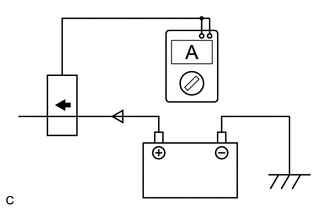
| *a | Probe Direction |
| *b | Current Flowing from Auxiliary Battery |
Measure the current flowing from the auxiliary battery with the ignition switch ON (READY), the headlight position switch and blower motor switch in the HI position, and the rear window defogger turned on.
- Standard Current:
Item Condition Specified Condition Current flowing from auxiliary battery Ignition switch ON (READY)
(The headlight position switch and blower motor switch are in the HI position, and the rear window defogger is turned on.)0 A or less
(no current from auxiliary battery)
Measure the voltage according to the value(s) in the table below.
- Standard Voltage:
Item Condition Specified Condition Auxiliary battery voltage Ignition switch ON (READY)
(The headlight position switch and blower motor switch are in the HI position, and the rear window defogger is turned on.)12.5 to 15 V
Turn the ignition switch off.
- Result:
Proceed to OK NG
OK
NG
Check for DTCs.
- Powertrain > Hybrid Control > Trouble Codes
- 50001 397
- Result:
Result Proceed to P19E100 is output. A P19E100 is not output. B
- HINT:
-
As the DTC detection conditions include decreased auxiliary battery voltage, if the DTC is not input again, when the auxiliary battery is charged it can be judged that the vehicle has returned to normal.
Turn the ignition switch off.
A
B
- CAUTION:
-
Be sure to wear insulated gloves.
Check that the service plug grip is not installed.
- NOTICE:
-
After removing the service plug grip, do not turn the ignition switch to ON (READY), unless instructed by the repair manual because this may cause a malfunction.
Remove the inverter cover from the inverter with converter assembly.
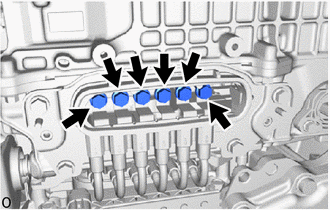
Using a megohmmeter set to 500 V, measure the insulation resistance according to the value(s) in the table below.
- NOTICE:
-
Be sure to set the megohmmeter to 500 V when performing this test. Using a setting higher than 500 V can result in damage to the component being inspected.
- Standard Resistance:
Tester Connection Condition Specified Condition Y2-1 (W) - Body ground and shield ground Ignition switch off 1 MΩ or higher Y2-2 (U) - Body ground and shield ground Ignition switch off 1 MΩ or higher Y2-3 (V) - Body ground and shield ground Ignition switch off 1 MΩ or higher Y2-4 (W) - Body ground and shield ground Ignition switch off 1 MΩ or higher Y2-5 (U) - Body ground and shield ground Ignition switch off 1 MΩ or higher Y2-6 (V) - Body ground and shield ground Ignition switch off 1 MΩ or higher
- HINT:
-
Perform this inspection while the motor cable is connected.
Install the inverter cover to the inverter with converter assembly.
- Result:
Proceed to OK NG
OK
NG
- CAUTION:
-
Be sure to wear insulated gloves.
Check that the service plug grip is not installed.
- NOTICE:
-
After removing the service plug grip, do not turn the ignition switch to ON (READY), unless instructed by the repair manual because this may cause a malfunction.
Disconnect the cable from the negative (-) auxiliary battery terminal.
Disconnect the engine wire from the AMD terminal connector (inverter with converter assembly side and No. 1 engine room relay block and No. 1 junction block assembly side).
Measure the resistance according to the value(s) in the table below.
- Standard Resistance:
Tester Connection Condition Specified Condition D1-1 (AMD) or 2D-1 - Body ground and other terminals Ignition switch off 10 kΩ or higher
Reconnect the AMD terminal connector.
Connect the cable to the negative (-) auxiliary battery terminal.
- Result:
Proceed to OK NG
OK
NG
- CAUTION:
-
Be sure to wear insulated gloves.
Check that the service plug grip is not installed.
- NOTICE:
-
After removing the service plug grip, do not turn the ignition switch to ON (READY), unless instructed by the repair manual because this may cause a malfunction.
Disconnect the engine wire from the inverter with converter assembly (AMD terminal connector).
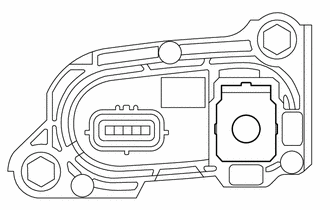
| *a | Component without harness connected
Inverter with Converter Assembly |
| *b | D1-1 (AMD) |
Measure the voltage according to the value(s) in the table below.
- Standard Voltage:
Tester Connection Condition Specified Condition D1-1 (AMD) - Body ground Ignition switch off 10 kΩ or higher
Reconnect the engine wire.
- Result:
Proceed to OK NG
OK
NG
- Result:
Proceed to NEXT
NEXT
- HINT:
-
If the "Motor High-voltage Circuit" inspection results are normal, perform the next step.
- Result:
Proceed to NEXT
NEXT
- Result:
Proceed to NEXT
NEXT
- Result:
Proceed to NEXT
NEXT