HYBRID / BATTERY CONTROL HYBRID CONTROL SYSTEM P0AA000 Hybrid/EV Battery Positive Contactor Circuit Stuck Closed
DTC SUMMARY
MALFUNCTION DESCRIPTION
The hybrid vehicle control ECU detects a stuck closed malfunction of a system main relay on the HV battery positive (+) terminal side.
The cause of this malfunction may be one of the following:
Voltage sensor (VH) malfunction
Motor generator control ECU (MG ECU) malfunction
Communication (wire harness) malfunction
HV battery junction block assembly malfunction
Hybrid vehicle control ECU malfunction
HV battery junction block assembly malfunction
Low voltage wire harness malfunction
Low voltage connector malfunction
DESCRIPTION
The SMRs (System Main Relays) are the relays that connect or disconnect the high-voltage system in accordance with commands from the hybrid vehicle control ECU.
There are 2 SMRs. SMRB and SMRG are located in the HV battery junction block assembly.
To shut off the high voltage power system, SMRB and SMRG are turned off.
| DTC No. | Detection Item | DTC Detection Condition | Trouble Area | MIL | Warning Indicate | Note |
|---|---|---|---|---|---|---|
| P0AA000 | Hybrid/EV Battery Positive Contactor Circuit Stuck Closed | Even the system main relay of HV battery positive (+) terminal side is turned off, the inverter voltage (VH) does not drop.
(1 trip detection logic) |
·
HV battery junction block assembly ·
Inverter with converter assembly ·
Hybrid vehicle control ECU ·
Wire harness or connector |
Does not come on | Master Warning:
Comes on |
SAE Code:
P0AA1 |
CONFIRMATION DRIVING PATTERN
- HINT:
-
After repair has been completed, clear the DTC and then check that the vehicle has returned to normal by performing the following All Readiness check procedure.
Connect the GTS to the DLC3.
Turn the ignition switch to ON and turn the GTS on.
Clear the DTCs (even if no DTCs are stored, perform the clear DTC procedure).
Turn the ignition switch off and wait for 30 seconds or more.
Turn the ignition switch to ON (READY).
Turn the ignition switch off and wait for 30 seconds or more.
Turn the ignition switch to ON (READY).
- HINT:
-
According to the display on the GTS, read the Data List and monitor the values of "Hybrid/EV Battery Voltage" and "VL-Voltage before Boosting" for 3 minutes. If the difference between "Hybrid/EV Battery Voltage" and "VL-Voltage before Boosting" is always less than 100 V, the vehicle has returned to normal.
Enter the following menus: Powertrain / Hybrid Control / Utility / All Readiness.
Check the DTC judgment result.
- HINT:
- ·
If the judgment result shows NORMAL, the system is normal.
·If the judgment result shows ABNORMAL, the system has a malfunction.
·If the judgment result shows INCOMPLETE, perform driving pattern again.
WIRING DIAGRAM
Refer to the wiring diagram for the HV Battery High-voltage Line Circuit.
CAUTION / NOTICE / HINT
- CAUTION:
-
Refer to the precautions before inspecting high voltage circuit.
- NOTICE:
- ·
If the DTCs are cleared or the cable is disconnected and reconnected to the negative (-) auxiliary battery terminal before performing repairs, turning the ignition switch to ON (READY) may cause a malfunction. Do not turn the ignition switch to ON (READY).
·After the ignition switch is turned off, there may be a waiting time before disconnecting the negative (-) auxiliary battery terminal.
·When disconnecting and reconnecting the auxiliary battery
- HINT:
-
When disconnecting and reconnecting the auxiliary battery, there is an automatic learning function that completes learning when the respective system is used.
- HINT:
- ·
If DTC P0AA000 is output, the ignition switch cannot be turned to ON (READY).
·P0AA000 may be output as a result of the malfunction indicated by the DTCs in table below.
(a)The chart above is listed in inspection order of priority.
(b)Check DTCs that are output at the same time by following the listed order. (The main cause of the malfunction can be determined without performing unnecessary inspections.)
Malfunction Content System Relevant DTC Microcomputer malfunction Hybrid Control System P060647 Hybrid/EV Powertrain Control Module Processor Watchdog / Safety MCU Failure P060687 Hybrid/EV Powertrain Control Module Processor to Monitoring Processor Missing Message P060A47 Hybrid/EV Powertrain Control Module Monitoring Processor Watchdog / Safety MCU Failure P060A87 Hybrid/EV Powertrain Control Module Processor from Monitoring Processor Missing Message P0A1B49 Drive Motor "A" Control Module Internal Electronic Failure P1C9E9F Hybrid/EV System Reset Stuck Off Motor Generator Control System P0A1B1F Generator Control Module Circuit Intermittent P0A1A47 Generator Control Module Watchdog / Safety MC Failure P0A1A49 Generator Control Module Internal Electronic Failure P1C2A1C Generator A/D Converter Circuit Circuit Voltage Out of Range P1C2A49 Generator A/D Converter Circuit Internal Electronic Failure P1C2B1C Drive Motor "A" Control Module A/D Converter Circuit Voltage Out of Range P1C2B49 Drive Motor "A" Control Module A/D Converter Circuit Internal Electronic Failure P1CAC49 Generator Position Sensor Internal Electronic Failure P1CAD49 Drive Motor "A" Position Sensor Internal Electronic Failure P1CAF38 Generator Position Sensor REF Signal Cycle Malfunction Signal Frequency Incorrect P1CB038 Drive Motor "A" Position Sensor REF Signal Frequency Incorrect P313383 Communication Error from Generator to Drive Motor "A" Value of Signal Protection Calculation Incorrect P313386 Communication Error from Generator to Drive Motor "A" Signal Invalid Power source circuit malfunction Motor Generator Control System P06D61C Generator Control Module Offset Power Circuit Voltage Out of Range P06B01C Generator Control Module Position Sensor REF Power Source Circuit Voltage Out of Range Communication system malfunction Motor Generator Control System P313387 Communication Error from Generator to Drive Motor "A" Missing Message Sensor and actuator circuit malfunction Hybrid Control System P0AD911 Hybrid/EV Battery Positive Contactor Circuit Short to Ground P0AD915 Hybrid/EV Battery Positive Contactor Circuit Short to Auxiliary Battery or Open P0ADD11 Hybrid/EV Battery Negative Contactor Circuit Short to Ground P0ADD15 Hybrid/EV Battery Negative Contactor Circuit Short to Auxiliary Battery or Open Motor Generator Control System P0A3F16 Drive Motor "A" Position Sensor Circuit Voltage Below Threshold P0A4B16 Generator Position Sensor Circuit Voltage Below Threshold P0A4B21 Generator Position Sensor Signal Amplitude < Minimum P0A4B22 Generator Position Sensor Signal Amplitude > Maximum P0C5013 Drive Motor "A" Position Sensor Circuit "A" Circuit Open P0C5016 Drive Motor "A" Position Sensor Circuit "A" Circuit Voltage Below Threshold P0C5017 Drive Motor "A" Position Sensor Circuit "A" Circuit Voltage Above Threshold P0C5A13 Drive Motor "A" Position Sensor Circuit "B" Circuit Open P0C5A16 Drive Motor "A" Position Sensor Circuit "B" Circuit Voltage Below Threshold P0C5A17 Drive Motor "A" Position Sensor Circuit "B" Circuit Voltage Above Threshold P0C6413 Generator Position Sensor Circuit "A" Circuit Open P0C6416 Generator Position Sensor Circuit "A" Circuit Voltage Below Threshold P0C6417 Generator Position Sensor Circuit "A" Circuit Voltage Above Threshold P0C6913 Generator Position Sensor Circuit "B" Circuit Open P0C6916 Generator Position Sensor Circuit "B" Circuit Voltage Below Threshold P0C6917 Generator Position Sensor Circuit "B" Circuit Voltage Above Threshold System malfunction Hybrid Control System P0D2D1C Drive Motor "A" Inverter Voltage Sensor Voltage Out of Range P1C8349 High Voltage Power Resource Circuit Voltage Sensor after Boosting Malfunction P0C7600 Hybrid/EV Battery System Discharge Time Too Long Motor Generator Control System P0D2D16 Drive Motor "A" Inverter Voltage Sensor (VH) Circuit Voltage Below Threshold P0D2D17 Drive Motor "A" Inverter Voltage Sensor (VH) Circuit Voltage Above Threshold P1CB69E Drive Motor "A" Inverter Voltage Sensor (VH) Stuck On
PROCEDURE
Read the Freeze Frame Data of DTC P0AA000.
- Powertrain > Hybrid Control > Trouble Codes
- 50001 397
- NOTICE:
-
As freeze frame data is stored immediately before and after a DTC is stored, make sure to only read the values for the moment the DTC was stored ("0(s)").
- Result:
Result Proceed to Difference between "VL-Voltage before Boosting" and "VH-Voltage after Boosting" is less than 76 V. A Difference between "VL-Voltage before Boosting" and "VH-Voltage after Boosting" is 76 V or more. B
- HINT:
-
If VH-Voltage after Boosting is output even when an off command is being sent to the system main relay (positive side), P0AA000 is output. If the difference between the "VL-Voltage before Boosting" and the "VH-Voltage after Boosting" is large, it is determined that there is an inverter (VH sensor) malfunction.
Turn the ignition switch off.
A
B
- Result:
Proceed to OK NG
OK
NG
- Result:
Proceed to NEXT
NEXT
Check the connection condition of the floor wire connector and the contact pressure of each terminal. Check the terminals for deformation, and check the connector for water ingress and foreign matter.
- OK:
- The connector is connected securely.
- The terminals are not deformed and are connected securely.
- No water or foreign matter in the connector.
- Result:
Result Proceed to OK A NG (The connector is not connected securely.) B NG (The terminals are not making secure contact or are deformed, or water or foreign matter exists in the connector.) C
A
B
C
- Result:
Proceed to NEXT
NEXT
- Result:
Proceed to NEXT
NEXT
- CAUTION:
-
Be sure to wear insulated gloves.
Check that the service plug grip is not installed.
- NOTICE:
-
After removing the service plug grip, do not turn the ignition switch to ON (READY), unless instructed by the repair manual because this may cause a malfunction.
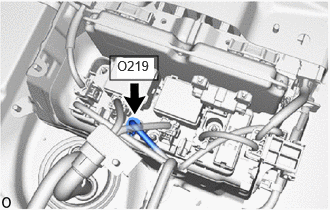
Check the connector connections and contact pressure of the relevant terminals of the HV battery junction block assembly connector.
- OK:
The connectors are connected securely and there are no contact pressure problems.
- Result:
Proceed to OK NG
OK
NG
- Result:
Proceed to NEXT
NEXT
Check the installation condition of the ground wire OF.
- OK:
The ground wire OF is securely installed.
- Result:
Proceed to OK NG
OK
NG
- Result:
Proceed to NEXT
NEXT
- CAUTION:
-
Be sure to wear insulated gloves.
Check that the service plug grip is not installed.
- NOTICE:
-
After removing the service plug grip, do not turn the ignition switch to ON (READY), unless instructed by the repair manual because this may cause a malfunction.
Disconnect the HV battery junction block assembly connector.
Disconnect the hybrid vehicle control ECU connector.
Measure the resistance according to the value(s) in the table below.
- Standard Resistance (Check for Open):
Tester Connection Condition Specified Condition I278-3 (SMRB) - O219-4 (SMRB) Ignition switch off Below 1 Ω
- Standard Resistance (Check for Short):
Tester Connection Condition Specified Condition I278-3 (SMRB) or O219-4 (SMRB) - Body ground and other terminals Ignition switch off 10 kΩ or higher
Reconnect the hybrid vehicle control ECU connector.
Reconnect the HV battery junction block assembly connector.
- Result:
Proceed to OK NG
OK
NG
- Result:
Proceed to NEXT
NEXT
- CAUTION:
-
Be sure to wear insulated gloves.
Check that the service plug grip is not installed.
- NOTICE:
-
After removing the service plug grip, do not turn the ignition switch to ON (READY), unless instructed by the repair manual because this may cause a malfunction.
Disconnect the HV battery junction block assembly connector.
Measure the resistance according to the value(s) in the table below.
- Standard Resistance:
Tester Connection Condition Specified Condition O219-2 (GND) - Body ground Ignition switch off Below 1 Ω
Reconnect the HV battery junction block assembly connector.
- Result:
Proceed to OK NG
OK
NG
- Result:
Proceed to NEXT
NEXT
- CAUTION:
-
Be sure to wear insulated gloves.
Check that the service plug grip is not installed.
- NOTICE:
-
After removing the service plug grip, do not turn the ignition switch to ON (READY), unless instructed by the repair manual because this may cause a malfunction.
Disconnect the HV battery junction block assembly connector.
Measure the resistance according to the value(s) in the table below.
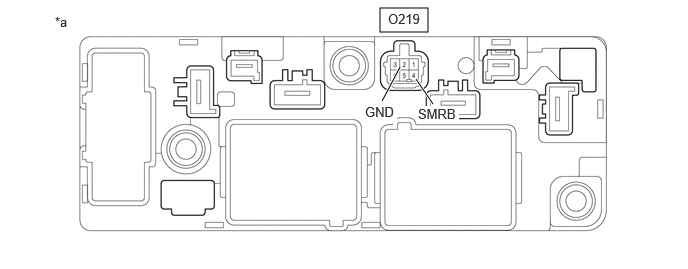
| *a | Component without harness connected
(HV Battery Junction Block Assembly) |
- | - |
- Standard Resistance:
Tester Connection Condition Specified Condition O219-4 (SMRB) - O219-2 (GND) -40 to 80°C (-40 to 176°F) 20.6 to 40.8 Ω
Reconnect the HV battery junction block assembly connector.
- Result:
Proceed to OK NG
OK
NG
- CAUTION:
-
Be sure to wear insulated gloves.
Check that the service plug grip is not installed.
- NOTICE:
-
After removing the service plug grip, do not turn the ignition switch to ON (READY), unless instructed by the repair manual because this may cause a malfunction.
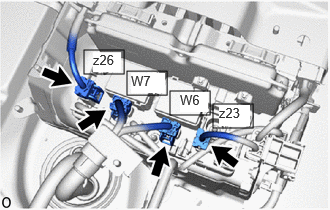
Disconnect the HV battery high voltage connectors from the HV battery junction block assembly.
- NOTICE:
-
Insulate each disconnected high-voltage connector with insulating tape. Wrap the connector from the wire harness side to the end of the connector.
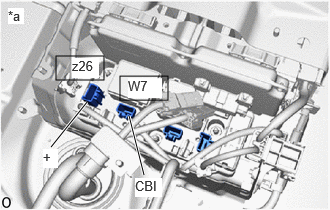
| *a | Component without harness connected
(HV Battery Junction Block Assembly) |
Measure the resistance according to the value(s) in the table below.
- Standard Resistance:
Tester Connection Condition Specified Condition W7-1 (CBI) - z26-1 (+) Ignition switch off 10 kΩ or higher
- HINT:
- ·
If a system main relay is stuck closed, inspect the HV battery junction block assembly without removing it from the vehicle, in order to keep the relay closed.
·If the result of reading the freeze frame data is A, the HV battery junction block assembly must be replaced. Measuring resistance can determine that this is either a present or past malfunction.
Reconnect the HV battery high voltage connectors.
- Result:
Result Judgment Proceed to OK Past malfunction A NG Present malfunction B
A
B
- Result:
Proceed to NEXT
NEXT
- Result:
Proceed to NEXT
NEXT
- Result:
Proceed to NEXT
NEXT
- CAUTION:
-
Be sure to wear insulated gloves.
Install the service plug grip.
Clear the DTCs.
- Powertrain > Hybrid Control > Clear DTCs
- 50002 397
Turn the ignition switch off and wait for 30 seconds or more.
Turn the ignition switch to ON (READY).
Turn the ignition switch off and wait for 30 seconds or more.
Turn the ignition switch to ON (READY).
Check for DTCs.
- Powertrain > Hybrid Control > Trouble Codes
- 50001 397
- Powertrain > Motor Generator > Trouble Codes
- 50001 395
- Powertrain > HV Battery > Trouble Codes
- 50001 398
- Result:
Result Proceed to DTCs are not output A DTCs of Hybrid Control System are output. B DTCs of Motor Generator Control System are output. C DTCs of Hybrid Battery System are output. D
Turn the ignition switch off.
A
B
C
D
According to the display on the GTS, read the Data List and monitor the values of "Hybrid/EV Battery Voltage" and "VL-Voltage before Boosting" for 3 minutes.
- Powertrain > Hybrid Control > Data List
-
Tester Display VL-Voltage before Boosting Hybrid/EV Battery Voltage - 50003 397 150,227
- Result:
Result Proceed to Difference between "Hybrid/EV Battery Voltage" and "VL-Voltage before Boosting" is always less than 100 V. A Difference between "Hybrid/EV Battery Voltage" and "VL-Voltage before Boosting" is 100 V or more. B
Turn the ignition switch off.
A
B
HYBRID VEHICLE CONTROL ECU: Click hereEngine / Hybrid System>HYBRID / BATTERY CONTROL>HYBRID VEHICLE CONTROL ECU>REMOVAL202307,999999,_51,_144957,_0604236,RM100000002BTQT,
HV BATTERY JUNCTION BLOCK ASSEMBLY: Click hereEngine / Hybrid System>HYBRID / BATTERY CONTROL>HV RELAY ASSEMBLY>REMOVAL202307,999999,_51,_144957,_0604249,RM100000002BTRT,