PARK ASSIST / MONITORING BLIND SPOT MONITOR SENSOR INSTALLATION
CAUTION / NOTICE / HINT
- NOTICE:
- ·
Avoid any impact to the blind spot monitor sensor.
·Do not drop the blind spot monitor sensor. If it is dropped, replace it with a new one.
- HINT:
- ·
The blind spot monitor beam axis inspection is performed to confirm whether the sensor is transmitting radio waves.
·The blind spot monitor beam axis confirmation is performed to confirm whether the sensor's beam axis is correct, and perform adjustment of the beam axis by using a reflector.
·The blind spot monitor sensor installation condition inspection is performed to confirm whether the sensor is placed vertically to the ground (+/-2.2°) by using a jig, and that the sensor is 46 to 54° from the line parallel to the vehicle center line.
PROCEDURE

 88172
1.INSTALL BLIND SPOT MONITOR SENSOR LH
88172
1.INSTALL BLIND SPOT MONITOR SENSOR LH
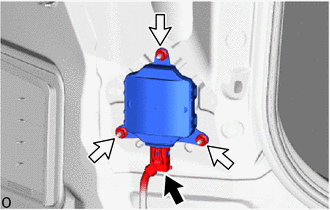

|
Connector |

|
Nut |
Connect the connector.
Install the 3 nuts and blind spot monitor sensor LH.
- NOTICE:
-
Do not drop the blind spot monitor sensor LH. If it is dropped, replace it with a new one.
- Torque:
- 10 N*m (102 kgf*cm, 7 ft.*lbf)
88162
2.INSTALL BLIND SPOT MONITOR SENSOR RH
- HINT:
-
Use the same procedure described for the LH side.
3.PERFORM BLIND SPOT MONITOR SENSOR INSTALLATION CONDITION INSPECTION
4.INSTALL REAR BUMPER ASSEMBLY
5.CONNECT CABLE TO NEGATIVE AUXILIARY BATTERY TERMINAL (w/ Hands Free Power Back Door)
6. INITIALIZATION AFTER RECONNECTING BATTERY TERMINAL (w/ Hands Free Power Back Door)
- HINT:
-
When disconnecting and reconnecting the battery, there is an automatic learning function that completes learning when the respective system is used.
7. BSM ECU DATA WRITE
- NOTICE:
-
BSM ECU data write can only be performed when the beam axis adjustment value is able to be saved to the GTS.
8.PERFORM BLIND SPOT MONITOR BEAM AXIS CONFIRMATION
- NOTICE:
-
When BSM ECU data write can be performed, it is possible to omit the blind spot monitor beam axis confirmation.
- SST
- 09870-60000 (09870-60010)
09870-60040
9. PERFORM DIAGNOSTIC SYSTEM CHECK
891B2
10. CHECK KICK DOOR CONTROL SENSOR (w/ Hands Free Power Back Door)