M20C-FKS FUEL FUEL TANK REMOVAL
CAUTION / NOTICE / HINT
The necessary procedures (adjustment, calibration, initialization or registration) that must be performed after parts are removed and installed, or replaced during fuel tank assembly removal/installation are shown below.
- HINT:
-
When the cable is disconnected / reconnected to the auxiliary battery terminal, systems temporarily stop operating. However, each system has a function that completes learning the first time the system is used.
- ·
Learning completes when vehicle is driven
Effect/Inoperative when not Performed Necessary Procedures Link Stop and start system Drive the vehicle until stop and start control is permitted (approximately 5 to 60 minutes). (  202409,999999,_51,_083056,_0402418,RM100000002NSFO,)
Lane tracing assist system Drive the vehicle straight ahead at 15 km/h (10 mph) or more for 1 second or more. ( 201910,999999,_58,_083101,_0401880,RM100000001JE9I,)
Pre-collision system
·Learning completes when vehicle is operated normally
Effect/Inoperative when not Performed Necessary Procedures Link *: w/ Power back door system
Power back door function* Fully close the back door by hand.
- HINT:
-
Initialization is not necessary if the above procedures are performed while the back door is closed.
( 202304,999999,_59,_083093,_0584672,RM1000000029PGT,)
Power door lock control system If the back door is locked and therefore cannot be opened, it is necessary to unlock the back door using the door control switch, electrical key transmitter sub-assembly switch. ( 202409,999999,_58,_083092,_0403003,RM100000002NS90,)
Air conditioning system After the ignition switch is turned to ON, the servo motor standard position is recognized -
- CAUTION:
- ·
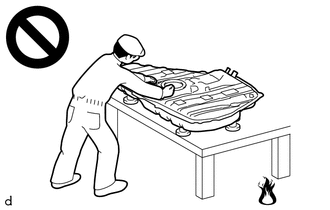
Never perform work on fuel system components near any possible ignition sources.
·Vaporized fuel could ignite, resulting in a serious accident.
- ·

Do not perform work on fuel system components without first disconnecting the cable from the negative (-) battery terminal.
·Sparks could cause vaporized fuel to ignite, resulting in a serious accident.
·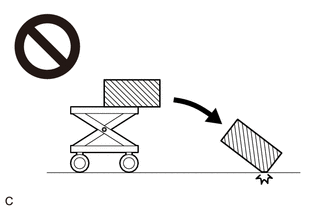
The fuel tank assembly is very heavy. Be sure to follow the procedure described in the repair manual, or the fuel tank assembly may fall off the engine lifter.
- NOTICE:
-
Do not disconnect the tube shown in the illustration when disassembling the fuel suction tube with pump and gauge assembly. Doing so will cause reassembly of the fuel suction tube with pump and gauge assembly to be impossible as the tube is pressed into the fuel suction plate sub-assembly.
PROCEDURE

 1. DISCHARGE FUEL SYSTEM PRESSURE
2. PRECAUTION
- NOTICE:
-
After the ignition switch is turned off, there may be a waiting time before disconnecting the negative (-) battery terminal.
3.DISCONNECT CABLE FROM NEGATIVE BATTERY TERMINAL
77010
4.REMOVE FUEL TANK VENT TUBE ASSEMBLY
77020A
5.REMOVE FUEL SUCTION WITH PUMP AND GAUGE TUBE ASSEMBLY
6.DRAIN FUEL
17430
7.REMOVE TAIL EXHAUST PIPE ASSEMBLY
37100
8.REMOVE PROPELLER WITH CENTER BEARING SHAFT ASSEMBLY (for AWD)
53896B
9.REMOVE FRONT FENDER FRONT SPLASH SHIELD LH
53895B
10.REMOVE FRONT FENDER FRONT SPLASH SHIELD RH
51441
11.REMOVE NO. 1 ENGINE UNDER COVER
51420
12.REMOVE NO. 2 ENGINE UNDER COVER ASSEMBLY
58166A
13.REMOVE FRONT FLOOR COVER LH
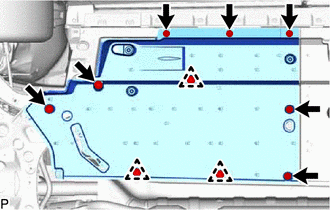
Detach the 3 clips and remove the 2 bolts and 5 screws.
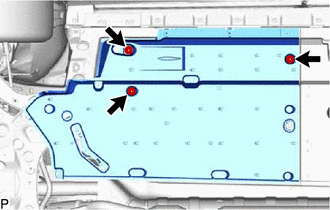
Loosen the 3 nuts and remove the front floor cover LH from the body.
58399D
14.REMOVE NO. 2 FLOOR UNDER COVER
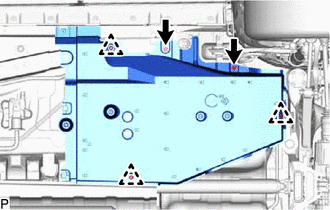
Detach the 3 clips and remove the 2 bolts.
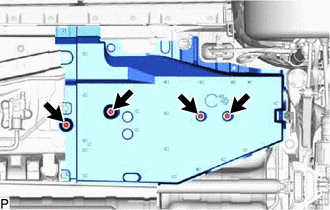
Loosen the 4 nuts and remove the No. 2 floor under cover from the body.
58165C
15.REMOVE FRONT FLOOR COVER RH
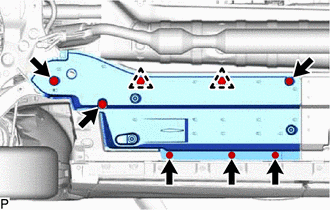
Detach the 2 clips and remove the 2 bolts and 4 screws.
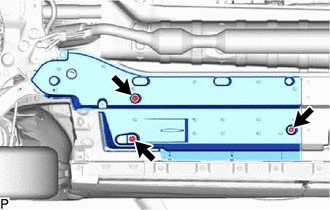
Loosen the 3 nuts and remove the front floor cover RH from the body.
58398F
16.REMOVE NO. 1 FLOOR UNDER COVER
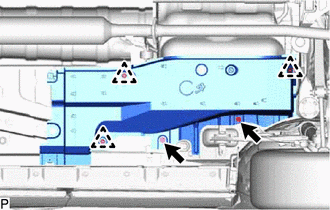
Detach the 3 clips and remove the 2 bolts.
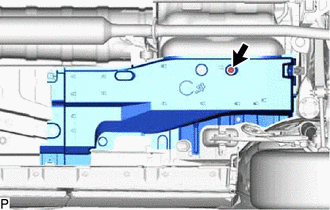
Loosen the nut and remove the No. 1 floor under cover from the body.
77606
17.REMOVE NO. 1 FUEL TANK PROTECTOR
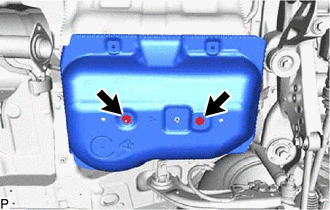
Remove the 2 nuts and No. 1 fuel tank protector from the fuel tank band.
18.DISCONNECT FUEL TANK VENT TUBE
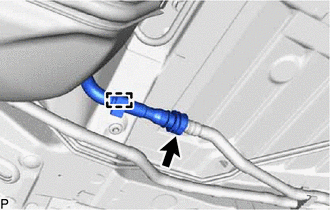
Disconnect the fuel tank vent tube from the fuel tank vent hose sub-assembly.
Detach the clamp and disconnect the fuel tank vent tube.
77209C
19.DISCONNECT FUEL TANK MAIN TUBE SUB-ASSEMBLY
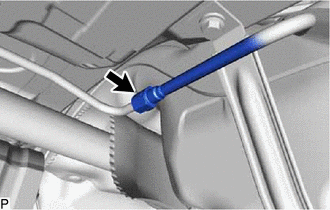
Disconnect the fuel tank main tube sub-assembly from the fuel tube.
20.DISCONNECT FUEL TANK BREATHER TUBE
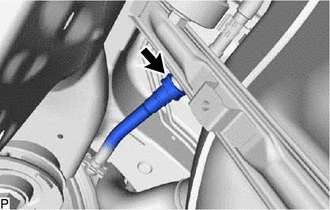
Disconnect the fuel tank breather tube from the fuel tank filler pipe assembly.
21.DISCONNECT FUEL TANK FILLER PIPE SUB-ASSEMBLY
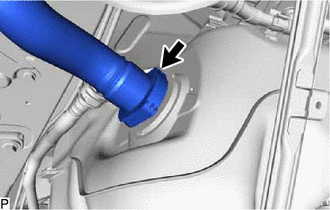
Disconnect the fuel tank filler pipe sub-assembly from the fuel tank filler pipe assembly.
77100
22.REMOVE FUEL TANK ASSEMBLY
- CAUTION:
-
The fuel tank assembly is very heavy. Be sure to follow the procedure described in the repair manual, or the fuel tank assembly may fall off the engine lifter.
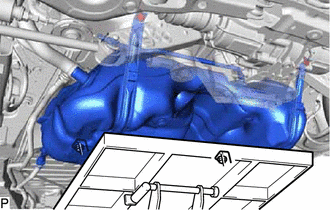
Using an engine lifter, support the fuel tank assembly.
- HINT:
-
Using height adjustment attachments and plate lift attachments, keep the fuel tank assembly horizontal.
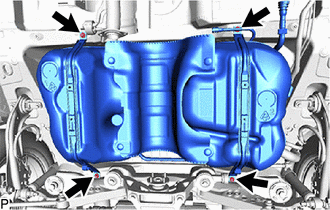
Remove the 4 bolts and 2 fuel tank band sub-assemblies.
Lower the engine lifter to remove the fuel tank assembly.
- NOTICE:
- ·
Be careful not to drop the fuel tank assembly.
·When removing the fuel tank assembly, tilt it slightly to prevent it from interfering with the surrounding parts.
77209C
23.REMOVE FUEL TANK MAIN TUBE SUB-ASSEMBLY
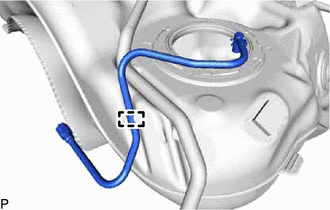
Detach the clamp and remove the fuel tank main tube sub-assembly from the fuel tank assembly.
77651A
24.REMOVE NO. 1 FUEL TANK CUSHION
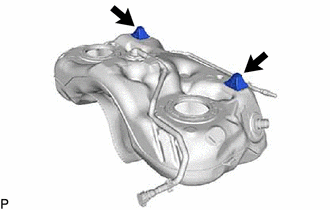
Remove the 2 No. 1 fuel tank cushions from the fuel tank assembly.
77606
25.REMOVE NO. 1 FUEL TANK PROTECTOR SUB-ASSEMBLY
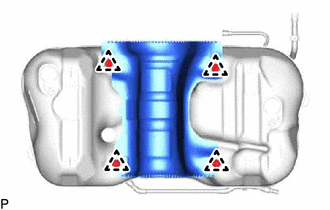
Detach the 4 clips and remove the No. 1 fuel tank protector sub-assembly from the fuel tank assembly.