SLIDING ROOF / CONVERTIBLE SLIDING ROOF HOUSING(for Panoramic Moon Roof) INSTALLATION
PROCEDURE

 63203F
1.INSTALL SLIDING ROOF HOUSING SUB-ASSEMBLY
63203F
1.INSTALL SLIDING ROOF HOUSING SUB-ASSEMBLY
Pass a string under the windshield outside moulding as shown in the illustration.
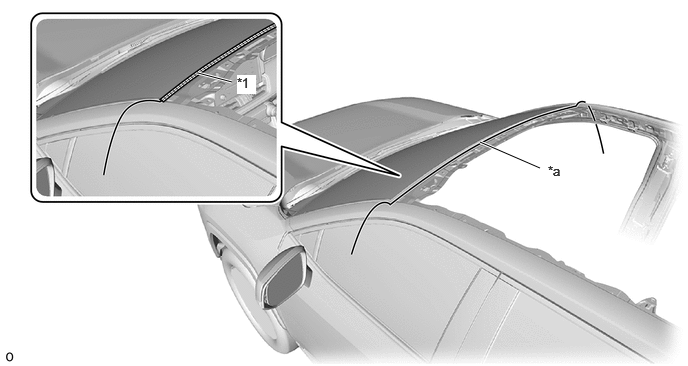
| *1 | Windshield Outside Moulding | - | - |
| *a | String | - | - |
Attach the guide in the order shown in the illustration.
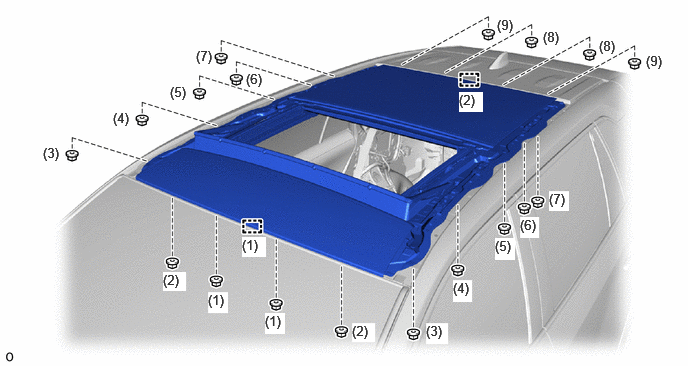
Temporarily install the sliding roof housing sub-assembly with the 18 nuts.
Tighten the 18 nuts to install the sliding roof housing sub-assembly.
- HINT:
-
Tighten the nuts in the order shown in the illustration.
- Torque:
- for SFTM Made : 5.5 N*m (56 kgf*cm, 49 in.*lbf)
- for GTMC Made : 8.0 N*m (82 kgf*cm, 71 in.*lbf)
- NOTICE:
-
-
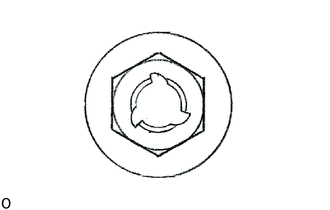
If the removed nut is the same shape as that shown in the illustration, replace it with the supplied replacement part.
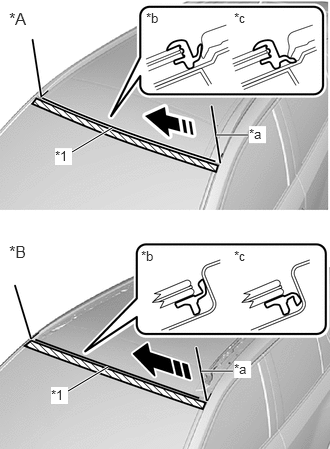
| *A | for SFTM Made |
| *B | for GTMC Made |
| *1 | Windshield Outside Moulding |
| *a | String |
| *b | Correct |
| *c | Incorrect |

|
String Pulling Direction |
Apply soapy water to the windshield outside moulding.
Slowly pull out the string to install the windshield outside moulding to the correct position.
63246D
2.INSTALL REAR SLIDING ROOF HOUSING MOUNTING BRACKET LH
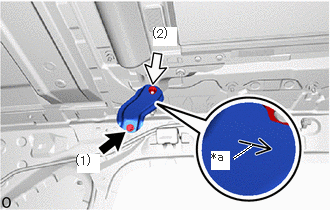
| *a | Arrow Mark (Front) |

|
Bolt |

|
Nut |
Install the rear sliding roof housing mounting bracket LH with the bolt and nut as shown in the illustration.
- Torque:
- Bolt : 8.0 N*m (82 kgf*cm, 71 in.*lbf)
- for Nut, SFTM Made : 5.5 N*m (56 kgf*cm, 49 in.*lbf)
- for Nut, GTMC Made : 8.0 N*m (82 kgf*cm, 71 in.*lbf)
- NOTICE:
-
-
If the removed nut is the same shape as that shown in the illustration, replace it with the supplied replacement part.
63245D
3.INSTALL REAR SLIDING ROOF HOUSING MOUNTING BRACKET RH
- HINT:
-
Use the same procedure as for the LH side.
63244C
4.INSTALL CENTER SLIDING ROOF HOUSING MOUNTING BRACKET LH
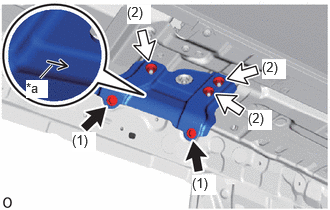
| *a | Arrow Mark (Front) |
|
|
Bolt |
|
|
Nut |
Install the center sliding roof housing mounting bracket LH with the 2 bolts and 3 nuts as shown in the illustration.
- Torque:
- Bolt : 8.0 N*m (82 kgf*cm, 71 in.*lbf)
- for Nut, SFTM Made : 5.5 N*m (56 kgf*cm, 49 in.*lbf)
- for Nut, GTMC Made : 8.0 N*m (82 kgf*cm, 71 in.*lbf)
- NOTICE:
-
-
If the removed nut is the same shape as that shown in the illustration, replace it with the supplied replacement part.
63243C
5.INSTALL CENTER SLIDING ROOF HOUSING MOUNTING BRACKET RH
- HINT:
-
Use the same procedure as for the LH side.
63242A
6.INSTALL FRONT SLIDING ROOF HOUSING MOUNTING BRACKET LH
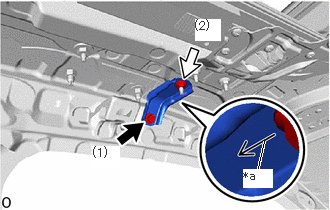
| *a | Arrow Mark (Outside) |
|
|
Bolt |
|
|
Nut |
Install the front sliding roof housing mounting bracket LH with the bolt and nut as shown in the illustration.
- Torque:
- Bolt : 8.0 N*m (82 kgf*cm, 71 in.*lbf)
- for Nut, SFTM Made : 5.5 N*m (56 kgf*cm, 49 in.*lbf)
- for Nut, GTMC Made : 8.0 N*m (82 kgf*cm, 71 in.*lbf)
- NOTICE:
-
-
If the removed nut is the same shape as that shown in the illustration, replace it with the supplied replacement part.
63241A
7.INSTALL FRONT SLIDING ROOF HOUSING MOUNTING BRACKET RH
- HINT:
-
Use the same procedure as for the LH side.
63218M
8.INSTALL SLIDING ROOF SIDE GARNISH LH
- HINT:
-
Perform the following procedures if replacing the sliding roof side garnish LH.
Clean the body panel.
Using a heat light, heat the body panel.
| Item | Temperature |
|---|---|
| Body Panel | 20 to 30°C (68 to 86°F) |
- CAUTION:
-
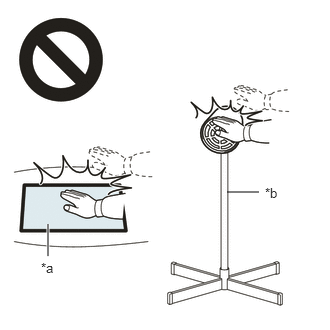 2.365,2 2.698,2 false 0.5,2.333 0.5,2.667 true 0.427,2.708 0.74,2.865 0.313,0.156 10 false *a 2.76,1.927 3.073,2.083 0.313,0.156 10 false *b
*a Heated Part *b Heat Light
- ·
Do not touch the heat light and heated parts, as touching the heat light may result in burns.
·Touching heated parts for a long time may result in burns.
- NOTICE:
-
Do not heat the body panel excessively.
Remove the double-sided tape from the body panel.
Clean off any tape adhesive residue with cleaner.
Remove the release paper from a new sliding roof side garnish LH.
- HINT:
-
After removing the release paper, keep the exposed adhesive free from foreign matter.
for SFTM Made:
Attach the clip and double-sides tape to install the sliding roof side garnish LH as shown in the illustration.
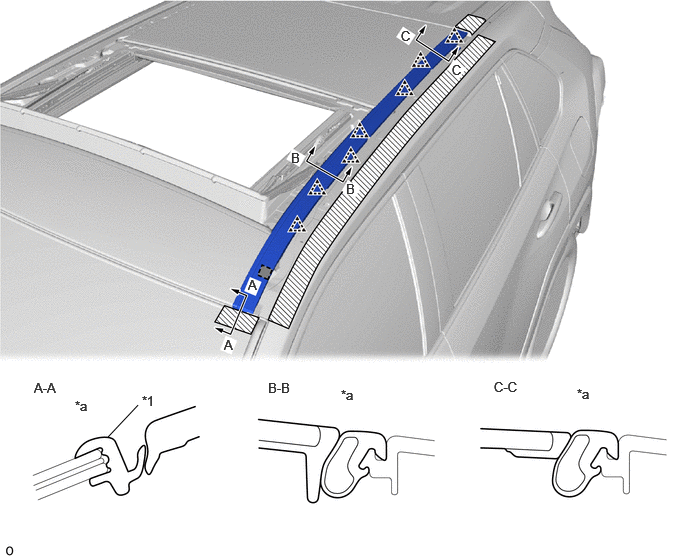
| *1 | Windshield Outside Moulding | - | - |
| *a | Correct | - | - |

|
Double-sided Tape | 
|
Protective Tape |
for GTMC Made:
Attach the clip to install the sliding roof side garnish LH as shown in the illustration.
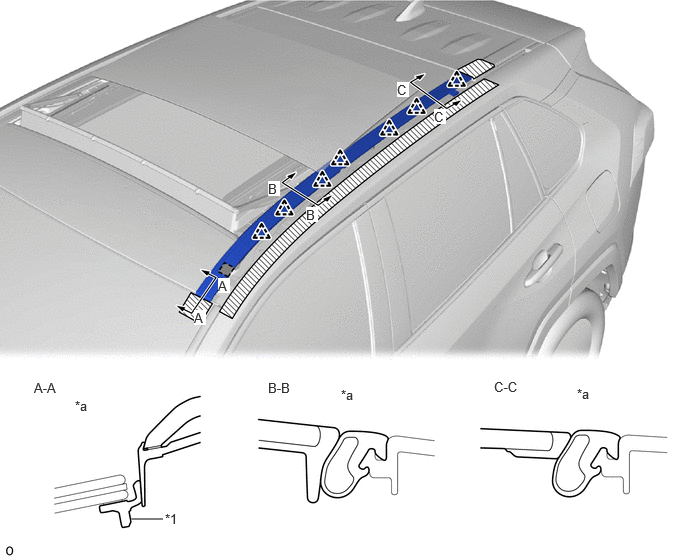
| *1 | Windshield Outside Moulding | - | - |
| *a | Correct | - | - |
|
|
Double-sided Tape |
|
Protective Tape |
63217K
9.INSTALL SLIDING ROOF SIDE GARNISH RH
- HINT:
-
Use the same procedure described for the LH side.
62180A
10.INSTALL CURTAIN SHIELD AIRBAG ASSEMBLY LH
62170A
11.INSTALL CURTAIN SHIELD AIRBAG ASSEMBLY RH
- HINT:
-
Use the same procedure described for the LH side.
12.INSTALL ROOF SIDE RAIL GARNISH SUB-ASSEMBLY LH
13.INSTALL ROOF SIDE RAIL GARNISH SUB-ASSEMBLY RH
- HINT:
-
Use the same procedure described for the LH side.
63201P
14.INSTALL SLIDING ROOF GLASS SUB-ASSEMBLY
Using a T25 "TORX" socket wrench, temporarily install the sliding roof glass sub-assembly with the 6 screws.
Perform a level check.
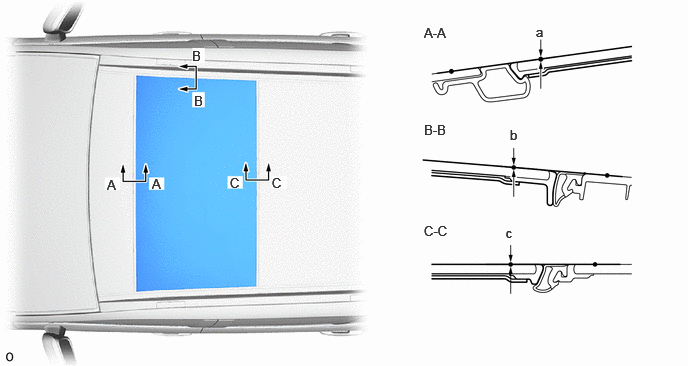
Check the difference in level of the sliding roof glass sub-assembly when the sliding roof glass sub-assembly is fully closed.
| Area | Measurement | Area | Measurement |
|---|---|---|---|
| a | 0 + 2.0 mm (0 + 0.0787 in.)
0 - 1.0 mm (0 + 0.0394 in.) |
b | 0 + 2.2 mm (0 + 0.0866 in.)
0 - 2.2 mm (0 - 0.0866 in.) |
| c | 0 + 2.4 mm (0 + 0.0945 in.)
0 - 1.0 mm (0 + 0.0394 in.) |
- | - |
Perform a gap check.
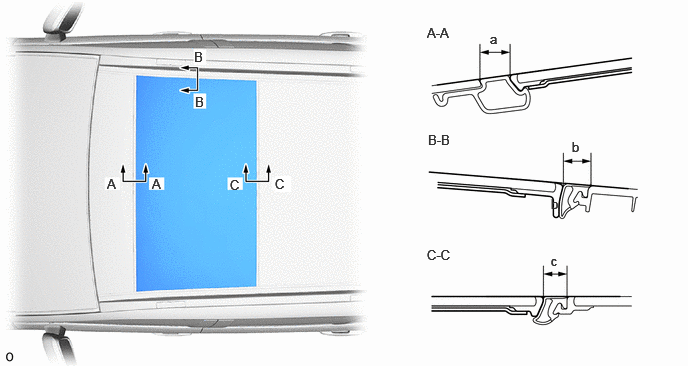
Check the gap between the sliding roof glass sub-assembly and sliding roof housing assembly.
| Area | Measurement | Area | Measurement |
|---|---|---|---|
| a | 10.7 to 12.7 (0.421 to 0.50 in.) | b | 7.7 to 12.1 (0.303 to 0.476 in.) |
| c | 7.9 to 11.1 mm (0.311 to 0.437 in.) | - | - |
After adjusting the sliding roof glass sub-assembly, using a T25 "TORX" socket wrench, tighten the 6 screws.
- Torque:
- 5.0 N*m (51 kgf*cm, 44 in.*lbf)
15. CHECK FOR WATER LEAK
After adjusting the sliding roof glass sub-assembly, check for water leakage into the vehicle interior.
If there are any leaks, readjust the sliding roof glass sub-assembly.
63218E
16.INSTALL FRONT SLIDING ROOF GARNISH LH (for Front Outer Side)
Attach the guide to install the front sliding roof side garnish LH.
63217E
17.INSTALL FRONT SLIDING ROOF GARNISH RH (for Front Outer Side)
- HINT:
-
Use the same procedure described for the LH side.
63218R
18.INSTALL SLIDING ROOF SIDE GARNISH LH (for Rear Side)
Attach the guide to install the sliding roof side garnish LH.
63217R
19.INSTALL SLIDING ROOF SIDE GARNISH RH (for Rear Side)
- HINT:
-
Use the same procedure described for the LH side.
63218M
20.INSTALL SLIDING ROOF SIDE GARNISH LH (for Front Inner Side)
Attach the guide to install the sliding roof side garnish LH.
63217K
21.INSTALL SLIDING ROOF SIDE GARNISH RH (for Front Inner Side)
- HINT:
-
Use the same procedure described for the LH side.
22.CONNECT CABLE TO NEGATIVE AUXILIARY BATTERY TERMINAL
23. INITIALIZATION AFTER RECONNECTING AUXILIARY BATTERY TERMINAL
- HINT:
-
When disconnecting and reconnecting the auxiliary battery, there is an automatic learning function that completes learning when the respective system is used.
24. PERFORM DIAGNOSTIC SYSTEM CHECK
25.CHECK SRS WARNING LIGHT
26.PERFORM SYSTEM INITIALIZATION AND CALIBRATION
27.INITIALIZE ROOF SUNSHADE SYSTEM
28.INITIALIZE PANORAMIC MOON ROOF SYSTEM
- NOTICE:
-
Before initializing the panoramic moon roof system, first initialize the roof sunshade system.
29.CHECK ROOF SUNSHADE SYSTEM
30.CHECK PANORAMIC MOON ROOF SYSTEM