REAR SUSPENSION REAR LOWER ARM INSTALLATION
CAUTION / NOTICE / HINT
- HINT:
- ·
Use the same procedure for the RH side and LH side.
·The following procedure is for the LH side.
PROCEDURE

 48720A
1.TEMPORARILY INSTALL REAR NO. 1 SUSPENSION ARM ASSEMBLY
48720A
1.TEMPORARILY INSTALL REAR NO. 1 SUSPENSION ARM ASSEMBLY
Temporarily install the rear No. 1 suspension arm assembly to the rear axle carrier sub-assembly and rear suspension member sub-assembly with the 2 bolts and 2 nuts.
- NOTICE:
- ·
Because the nut has its own stopper, do not turn the nut. Tighten the bolt with the nut secured.
·Insert the bolt with the threaded end facing the rear of the vehicle.
48740F
2.TEMPORARILY INSTALL REAR NO. 2 SUSPENSION ARM ASSEMBLY
Temporarily install the rear No. 2 suspension arm assembly to the rear suspension member sub-assembly with the No. 2 camber adjust cam, rear suspension toe adjust cam sub-assembly and nut.
- NOTICE:
- ·
Insert the rear suspension toe adjust cam sub-assembly from the front of the vehicle.
·When tightening the nut, keep the rear suspension toe adjust cam sub-assembly from rotating.
48258C
3.INSTALL REAR LOWER COIL SPRING INSULATOR
48231B
4.INSTALL REAR COIL SPRING
5.STABILIZE SUSPENSION
48840A
6.INSTALL REAR STABILIZER LINK ASSEMBLY
48720A
7.INSTALL REAR NO. 1 SUSPENSION ARM ASSEMBLY
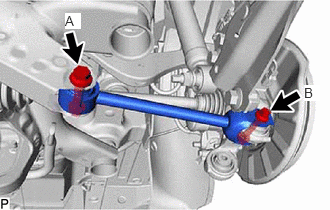
Install the rear No. 1 suspension arm assembly with the 2 bolts.
- Torque:
- Bolt A : 115 N*m (1173 kgf*cm, 85 ft.*lbf)
- Bolt B : 73 N*m (744 kgf*cm, 54 ft.*lbf)
- NOTICE:
-
Because the nut has its own stopper, do not turn the nut. Tighten the bolt with the nut secured.
48740F
8.INSTALL REAR NO. 2 SUSPENSION ARM ASSEMBLY
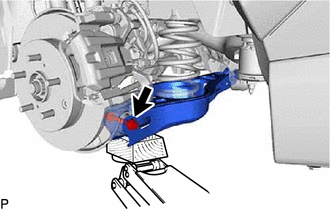
Install the rear No. 2 suspension arm assembly (rear axle carrier sub-assembly side) with the bolt.
- Torque:
- 73 N*m (744 kgf*cm, 54 ft.*lbf)
- NOTICE:
-
Because the nut has its own stopper, do not turn the nut. Tighten the bolt with the nut secured.
9.INSTALL REAR WHEEL
48740F
10.INSTALL REAR NO. 2 SUSPENSION ARM ASSEMBLY
Lower the vehicle to the ground.
Bounce the vehicle up and down at the corners to stabilize the rear suspension.
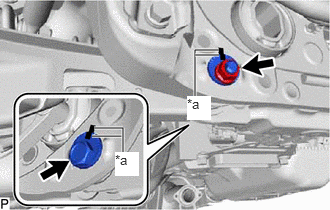
| *a | Matchmark |
Align the matchmarks on the No. 2 camber adjust cam, rear suspension toe adjust cam sub-assembly and rear suspension member sub-assembly.
Fully tighten the nut.
- Torque:
- 100 N*m (1020 kgf*cm, 74 ft.*lbf)
- NOTICE:
- ·
Hold the rear suspension toe adjust cam sub-assembly while rotating the nut.
·Make sure that the vehicle is unloaded when fully tightening the nut.
11.INSPECT AND ADJUST REAR WHEEL ALIGNMENT