K121F CVT TRANSMISSION CONTROL CABLE INSTALLATION
PROCEDURE

 33820B
1.INSTALL TRANSMISSION CONTROL CABLE ASSEMBLY
33820B
1.INSTALL TRANSMISSION CONTROL CABLE ASSEMBLY
- NOTICE:
-
Before installing the transmission control cable assembly, check that the shift lever is in N.
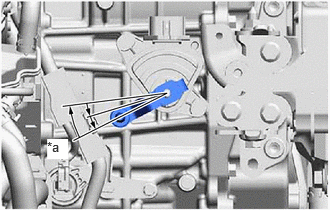
| *a | N |
Turn the transmission control shaft lever clockwise until it stops, then turn it counterclockwise 2 notches.
- NOTICE:
-
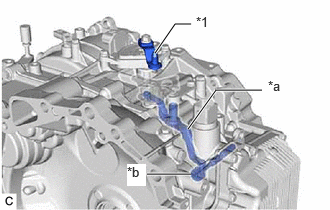 1.615,0.552 1.823,0.25 1.823,0.25 1.99,0.25 true 1.958,1.344 2.25,0.938 2.25,0.938 2.729,0.938 true 1.531,1.813 1.99,1.813 true 2.042,0.146 2.323,0.385 0.281,0.24 10 false *1 2.792,0.813 3.073,1.052 0.281,0.24 10 false *a 1.323,1.708 1.521,1.938 0.198,0.229 10 true *b
*1 Transmission Control Shaft Lever *a Manual Valve Link Lever Sub-assembly *b Manual Valve
-
If the transmission control shaft lever is turned counterclockwise more than necessary, manual valve link lever sub-assembly may separate from the manual valve.
Pass the transmission control cable assembly into the vehicle and install the transmission control cable assembly to the vehicle body with the 2 nuts.
- Torque:
- 6.0 N*m (61 kgf*cm, 53 in.*lbf)
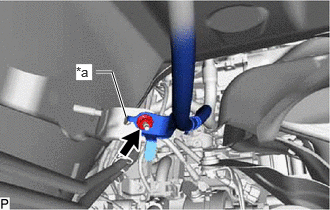
| *a | Align the hole on the transmission control cable bracket with the protrusion of the vehicle body. |
Connect the transmission control cable assembly to the vehicle body with the nut.
- Torque:
- 6.0 N*m (61 kgf*cm, 53 in.*lbf)
- NOTICE:
-
Do not deform the transmission control cable bracket.
Connect the transmission control cable assembly to the No. 1 transmission control cable bracket with a new clip.

| *a | Correct |
| *b | Incorrect |
Connect the transmission control cable assembly to the transmission control shaft lever as shown in the illustration.
33820B
2.CONNECT TRANSMISSION CONTROL CABLE ASSEMBLY
58861B
3.INSTALL NO. 1 CONSOLE BOX DUCT
58810J
4.INSTALL CONSOLE BOX ASSEMBLY
58152A
5.INSTALL FRONT LOWER NO. 1 FLOOR HEAT INSULATOR
Install the front lower No. 1 floor heat insulator to the vehicle body with the 3 nuts.
- Torque:
- 4.9 N*m (50 kgf*cm, 43 in.*lbf)
58165C
6.INSTALL FRONT FLOOR COVER RH
58166A
7.INSTALL FRONT FLOOR COVER LH
17410
8.INSTALL FRONT EXHAUST PIPE ASSEMBLY
51420
9.INSTALL NO. 2 ENGINE UNDER COVER ASSEMBLY
51441
10.INSTALL NO. 1 ENGINE UNDER COVER
53896B
11.INSTALL FRONT FENDER FRONT SPLASH SHIELD LH
53895B
12.INSTALL FRONT FENDER FRONT SPLASH SHIELD RH
74404B
13.INSTALL BATTERY CLAMP SUB-ASSEMBLY
89661
14.INSTALL ECM
15.INSTALL BATTERY
16.INSPECT SHIFT LEVER POSITION
17.ADJUST SHIFT LEVER POSITION