EXTERIOR PANELS / TRIM REAR DOOR WINDOW FRAME MOULDING REMOVAL
CAUTION / NOTICE / HINT
The necessary procedures (adjustment, calibration, initialization or registration) that must be performed after parts are removed and installed, or replaced during rear door window frame moulding removal/installation are shown below.
| Replaced Part or Performed Procedure | Necessary Procedures | Effect/Inoperative Function When Necessary Procedures are not Performed | Link |
|---|---|---|---|
|
*: Even when not replacing the part, it is necessary to perform the specified necessary procedures after installation. |
|||
| Auxiliary battery terminal is disconnected/reconnected | Reset back door close position | Power Back Door System | ( 202111,999999,_59,_111831,_0505274,RM100000001ZMEG,) 202111,999999,_59,_111831,_0505274,RM100000001ZMEG,)
|
·
Rear door glass sub-assembly LH* ·
Rear door glass sub-assembly RH* ·
Rear door glass run LH* ·
Rear door glass run RH* |
Initialize power window control system | ·
Auto up and down function ·
Jam protection function ·
Catch protection function ·
Remote control function ·
Wireless transmitter-linked function ·
Key-linked function ·
Key-off operation function ·
Window open warning function |
(202111,999999,_59,_111844,_0505692,RM100000001ZOBP,)
|
- NOTICE:
-
After the ignition switch is turned off, there may be a waiting time before disconnecting the negative (-) auxiliary battery terminal.
- HINT:
-
When the cable is disconnected / reconnected to the auxiliary battery terminal, systems temporarily stop operating. However, each system has a function that completes learning the first time the system is used.
- ·
for HV Model:
Items for which learning is completed by driving the vehicle Effect/Inoperative Function When Necessary Procedures are not Performed Necessary Procedures Link Lane Tracing Assist System Drive the vehicle straight ahead at 35 km/h (22 mph) or more for 5 seconds or more. ( 202111,999999,_95,_111850,_0502173,RM100000001Z92I,)
Pre-collision System
Items for which learning is completed by operating the vehicle normally Effect/Inoperative Function When Necessary Procedures are not Performed Necessary Procedures Link Power Door Lock Control System
·Back door opener
Perform door unlock operation with door control switch or electrical key transmitter sub-assembly switch. ( 202111,999999,_58,_111830,_0505351,RM100000001ZMT3,)
Air Conditioning System After the ignition switch is turned to ON, the servo motor standard position is recognized. -
- ·
for Gasoline Model:
Items for which learning is completed by driving the vehicle Effect/Inoperative Function When Necessary Procedures are not Performed Necessary Procedures Link Lane Tracing Assist System Drive the vehicle straight ahead at 15 km/h (10 mph) or more for 1 seconds or more. ( 202111,999999,_95,_111850,_0502173,RM100000001Z92I,)
Pre-collision System Stop and Start System Idle the engine for approximately 5 to 60 minutes or drive the vehicle until stop and start control is permitted ( 202406,999999,_51,_111803,_0509671,RM100000002KOGF,)
Items for which learning is completed by operating the vehicle normally Effect/Inoperative Function When Necessary Procedures are not Performed Necessary Procedures Link Power Door Lock Control System
·Back door opener
Perform door unlock operation with door control switch or electrical key transmitter sub-assembly switch. ( 202111,999999,_58,_111830,_0505351,RM100000001ZMT3,)
Air Conditioning System After the ignition switch is turned to ON, the servo motor standard position is recognized. -
- ·
Use the same procedure for the RH side and LH side.
·The following procedure is for the LH side.
PROCEDURE

 75740
1.REMOVE REAR DOOR BELT MOULDING ASSEMBLY
75740
1.REMOVE REAR DOOR BELT MOULDING ASSEMBLY
67872
2.DISCONNECT REAR DOOR WEATHERSTRIP
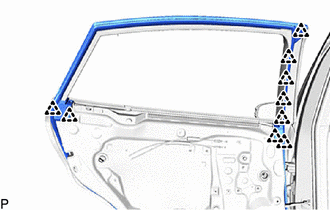
Disengage the 9 clips and disconnect the rear door weatherstrip.
75762B
3.REMOVE REAR DOOR WINDOW FRAME MOULDING (CENTER PILLAR SIDE)
- HINT:
-
When removing the rear door window frame moulding (center pillar side), heat the vehicle body and rear door window frame moulding (center pillar side) using a heat light.
- Heating Temperature:
Item Temperature Rear Door Window Frame Moulding (Center Pillar Side) and Vehicle Body 40 to 60°C (104 to 140°F)
- CAUTION:
-
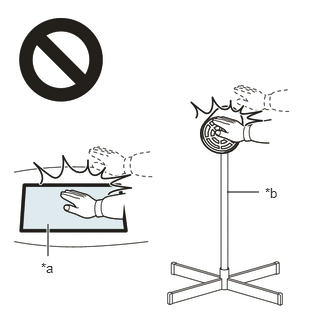 2.365,2 2.698,2 false 0.5,2.333 0.5,2.667 true 0.427,2.708 0.74,2.865 0.313,0.156 10 false *a 2.76,1.927 3.073,2.083 0.313,0.156 10 false *b
*a Heated Part *b Heat Light
- ·
Do not touch the heat light and heated parts, touching the heat light may result in burns.
·Touching heated parts for a long time may result in burns.
- NOTICE:
-
Do not heat the vehicle body and rear door window frame moulding (center pillar side) excessively.
Using a heat light, heat the vehicle body and rear door window frame moulding (center pillar side) surface.
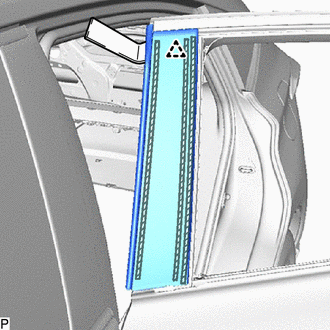
| *a | Double-sided Tape |
| *b | Caulking Sponge |
Using a moulding remover, disengage the clip and separate the double-sided tape and caulking sponge to remove the rear door window frame moulding (center pillar side).
75766A
4.REMOVE REAR DOOR REAR WINDOW FRAME MOULDING
Insert a 4.0 mm (0.157 in.) drill bit into a drill.
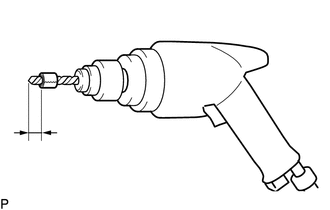
| *a | Tape |
Tape the 4.0 mm (0.157 in.) drill bit 5.0 mm (0.197 in.) from the tip as shown in the illustration.
- Standard Measurement:
Area Measurement A 5.0 mm (0.197 in.)
- NOTICE:
-
Tape the 4.0 mm (0.157 in.) drill bit to prevent the drill bit from going too deep.
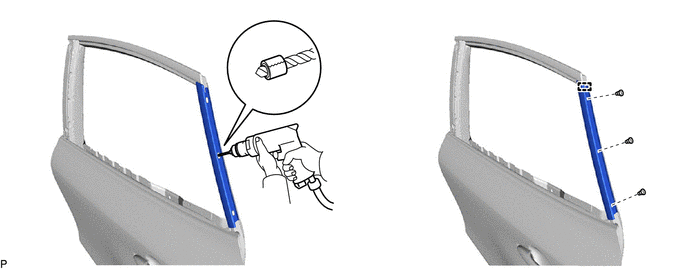
Lightly press the drill bit against the rivets to drill off the rivet flanges, and remove the 3 rivets.
- CAUTION:
-
Be careful of the drilled rivets, as they may be hot.
- NOTICE:
- ·
Pressing the drill too firmly will cause the rivet to turn and result in the rivet not being drilled through.
·Prying the rivets with the drill may damage the rivet installation holes or drill bit.
Using a vacuum cleaner, remove the rivet fragments and shavings from the drilled areas.
Disengage the guide to remove the rear door rear window frame moulding.
75764A
5.REMOVE REAR DOOR UPPER WINDOW FRAME MOULDING
Insert a 4.0 mm (0.157 in.) drill bit into a drill.
| *a | Tape |
Tape the 4.0 mm (0.157 in.) drill bit 5.0 mm (0.197 in.) from the tip as shown in the illustration.
- Standard Measurement:
Area Measurement A 5.0 mm (0.197 in.)
- NOTICE:
-
Tape the 4.0 mm (0.157 in.) drill bit to prevent the drill bit from going too deep.
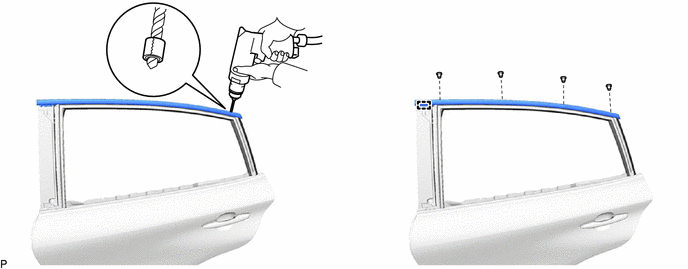
Lightly press the drill bit against the rivets to drill off the rivet flanges, and remove the 4 rivets.
- CAUTION:
-
Be careful of the drilled rivets, as they may be hot.
- NOTICE:
- ·
Pressing the drill too firmly will cause the rivet to turn and result in the rivet not being drilled through.
·Prying the rivets with the drill may damage the rivet installation holes or drill bit.
Using a vacuum cleaner, remove the rivet fragments and shavings from the drilled areas.
Disengage the guide to remove the rear door upper window frame moulding.