EXTERIOR PANELS / TRIM WINDSHIELD OUTSIDE MOULDING REMOVAL
CAUTION / NOTICE / HINT
The necessary procedures (adjustment, calibration, initialization or registration) that must be performed after parts are removed and installed, or replaced during windshield outside moulding removal/installation are shown below.
| Replaced Part or Performed Procedure | Necessary Procedure | Effect/Inoperative Function when Necessary Procedure not Performed | Link |
|---|---|---|---|
|
*: Even when not replacing the part, it is necessary to perform the specified necessary procedures after installation. |
|||
| Windshield glass* | Adjust forward recognition camera | ·
Dynamic Radar Cruise Control System ·
Front Camera System ·
Lane Tracing Assist System ·
Pre-collision System ·
Automatic High Beam System |
One Time Recognition:( 202303,999999,_95,_111850,_0502177,RM10000000292S8,) 202303,999999,_95,_111850,_0502177,RM10000000292S8,)
Sequential Recognition:( 202303,999999,_95,_111850,_0502177,RM10000000292S9,)
Driving Adjustment:( 202303,999999,_95,_111850,_0502177,RM10000000292SB,)
|
- NOTICE:
-
When replacing the windshield glass of a vehicle equipped with a forward recognition camera, make sure to use a Toyota genuine part. If a non-Toyota genuine part is used, the forward recognition camera may not be able to be installed due to a missing bracket. Also, the dynamic radar cruise control system, front camera system, lane tracing assist system, pre-collision system or adaptive high beam system may not operate properly due to a difference in the transmissivity or black ceramic border.
- HINT:
- ·
Use the same procedure for the RH side and LH side.
·The following procedure is for the LH side.
PROCEDURE

 53867H
1.REMOVE FRONT FENDER TO COWL SIDE SEAL
53867H
1.REMOVE FRONT FENDER TO COWL SIDE SEAL
75536D
2.REMOVE WINDSHIELD OUTSIDE LOWER MOULDING
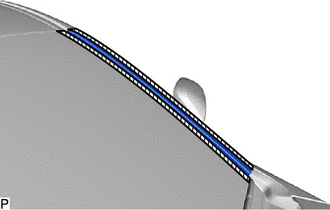

|
Protective Tape |
Apply protective tape around the windshield outside lower moulding as shown in the illustration.
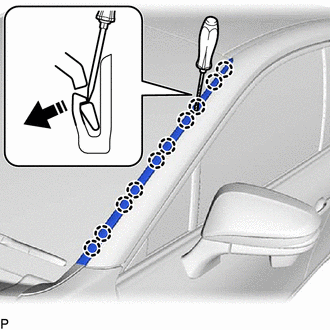

|
Remove in this Direction |
Using a screwdriver, disengage the 10 claws as shown in the illustration and remove the windshield outside lower moulding.
75545B
3.REMOVE NO. 1 WINDSHIELD OUTSIDE MOULDING CLIP
- HINT:
-
Perform the following procedure only when replacement of a No. 1 windshield outside moulding clip is necessary.
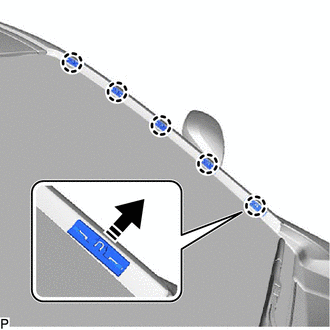
|
|
Remove in this Direction |
Disengage the 5 claws to remove the 5 No. 1 windshield outside moulding clips as shown in the illustration.
75547C
4.REMOVE NO. 3 WINDSHIELD OUTSIDE MOULDING CLIP
- HINT:
-
Perform the following procedure only when replacement of a No. 3 windshield outside moulding clip is necessary.
Remove the windshield glass sub-assembly.
Insert a 4.0 mm (0.157 in.) drill bit into a drill.

| *a | Tape |
Tape the 4.0 mm (0.157 in.) drill bit 5.0 mm (0.197 in.) from the tip as shown in the illustration.
- Standard Measurement:
Area Measurement A 5.0 mm (0.197 in.)
- NOTICE:
-
Tape the 4.0 mm (0.157 in.) drill bit to prevent the drill bit from going too deep.
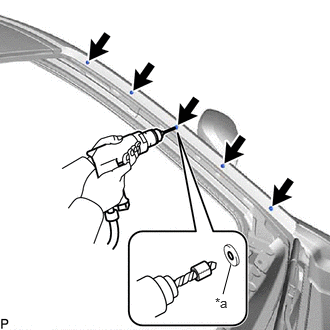
| *a | Flange |
Lightly press the drill bit against the No. 3 windshield outside moulding clips to drill off the No. 3 windshield outside moulding clip flanges, and remove the 5 No. 3 windshield outside moulding clips.
- CAUTION:
-
Be careful of the drilled No. 3 windshield outside moulding clips, as they may be hot.
- NOTICE:
- ·
Make sure to protect both the inside and outside of the vehicle as the No. 3 windshield outside moulding clip shavings will fly about.
·Pressing the drill too firmly will cause the No. 3 windshield outside moulding clip to turn and result in the No. 3 windshield outside moulding clip not being drilled through.
·Prying the No. 3 windshield outside moulding clip with the drill may damage the No. 3 windshield outside moulding clip installation hole or drill bit.
Using a vacuum cleaner, remove the No. 3 windshield outside moulding clip fragments and shavings from the drilled areas.