EXTERIOR PANELS / TRIM FRONT DOOR WINDOW FRAME MOULDING INSTALLATION
CAUTION / NOTICE / HINT
- HINT:
- ·
Use the same procedure for the RH side and LH side.
·The following procedure is for the LH side.
PROCEDURE

 75072A
1.INSTALL FRONT DOOR OUTSIDE MOULDING SUB-ASSEMBLY
75072A
1.INSTALL FRONT DOOR OUTSIDE MOULDING SUB-ASSEMBLY
Engage the 2 guides to temporarily install the front door outside moulding sub-assembly to the door frame.
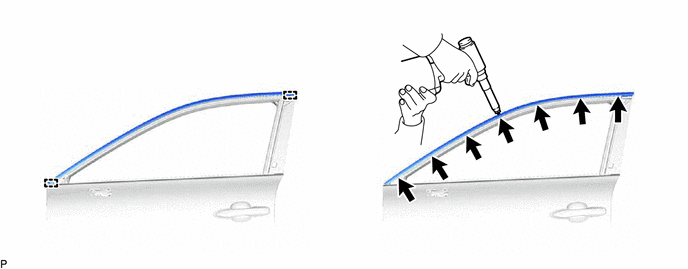
Using an air riveter or hand riveter with a nose piece, install the front door outside moulding sub-assembly with 7 new rivets.
- NOTICE:
- ·
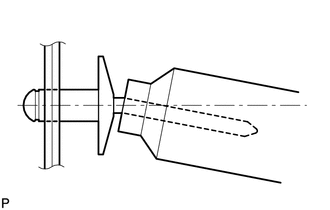 1.292,0.281 1.438,0.281 1.438,0.281 1.781,0.74 false 1.875,1.271 1.875,1.823 false 1.125,0.208 1.438,0.365 0.313,0.156 10 false *a 1.823,1.875 2.135,2.094 0.313,0.219 10 false *b 2.063,0.063 2.385,0.302 0.323,0.24 10 false *c
*a Riveter *b Mandrel *c Incorrect
Do not pry the rivet with the riveter, as this will cause damage to the riveter and mandrel.
·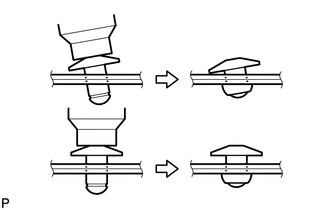 1.438,0.448 1.156,0.448 false 1.458,1.417 1.219,1.417 false 1.479,0.365 1.802,0.604 0.323,0.24 10 false *a 2.198,0.125 2.51,0.365 0.313,0.24 10 false *b 2.052,1.146 2.365,1.385 0.313,0.24 10 false *b 1.531,1.313 1.854,1.552 0.323,0.24 10 false *a
*a Riveter *b Incorrect
Confirm that the rivets are seated properly against the moulding.
·Do not tilt the riveter when installing the rivet to the moulding.
·Do not leave any space between the rivet head and moulding.
·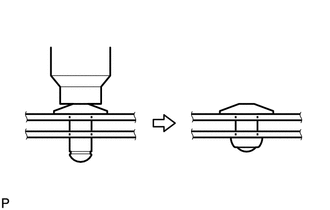 1.135,0.771 1.396,0.771 false 1.438,0.667 1.75,0.938 0.313,0.271 10 false *a 2.01,0.188 2.344,0.469 0.333,0.281 10 false *b
*a Riveter *b Incorrect
Do not leave any space between the moulding and door frame. Firmly hold the 2 items together while installing the rivet.
- HINT:
-
If the mandrel of the rivet does not come off on the first operation of the rivet gun, slide the rivet gun forward on the mandrel and operate it again.
75756D
2.INSTALL FRONT DOOR WINDOW FRAME MOULDING (CENTER PILLAR SIDE)
- HINT:
-
When installing a new front door window frame moulding (center pillar side), heat the vehicle body using a heat light.
- Heating Temperature:
Item Temperature Vehicle Body 20 to 30 °C (68 to 86 °F)
- CAUTION:
-
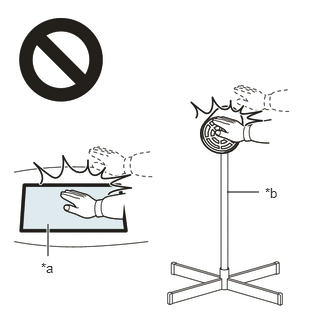 2.365,2 2.698,2 false 0.5,2.333 0.5,2.667 true 0.427,2.708 0.74,2.865 0.313,0.156 10 false *a 2.76,1.927 3.073,2.083 0.313,0.156 10 false *b
*a Heated Part *b Heat Light
- ·
Do not touch the heat light and heated parts, touching the heat light may result in burns.
·Touching heated parts for a long time may result in burns.
- NOTICE:
-
Do not heat the vehicle body excessively.
Clean the vehicle body surface.
Using a heat light, heat the vehicle body surface.
Remove any remaining double-sided tape from the vehicle body.
Wipe off any tape adhesive residue with cleaner.
Install a new front door window frame moulding (center pillar side).
Using a heat light, heat the vehicle body surface.
Remove the release paper from the front door window frame moulding (center pillar side).
- HINT:
-
After removing the release paper, keep the exposed adhesive free from foreign matter.

| *a | Double-sided Tape |
| *b | Caulking Sponge |
Engage the clip and attach the double-sided tape and caulking sponge to install the front door window frame moulding (center pillar side).
- HINT:
-
Press the front door window frame moulding (center pillar side) firmly to install it.
67862
3.CONNECT FRONT DOOR WEATHERSTRIP
Engage the 3 clips and connect the front door weatherstrip.
75720
4.INSTALL FRONT DOOR BELT MOULDING ASSEMBLY